In this tutorial, we will learn How to implement Barcode or QR Code reader and generator in Ionic React application using Native plugin.
Using Ionic Frameworks Native plugin we can easily scan or generate QR codes. In the previous tutorial, we have already discussed its implementation in Ionic application based on Angular framework.
But here we will discuss how to use Barcode/ QR code reader in React application.
Let’s get started!
Version Check
@ionic/cli

   _             _
  (_) ___  _ __ (_) ___
  | |/ _ \| '_ \| |/ __|
  | | (_) | | | | | (__
  |_|\___/|_| |_|_|\___| CLI 6.4.1


#Update to the latest version of Ionic CLI by running following NPM command:

$ npm install -g @ionic/cli
Create Ionic React Application
Execute following command to create an Ionic application using React with a blank starter template:
$ ionic start react-barcode-demo --type=reactNote: You need to opt for CAPACITOR by typing Yes when asked. As the Capacitor is recommended by the Ionic team.
Install Barcode Scanner Plugin
Next, we will install Barcode native and Cordova plugin by executing below commands one by one:
// Install Core library (once per project)
$ npm install @ionic-native/core

// Install Ionic Native TypeScript wrapper
$ npm install @ionic-native/barcode-scanner

// Install Cordova plugin
$ npm install phonegap-plugin-barcodescanner

// Update native platform project(s) to include newly added plugin
$ ionic cap sync
Using Barcode Scanner/ Generator
In the Ionic React app we will modify pages/Home.jsx file to have following code in it:
import { IonContent, IonInput, IonButton, IonItem, IonLabel, IonHeader, IonPage, IonTitle, IonToolbar } from '@ionic/react';
import React from 'react';
import './Home.css';
import { BarcodeScanner } from '@ionic-native/barcode-scanner';
class Home extends React.Component {
state = {
encodedText: '',
encodeData: '',
textToEncode: ''
}
handleChange = (event: any) => {
const { value, name } = event.target;
this.setState({ [name]: value });
console.log(this.state);
};
render() {
const scanCode = async () => {
const data = await BarcodeScanner.scan();
alert(JSON.stringify(data));
this.setState({ encodedText: data.text })
};
const generateCode = () => {
BarcodeScanner.encode(BarcodeScanner.Encode.TEXT_TYPE, this.state.encodeData)
.then(data => {
console.log(data);
//this.setState({ textToEncode: encodedData });
}, err => {
console.log("Error occured : " + err);
});
};
return (
<IonPage>
<IonHeader>
<IonToolbar>
<IonTitle>Ionic Barcode Scanner</IonTitle>
</IonToolbar>
</IonHeader>
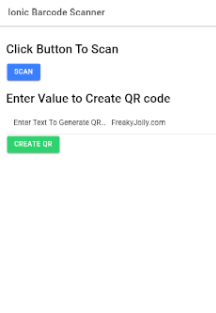
<IonContent className="ion-padding">
<h1>Click Button To Scan</h1>
<IonButton onClick={scanCode} color="primary">
Scan
</IonButton>
{
this.state.encodedText ?
(<div>
<p>
Scanned Code Text : <b></b>
</p>
<p>
Scanned Code Format : <b></b>
</p>
</div>) : ''
}
<h1>Enter Value to Create QR code</h1>
<IonItem>
<IonLabel>Enter Text To Generate QR CODE</IonLabel>
<IonInput name='textToEncode' value={this.state.encodeData} placeholder="Enter Input" onIonChange={this.handleChange} clearInput></IonInput>
</IonItem>
<IonButton onClick={generateCode} color="success">
Create QR
</IonButton>
</IonContent>
</IonPage >
);
}
};
export default Home;
That's it now you can check you Ionic React application with Barcode Scanner/ Generator by running in a real or emulator device.
How to Run Ionic React App?
To run Ionic React app you need Android Studio
Execute the following commands to build your application using Capacitor in Android studio:
$ npm run build
$ npx cap copy
$ npx cap add android
$ npx cap copy android
$ npx cap open android
After Android studio is open just click on debug icon to open app in connected device or emulator.