The ExcelJS library is known for creating the XLSX document with lots of features to format and apply dynamic formats. This library is mainly used for server-side generation of XLSX documents and is also created in the same sense.
In this Angular tutorial, we will learn How to export JSON data into XLSX / Excel files using the Excel Js library. Using ExcelJs we can create custom formated and styled XLS files using JSON data in Angular client-side Applications.
You will get to know how to resolve issues while using ExcelJS in the latest Angular versions and also how to add various dynamic formatting and download it as an XLSX document.
You can easily add colours and text formation, freeze panes, merge cells, validations, insert images and many more. You will see all examples here only.
How to Download XLSX from JSON using ExcelJS on Angular Application?
You can follow these steps to quickly download formatted JSON into the EXCEL file on client-application
Step 1 – Create Angular Application
Step 2 – Install ExcelJS and File-Saver
Step 3 – Configure tsconfig.json
Step 4 – Create & Update Excel Export Service
Step 5 – Create and Save XLSX File-Saver
Step 6 – See In Action
What is ExcelJS?
ExcelJS is the Javascript library used to read, manipulate, and write spreadsheet data and styles to XLSX and JSON. We can easily create XLSX files with formatted headers, footers, cells, and feed any customized data including textual, images, etc. It is an active and community-driven library with lots of features.
Features of ExcelJS
Following is the list of some awesome features of Excel JS:
- View, Add, Remove, Access Worksheets, and also set the Worksheet States like hidden, visible, veryHidden.
- Page setup includes orientation, Margins, height, width, Print area.
- Headers and Footers configuration with custom style, font size, color, etc.
- Worksheet Views to Freeze & Split sections.
- Handling individual cells or Merging the group of cells.
- Cell level data validation support.
- Tables and Comments on worksheets
- Styling includes fonts, fill, border, alignment, size, gradient fills, etc.
- Images can be added using the addImage() function.
- File I/O for Reading, Writing of CSV & XLSX.
- ES5 Support, can be used in simple HTML to reactive applications like Angular, React, and NodeJS.
Let’s get started with the implementation of ExcelJS in the Angular 9/8 application project…
Create a new Angular Project
Let’s first create a new Angular project using Angular CLI tool by executing the following command
$ ng new angular-export-to-excel
? Would you like to add Angular routing? No
? Which stylesheet format would you like to use? SCSS
Move inside the project
$ cd angular-export-to-excelIf you have Visual Studio Code installed, open the project by hitting
$ code .
Install Required Packages
Now, we’ll install some required packages in the Angular project to fulfil the export to excel functionality
Install ExcelJs
Run the following command to install the ExcelJs package which is the main player to deal with Excel format-related functionalities we want to achieve
$ npm install --save exceljs@1.12.1IMPORTANT NOTE: Make sure you install the 1.12.1 version of exceljs, otherwise it will throw errors. As this library is created for node servers it causes strict typing issues on the client-side.
Install FileSaver
FileSave.js is a lifesaver we must say when dealing with operations related to saving files on the disk. It is mainly used on client-side applications to save large files in web applications.
Run the following command to install the file-saver package and its @types support
$ npm install --save file-saver
$ npm i --save-dev @types/file-saver
Configure tsconfig.json
Now, open the tsconfig.json file at the project root, then add the “paths” property under the “compilerOptions” with "exceljs" library location.
"compilerOptions": {

     ...

    "paths": {
      "exceljs": [
        "node_modules/exceljs/dist/exceljs.min"
      ]
    }
  },
Create a Service for ExcelJs
Now we’ll create a new Service to keep Excel-related methods in one place. Run the following command to generate service in the services folder
$ ng generate service services/export-excelThis will create the ExportExcelService under the services folder.
Update the ExportExcelService
Now open the services/ export-excel.service.ts file and make the following changes:
Import the exceljs and file-saver files
import { Workbook } from 'exceljs';
import * as fs from 'file-saver';
Also, import the mylogo.js file.
import * as logo from './mylogo.js';To add the Logo image in the Excel file, we will keep the base64 format in the services/mylogo.js file
export const imgBase64 = "data:image/png;base64,iVBORw0KGgoA.....VORK5CYII=";You can convert any image to base64 using any online tools that vary easily.
The exportExcel() method will be called from the component, with an object having Title, Header Arraya, and Data for excel file.
Get Title, Header, and Data
//Title, Header & Data
    const title = excelData.title;
    const header = excelData.headers
    const data = excelData.data;
Create a Workbook with Worksheet
//Create a workbook with a worksheet
let workbook = new Workbook();
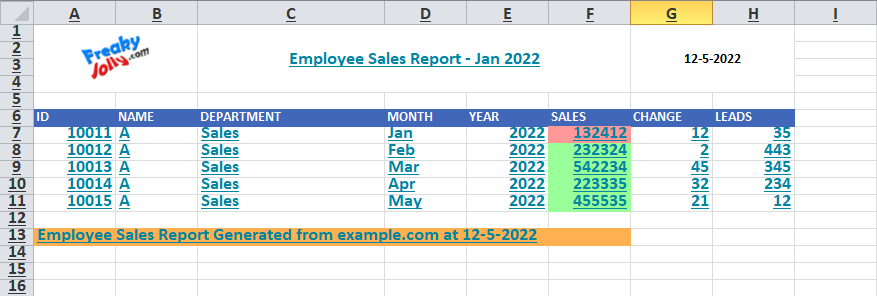
let worksheet = workbook.addWorksheet('Sales Data');Adding Title
//Add Row and formatting
    worksheet.mergeCells('C1', 'F4');
    let titleRow = worksheet.getCell('C1');
    titleRow.value = title
    titleRow.font = {
      name: 'Calibri',
      size: 16,
      underline: 'single',
      bold: true,
      color: { argb: '0085A3' }
    }
    titleRow.alignment = { vertical: 'middle', horizontal: 'center' }
Adding Date
// Date
    worksheet.mergeCells('G1:H4');
    let d = new Date();
    let date = d.getDate() + '-' + d.getMonth() + '-' + d.getFullYear();
    let dateCell = worksheet.getCell('G1');
    dateCell.value = date;
    dateCell.font = {
      name: 'Calibri',
      size: 12,
      bold: true
    }
    dateCell.alignment = { vertical: 'middle', horizontal: 'center' }
Adding Logo Image
//Add Image
    let myLogoImage = workbook.addImage({
      base64: logo.imgBase64,
      extension: 'png',
    });
    worksheet.mergeCells('A1:B4');
    worksheet.addImage(myLogoImage, 'A1:B4');
Adding Excel header
//Adding Header Row
    let headerRow = worksheet.addRow(header);
    headerRow.eachCell((cell, number) => {
      cell.fill = {
        type: 'pattern',
        pattern: 'solid',
        fgColor: { argb: '4167B8' },
        bgColor: { argb: '' }
      }
      cell.font = {
        bold: true,
        color: { argb: 'FFFFFF' },
        size: 12
      }
    })
Formating Cells Conditionally
// Adding Data with Conditional Formatting
    data.forEach(d => {
      let row = worksheet.addRow(d);

      let sales = row.getCell(6);
      let color = 'FF99FF99';
      if (+sales.value < 200000) {
        color = 'FF9999'
      }

      sales.fill = {
        type: 'pattern',
        pattern: 'solid',
        fgColor: { argb: color }
      }
    }
    );
//Footer Row
    let footerRow = worksheet.addRow(['Employee Sales Report Generated from example.com at ' + date]);
    footerRow.getCell(1).fill = {
      type: 'pattern',
      pattern: 'solid',
      fgColor: { argb: 'FFB050' }
    };
Saving and Exporting the Excel File
//Generate & Save Excel File
    workbook.xlsx.writeBuffer().then((data) => {
      let blob = new Blob([data], { type: 'application/vnd.openxmlformats-officedocument.spreadsheetml.sheet' });
      fs.saveAs(blob, title + '.xlsx');
    })
Finally, the complete ExportExcelService in the export-excel.service.ts will look like this
import { Injectable } from '@angular/core';
import { Workbook } from 'exceljs';
import * as fs from 'file-saver';

export interface ROW_ITEM {
  ID: number;
  NAME: string;
  DEPARTMENT: string;
  MONTH: string;
  YEAR: number;
  SALES: number;
  CHANGE: number;
  LEADS: number;
}

export const imgBase64 =
  'data:image/png;base64,iVBORw0KGgoAAAAN....ElFTkSuQmCC';

@Injectable({
  providedIn: 'root',
})
export class ExportExcelService {
  constructor() {}

  exportExcel(excelData: { title: any; data: any; headers: any }) {
    //Title, Header & Data
    const title = excelData.title;
    const header = excelData.headers;
    const data = excelData.data;

    //Create a workbook with a worksheet
    let workbook = new Workbook();
    let worksheet = workbook.addWorksheet('Sales Data');

    //Add Row and formatting
    worksheet.mergeCells('C1', 'F4');
    let titleRow = worksheet.getCell('C1');
    titleRow.value = title;
    titleRow.font = {
      name: 'Calibri',
      size: 16,
      underline: 'single',
      bold: true,
      color: { argb: '0085A3' },
    };
    titleRow.alignment = { vertical: 'middle', horizontal: 'center' };

    // Date
    worksheet.mergeCells('G1:H4');
    let d = new Date();
    let date = d.getDate() + '-' + d.getMonth() + '-' + d.getFullYear();
    let dateCell = worksheet.getCell('G1');
    dateCell.value = date;
    dateCell.font = {
      name: 'Calibri',
      size: 12,
      bold: true,
    };
    dateCell.alignment = { vertical: 'middle', horizontal: 'center' };

    //Add Image
    let myLogoImage = workbook.addImage({
      base64: imgBase64,
      extension: 'png',
    });
    worksheet.mergeCells('A1:B4');
    worksheet.addImage(myLogoImage, 'A1:B4');

    //Blank Row
    worksheet.addRow([]);

    //Adding Header Row
    let headerRow = worksheet.addRow(header);
    headerRow.eachCell((cell, number) => {
      cell.fill = {
        type: 'pattern',
        pattern: 'solid',
        fgColor: { argb: '4167B8' },
        bgColor: { argb: '' },
      };
      cell.font = {
        bold: true,
        color: { argb: 'FFFFFF' },
        size: 12,
      };
    });

    // Adding Data with Conditional Formatting
    data.forEach((d: any) => {
      let row = worksheet.addRow(Object.values(d));

      let sales = row.getCell(6);
      let color = 'FF99FF99';
      let sales_val = sales.value || 0;
      // Conditional fill color
      if (sales_val < 200000) {
        color = 'FF9999';
      }

      sales.fill = {
        type: 'pattern',
        pattern: 'solid',
        fgColor: { argb: color },
      };
    });

    worksheet.getColumn(3).width = 20;
    worksheet.addRow([]);

    //Footer Row
    let footerRow = worksheet.addRow([
      'Employee Sales Report Generated from example.com at ' + date,
    ]);
    footerRow.getCell(1).fill = {
      type: 'pattern',
      pattern: 'solid',
      fgColor: { argb: 'FFB050' },
    };

    //Merge Cells
    worksheet.mergeCells(`A${footerRow.number}:F${footerRow.number}`);

    //Generate & Save Excel File
    workbook.xlsx.writeBuffer().then((data) => {
      let blob = new Blob([data], {
        type: 'application/vnd.openxmlformats-officedocument.spreadsheetml.sheet',
      });
      fs.saveAs(blob, title + '.xlsx');
    });
  }
}
Calling in Component
We are done with the Service code, now we will import our service in the App component and pass Header, Title, and Data using JSON object
import { Component } from '@angular/core';
import { ExportExcelService, ROW_ITEM } from './services/export-excel.service';

@Component({
  selector: 'app-root',
  templateUrl: './app.component.html',
  styleUrls: ['./app.component.css'],
})
export class AppComponent {
  title = 'angular-export-to-excel';

  dataForExcel: ROW_ITEM[] = [];

  empPerformance = [
    {
      ID: 10011,
      NAME: 'A',
      DEPARTMENT: 'Sales',
      MONTH: 'Jan',
      YEAR: 2022,
      SALES: 132412,
      CHANGE: 12,
      LEADS: 35,
    },
    {
      ID: 10012,
      NAME: 'A',
      DEPARTMENT: 'Sales',
      MONTH: 'Feb',
      YEAR: 2022,
      SALES: 232324,
      CHANGE: 2,
      LEADS: 443,
    },
    {
      ID: 10013,
      NAME: 'A',
      DEPARTMENT: 'Sales',
      MONTH: 'Mar',
      YEAR: 2022,
      SALES: 542234,
      CHANGE: 45,
      LEADS: 345,
    },
    {
      ID: 10014,
      NAME: 'A',
      DEPARTMENT: 'Sales',
      MONTH: 'Apr',
      YEAR: 2022,
      SALES: 223335,
      CHANGE: 32,
      LEADS: 234,
    },
    {
      ID: 10015,
      NAME: 'A',
      DEPARTMENT: 'Sales',
      MONTH: 'May',
      YEAR: 2022,
      SALES: 455535,
      CHANGE: 21,
      LEADS: 12,
    },
  ];

  constructor(public ete: ExportExcelService) {}

  exportToExcel() {
    this.empPerformance.forEach((row: ROW_ITEM) => {
      this.dataForExcel.push(row);
    });

    let reportData = {
      title: 'Employee Sales Report - Jan 2022',
      data: this.dataForExcel,
      headers: Object.keys(this.empPerformance[0]),
    };

    this.ete.exportExcel(reportData);
  }
}
In the App template just add a button to call this method
<button (click)="exportToExcel()">Export The Report</button>Now you can run your Angular project by hitting
$ ng serve --open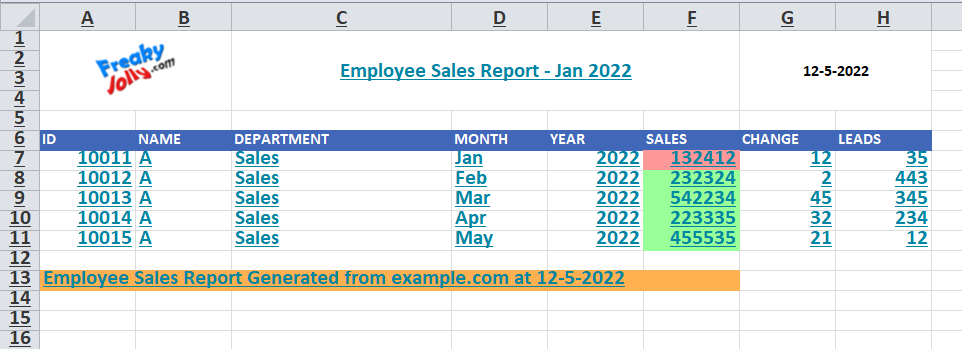
Conclusion
That’s it we have successfully implemented the export to excel functionally in our Angular application using the exceljs and file-saver modules. We can easily format the excel file while adding images to it. there are also number of features available to explore.
Hope you enjoyed its tutorial, share it with your friends
Thanks for reading!