The angular team introduces the google-maps component inside its official @angular library. It is exclusively built to adapt the Google Map’s core library and make it compatible with Angular applications.
In this Angular tutorial, you will learn how to add the Places Search box in the Angular application with Google Maps using the @angular/google-maps package.
Previously there was @agm a.k.a Angular Google Maps to implement the Google Maps into Angular project. But now with the latest version of Angular, it shows a few issues that make it difficult to maintain.
We have already provided the detailed implementation tutorial for @angular/google-maps which you can check over here.
Here we will extend our tutorial to integrate the Places or Address search bar with Google Maps. The search feature on Google maps is a basic and obvious feature that adds to usability. In this guide, you will learn how to implement Google Maps Search from scratch in step by step instructions.
Let’s start the implementation:
How to Add Places Search Box in Google Maps using @angular/google-maps ?
Step 1 – Create Angular Application
Step 2 – Install Angular Google Maps Package
Step 3 – Include Google Map API (2 Methods)
Step 4 – Enable Places Library on Google API
Step 5 – Adding Google Map and Search Box
Step 6 – See In Action
Step 1 – Create Angular Application
First, create a new Angular application. Before that, make sure you have the latest version of NG CLI installed on your system. To install or upgrade just execute the following command:
npm install -g @angular/cliNow execute the following to create a new Angular application project
ng new angular-google-map-appAfter the application is created, enter the application directory
cd angular-google-map-appStep 2 – Install Angular Google Maps Package
After setting up the project, install the required google maps package by executing the below npm install command:
npm install @angular/google-mapsUpdate the AppModule to import the required GoogleMapsModule in the imports array. Open the app.module.ts file and update as shown:
import { NgModule } from '@angular/core';
import { GoogleMapsModule } from '@angular/google-maps';
import { BrowserModule } from '@angular/platform-browser';

import { AppComponent } from './app.component';

@NgModule({
  declarations: [
    AppComponent
  ],
  imports: [
    BrowserModule,
    GoogleMapsModule
  ],
  providers: [],
  bootstrap: [AppComponent]
})
export class AppModule { }
Step 3 – Include Google Map API (2 Methods)
Now, we need to include the Google Maps API library and also the API KEY to use google maps in your application. To know more about how to get your own Google API Key, please refer to the following step by step tutorial.
Adding Google Maps API (2 Methods)
1# Method: Include in Index.html file
You can simply include the API library in the <head> section of your index.html as shown below:
<!doctype html>
<html lang="en">
<head>
  <meta charset="utf-8">
  <title>AngularGoogleMapsApp</title>
  <base href="/">
  <meta name="viewport" content="width=device-width, initial-scale=1">
  <link rel="icon" type="image/x-icon" href="favicon.ico">
  <script src="https://maps.googleapis.com/maps/api/js?key=AIzaSyAl..YOUR-KEY-HERE..bKEUg"></script>
</head>
<body>
  <app-root></app-root>
</body>
</html>
2# Method: Import the Google API in Component
Sometimes, we want the Google Maps API library to be lazy-loaded in case we want it for the dynamic module. In that scenario, you can follow this approach.
For example, you have the following module names MyOtherModule, then you need to import the
// my-other.module.ts

import { NgModule } from '@angular/core';
import { GoogleMapsModule } from '@angular/google-maps';
import { CommonModule } from '@angular/common';
import { HttpClientModule, HttpClientJsonpModule } from '@angular/common/http';

import { MyOtherComponent } from './my-other.component';

@NgModule({
  declarations: [
    MyOtherComponent,
  ],
  imports: [
    CommonModule,
    GoogleMapsModule,
    HttpClientModule,
    HttpClientJsonpModule,
  ],
  exports: [
    MyOtherComponent,
  ],
})
export class MyOtherModule {}
Then inside the component, you can call the Google Maps API as shown below inside the Component it self:
// my-other.component.ts

import { Component } from '@angular/core';
import { HttpClient } from '@angular/common/http';
import { Observable, of } from 'rxjs';
import { catchError, map } from 'rxjs/operators';

@Component({
  selector: 'my-other',
  templateUrl: './my-other.component.html',
})
export class MyOtherComponent {
  apiLoaded: Observable<boolean>;

  constructor(httpClient: HttpClient) {
    this.apiLoaded = httpClient.jsonp('https://maps.googleapis.com/maps/api/js?key=YOUR_KEY_HERE', 'callback')
        .pipe(
          map(() => true),
          catchError(() => of(false)),
        );
  }
}
Make sure in the template you load the google-map directive as shown below:
<!-- my-other.component.html -->

<div *ngIf="apiLoaded | async">
  <google-map></google-map>
</div>
Else things will remain the same. We will follow the first method to keep things simple to follow.
Step 4 – Enable Places Library on Google API
To search the address using the search box, make sure to enable the Places API in the Google API Key and most importantly you need to load the places API as well.
IMPORTANT!!!
This will be done by appending the places API in the google library URL which we added above.
https://maps.googleapis.com/maps/api/js?key=AIzaSy……bbKEUg&libraries=places
Step 5 – Adding Google Maps and Search Box
For adding a search box, we will add a native HTML text <input> in the template HTML. The Google Maps is created by adding the <google-map> component with the required properties and methods.
The final template in the app.component.html file will as shown below:
<!-- app.component.html -->
<div>
  <label>Enter address</label>
  <input
    type="text"
    class="my-search-box"
    (keydown.enter)="$event.preventDefault()"
    placeholder="Search Location"
    type="text"
    #search
  />
</div>

<google-map
  #myGoogleMap
  height="500px"
  width="100%"
  [zoom]="zoom"
  [center]="center"
  [options]="options"
></google-map>
We have added a few properties to control its height and width with zoom, centre and options to configure the viewability of the map.
Next, we will update the Component class. Open the app.component.ts file and update it with the following code:
// app.component.ts
import { Component, ElementRef, NgZone, ViewChild } from '@angular/core';
import { GoogleMap } from '@angular/google-maps';

@Component({
  selector: 'app-root',
  templateUrl: './app.component.html',
  styleUrls: ['./app.component.css'],
})
export class AppComponent {
  title = 'angular-google-map-search';

  @ViewChild('search')
  public searchElementRef!: ElementRef;
  @ViewChild(GoogleMap)
  public map!: GoogleMap;

  zoom = 12;
  center!: google.maps.LatLngLiteral;
  options: google.maps.MapOptions = {
    zoomControl: true,
    scrollwheel: false,
    disableDefaultUI: true,
    fullscreenControl: true,
    disableDoubleClickZoom: true,
    mapTypeId: 'hybrid',
    // maxZoom:this.maxZoom,
    // minZoom:this.minZoom,
  };
  latitude!: any;
  longitude!: any;

  constructor(private ngZone: NgZone) {}

  ngAfterViewInit(): void {
    // Binding autocomplete to search input control
    let autocomplete = new google.maps.places.Autocomplete(
      this.searchElementRef.nativeElement
    );
    // Align search box to center
    this.map.controls[google.maps.ControlPosition.TOP_CENTER].push(
      this.searchElementRef.nativeElement
    );
    autocomplete.addListener('place_changed', () => {
      this.ngZone.run(() => {
        //get the place result
        let place: google.maps.places.PlaceResult = autocomplete.getPlace();

        //verify result
        if (place.geometry === undefined || place.geometry === null) {
          return;
        }

        console.log({ place }, place.geometry.location?.lat());

        //set latitude, longitude and zoom
        this.latitude = place.geometry.location?.lat();
        this.longitude = place.geometry.location?.lng();
        this.center = {
          lat: this.latitude,
          lng: this.longitude,
        };
      });
    });
  }

  ngOnInit() {
    navigator.geolocation.getCurrentPosition((position) => {
      this.center = {
        lat: position.coords.latitude,
        lng: position.coords.longitude,
      };
    });
  }
}
The @ViewChild is used to fetch the Google Map and Input control instance into the class component. The navigator object is used to get current coordinates.
Inside the ngAfterViewInit hook, we are subscribing to the google places API to fetch results. After the address selection, we are setting the Google Map to selected address coordinates.
To style the Input control, add the following CSS style in the app.component.css file:
.my-search-box {
align-self: center;
font-size: 1rem;
font-weight: 400;
color: #212529;
width: 60%;
background-color: #fff;
background-clip: padding-box;
border: 1px solid #ced4da;
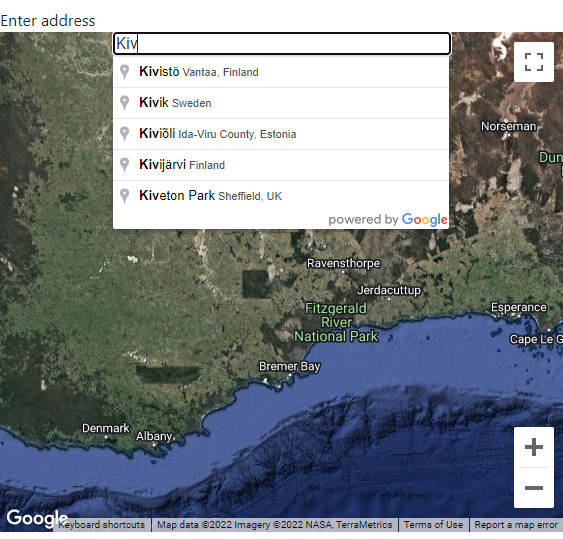
}Step 6 – See In Action
Now you can see the Google Maps implementation in action. Run the Angular application by hitting ng serve –open command to open the application on default URL as shown below:
http://localhost:4200/The application will look like this: