In this Angular tutorial, you will learn how to create Google Maps with Markers and Info windows in the Angular latest versions using @angular/google-maps without any issues. We will use the latest Google Maps which are now the part of @angular library itself.
Now Google Maps are a part of the angular component, making it more reliable and more compatible with the latest upcoming versions and changes.
In our tutorial, you will learn how to add Google Map directive with its Input and Output properties to easily control the behaviour. On Google Map, you can easily add dynamic markers with customised animation and with their own Info windows.
You will learn how to quickly add Google Map in the Angular app by following easy steps.
How to Add Google Maps in Angular 13 using ‘@angular/google-maps’ Package?
Step 1 – Create Angular Application
Step 2 – Install Angular Google Maps Package
Step 3 – Include Google Map API (2 Methods)
Step 4 – Adding Google Maps, Markers and Info Windows
Step 5 – Input and Output Properties on Google Map Components
Step 6 – See In Action
Step 1 – Create Angular Application
First, create a new Angular application. Before that, make sure you have the latest version of NG CLI installed on your system. To install or upgrade just execute the following command:
npm install -g @angular/cliNow execute the following to create a new Angular application project
ng new angular-google-map-appAfter the application is created, enter the application directory
cd angular-google-map-appStep 2 – Install Angular Google Maps Package
After setting up the project, install the required google maps package by executing the below npm install command:
npm install @angular/google-mapsUpdate the AppModule to import the required GoogleMapsModule in the imports array. Open the app.module.ts file and update as shown:
import { NgModule } from '@angular/core';
import { GoogleMapsModule } from '@angular/google-maps';
import { BrowserModule } from '@angular/platform-browser';

import { AppComponent } from './app.component';

@NgModule({
  declarations: [
    AppComponent
  ],
  imports: [
    BrowserModule,
    GoogleMapsModule
  ],
  providers: [],
  bootstrap: [AppComponent]
})
export class AppModule { }
Step 3 – Include Google Map API (2 Methods)
Now, we need to include the Google Maps API library and also the API KEY to use google maps in your application. To know more about how to get your own Google API Key, please refer to the following step by step tutorial.
Adding Google Maps API (2 Methods)
1# Method: Include in Index.html file
You can simply include the API library in the <head> section of your index.html as shown below:
<!doctype html>
<html lang="en">
<head>
  <meta charset="utf-8">
  <title>AngularGoogleMapsApp</title>
  <base href="/">
  <meta name="viewport" content="width=device-width, initial-scale=1">
  <link rel="icon" type="image/x-icon" href="favicon.ico">
  <script src="https://maps.googleapis.com/maps/api/js?key=AIzaSyAl..YOUR-KEY-HERE..bKEUg"></script>
</head>
<body>
  <app-root></app-root>
</body>
</html>
2# Method: Import the Google API in Component
Sometimes, we want the Google Maps API library to be lazy-loaded in case we want it for the dynamic module. In that scenario, you can follow this approach.
For example, you have the following module names MyOtherModule, then you need to import the
// my-other.module.ts

import { NgModule } from '@angular/core';
import { GoogleMapsModule } from '@angular/google-maps';
import { CommonModule } from '@angular/common';
import { HttpClientModule, HttpClientJsonpModule } from '@angular/common/http';

import { MyOtherComponent } from './my-other.component';

@NgModule({
  declarations: [
    MyOtherComponent,
  ],
  imports: [
    CommonModule,
    GoogleMapsModule,
    HttpClientModule,
    HttpClientJsonpModule,
  ],
  exports: [
    MyOtherComponent,
  ],
})
export class MyOtherModule {}
Then inside the component, you can call the Google Maps API as shown below inside the Component it self:
// my-other.component.ts

import { Component } from '@angular/core';
import { HttpClient } from '@angular/common/http';
import { Observable, of } from 'rxjs';
import { catchError, map } from 'rxjs/operators';

@Component({
  selector: 'my-other',
  templateUrl: './my-other.component.html',
})
export class MyOtherComponent {
  apiLoaded: Observable<boolean>;

  constructor(httpClient: HttpClient) {
    this.apiLoaded = httpClient.jsonp('https://maps.googleapis.com/maps/api/js?key=YOUR_KEY_HERE', 'callback')
        .pipe(
          map(() => true),
          catchError(() => of(false)),
        );
  }
}
Make sure in the template you load the google-map directive as shown below:
<!-- my-other.component.html -->

<div *ngIf="apiLoaded | async">
  <google-map></google-map>
</div>
Else things will remain the same. We will follow the first method to keep things simple to follow.
Step 4 – Adding Google Maps, Markers and Info Windows
Using the Angular’s Google Maps package you can easily create the Google Map, Markers and Info-Window components by adding their respective directive components:
<google-map></google-map>: Creates the Google Map on component view
<map-marker></map-marker>: Creates markers on the Google Map
<map-info-window>: Is used to create the Info Window component, which will open when Marker is clicked by the user.
Let’s see, how these components can be used to create a functional Google Maps layout on view.
Open the app.component.html and update with the following code:
<google-map

  #myGoogleMap

  height="500px"
  width="100%"
  [zoom]="zoom"
  [center]="center"
  [options]="options"
  (mapClick)="eventHandler($event,'mapClick')"
  (mapDblclick)="eventHandler($event,'mapDblclick')"
  (mapDrag)="eventHandler($event,'mapDrag')"
  (mapDragend)="eventHandler($event,'mapDragend')"
  (mapRightclick)="eventHandler($event,'mapRightclick')"
  (positionChanged)="eventHandler($event,'marker_positionChanged')"
  (zoomChanged)="eventHandler($event,'zoomChanged')"
>
  <map-marker
    #markerElem="mapMarker"
    *ngFor="let marker of markers"
    [position]="marker.position"
    [label]="marker.label"
    [title]="marker.title"
    [options]="marker.options"
    (mapClick)="openInfo(markerElem, marker.info)"
  >
  </map-marker>

  <map-info-window>{{ infoContent }}</map-info-window>
</google-map>

<button (click)="zoomIn()">Zoom in</button>
<button (click)="zoomOut()">Zoom out</button>
<button (click)="logCenter()">Log center</button>
You can add various available Input and Output properties on the above components. I have added mostly used in this demo application. We will discuss more of them in further sections.
Now, update the component class file with different methods and properties. Open the app.component.ts file and update with the following code:
import { Component, ViewChild } from '@angular/core';
import { GoogleMap, MapInfoWindow, MapMarker } from '@angular/google-maps';

@Component({
  selector: 'app-root',
  templateUrl: './app.component.html',
  styleUrls: ['./app.component.scss']
})
export class AppComponent {
  title = 'angular-google-maps-app';

  @ViewChild('myGoogleMap', { static: false })
  map!: GoogleMap;
  @ViewChild(MapInfoWindow, { static: false })
  info!: MapInfoWindow;

  zoom = 12;
  maxZoom = 15;
  minZoom = 8;
  center!: google.maps.LatLngLiteral;
  options: google.maps.MapOptions = {
    zoomControl: false,
    scrollwheel: false,
    disableDoubleClickZoom: true,
    mapTypeId: 'hybrid',
    maxZoom:this.maxZoom,
    minZoom:this.minZoom,
  }
  markers = []  as  any;
  infoContent = ''

  ngOnInit() {
    navigator.geolocation.getCurrentPosition((position) => {
      this.center = {
        lat: position.coords.latitude,
        lng: position.coords.longitude,
      }
    })
  }

  zoomIn() {
    if (this.zoom < this.maxZoom) this.zoom++;
    console.log('Get Zoom',this.map.getZoom());
  }

  zoomOut() {
    if (this.zoom > this.minZoom) this.zoom--;
  }

  eventHandler(event: any ,name:string){
    console.log(event,name);

    // Add marker on double click event
    if(name === 'mapDblclick'){
      this.dropMarker(event)
    }
  }

  // Markers
  logCenter() {
    console.log(JSON.stringify(this.map.getCenter()))
  }

  dropMarker(event:any) {
    this.markers.push({
      position: {
        lat: event.latLng.lat(),
        lng: event.latLng.lng(),
      },
      label: {
        color: 'blue',
        text: 'Marker label ' + (this.markers.length + 1),
      },
      title: 'Marker title ' + (this.markers.length + 1),
      info: 'Marker info ' + (this.markers.length + 1),
      options: {
        animation: google.maps.Animation.DROP,
      },
    })
  }

  openInfo(marker: MapMarker, content: string) {
    this.infoContent = content;
    this.info.open(marker)
  }
}
Step 5 – Input and Output Properties on Google Map Components
Now we will discuss in detail various Input and Output properties that are exposed to be used as per customisation of behaviours.
Google Map Properties
Input properties available for <google-map> are detailed below:
<strong>[height]</strong>: Initial height<strong>[width]</strong>: Initial width<strong>[center]</strong>: Initial centre[zoom]: Initial zoom[options]: Configuration options can be set, check here for more details.
Output properties available for <google-map> :
(boundsChanged): Triggered when viewport bounds have changed(centerChanged): Triggered when map center property changes(mapClick): Triggered when user clicks on the map(mapDblclick): Triggered when user double-clicks on the map. Note that the click event will also fire, right before this one(mapDrag): This event is repeatedly fired while the user drags the map(mapDragend): Triggered when user stops dragging the map(mapDragstart): Triggered when user starts dragging the map(headingChanged): Triggered when map heading property changes(idle): Triggered when map becomes idle after panning or zooming(maptypeidChanged): Triggered when mapTypeId property changes(mapMousemove): This event is fired whenever the user’s mouse moves over the map container(mapMouseout): Triggered when user’s mouse exits the map container(mapMouseover): Triggered when user’s mouse enters the map container(projectionChanged): Triggered when projection has changed(mapRightclick): Triggered when DOM context menu event is fired on the map container(tilesloaded): Triggered when visible tiles have finished loading(tiltChanged): Triggered when map tilt property changes(zoomChanged): Triggered when map zoom property changes
Other than Input and Output properties, you can also trigger methods and call getter functions by getting the map instance into the Component Class itself. For that, you can add the template variable like #myGoogleMap and get its instance using the @ViewChild to use its methods and functions.
We have used the getZoom() getter function for example in the component class above.
Marker Properties
Input properties of <map-marker>:
[title]: Configure title, visible on hover[position]: Configure position[label]: Configure label[clickable]: If the marker should listen to mouse and touch events, default is true[options]: Configure options, for more info see the docs
Output properties of <map-marker>:
(animationChanged): Triggered when the marker’s animation property changes(mapClick): Triggered when the marker icon was clicked(clickableChanged): Triggered when the marker’s cursor property changes(cursorChanged): Triggered when the marker’s cursor property changes(mapDblclick): Triggered when the marker icon was double-clicked(mapDrag): This event is repeatedly fired while the user drags the marker(mapDragend): Triggered when the user stops dragging the marker(draggableChange): Triggered when the marker’s draggable property changes(mapDragstart): Triggered when the user starts dragging the marker(flatChanged): Triggered when the marker’s flat property changes(iconChanged): Triggered when the marker icon property changes(mapMousedown): Triggered for a mousedown on the marker(mapMouseout): Triggered when the mouse leaves the area of the marker icon(mapMouseover): Triggered when the mouse enters the area of the marker icon(mapMouseup): Triggered for a mouseup on the marker(positionChanged): Triggered when the marker position property changes(mapRightclick): Triggered for a right-click on the marker(shapeChanged): Triggered when the marker’s shape property changes(titleChanged): Triggered when the marker title property changes(visibleChanged): Triggered when the marker’s visible property changes(zindexChanged): Triggered when the marker’s zIndex property changes
Info-Window Properties
Input properties of <map-info-window>:
[options]: Sets the options, for more info see the docs
Input properties of <map-info-window>:
(closeclick): Triggered when the close button was clicked(contentChanged): Triggered when the content property changes(domready): Triggered when the <div> containing the InfoWindow’s content is attached to the DOM(positionChanged): Triggered when the position property changes(zindexChanged): Triggered when the InfoWindow’s zIndex changes
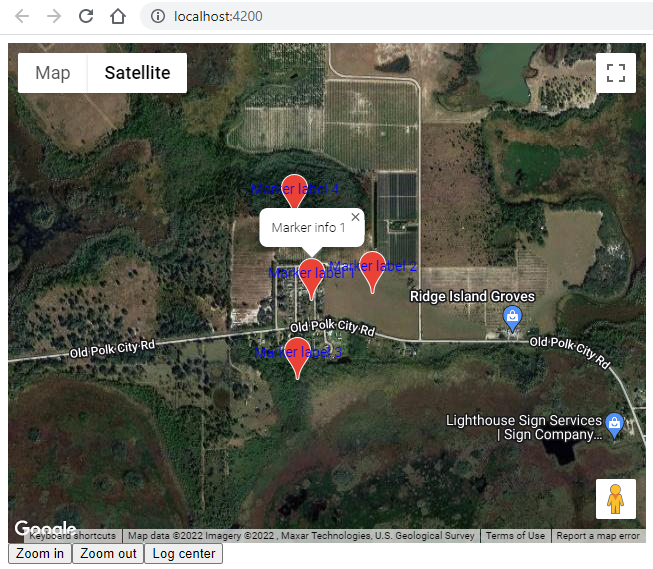
Step 6 – See In Action
Now you can see the Google Maps implementation in action. Run the Angular application by hitting ng serve –open command to open the application on default URL as shown below:
http://localhost:4200/The application will look like this: