Create PDF files from HTML content example is going to be discussed; In this tutorial, we will discuss how to generate and export PDF documents from HTML content in React application.
The PDF(Portable Document Format) files are immensely used file format, which is used for many purposes. PDF files can be easily shared as a document that is more secure and can’t be altered. These can be easily protected via password and shared as printed hard copies.
In the application, users can easily download different types of data like invoices, bills, reports etc as documents in PDF format. In React application, we will learn how to export any HTML content into a PDF file.
To demonstrate the PDF export feature, we’ll add an HTML table and integrate the PDF export feature. For implementing the PDF export feature, we’ll use the react-to-print package module.
How to Generate PDF Document from HTML in React Js application?
- Create React Application
- Install Bootstrap and React To Print Library
- Create Data HTML and PDF Component
- Adding PDF Generate Component in App
- Run React Application
Create React Application
First, create a new React application, head towards the terminal and execute below npx command.
$ npx create-react-app react-html-to-pdf-appMove inside the application directory
$ cd react-html-to-pdf-app
Install Bootstrap and React To Print Library
Next, install the bootstrap package to provide quick styling to our application. More importantly, install the react-to-print package library.
Execute the below command to install all the required packages in single npm command.
$ npm install bootstrap react-to-print --save
Create Data HTML and PDF Component
To demonstrate the HTML to PDF functionality, we will create a new table.component.js file under the src folder. This will contain a static HTML table and named TableComponent as shown below.
import React from "react";

class TableComponent extends React.Component {
  render() {
    return (
      <table className="table">
        <thead>
          <tr>
            <th>Firstname</th>
            <th>Lastname</th>
            <th>Email</th>
            <th>Image</th>
          </tr>
        </thead>
        <tbody>
          <tr>
            <td>John</td>
            <td>Doe</td>
            <td>john@example.com</td>
            <td>
                <img src="https://i.pravatar.cc/50?img=1" alt="thumb" />
            </td>
          </tr>
          <tr>
            <td>Mary</td>
            <td>Moe</td>
            <td>mary@example.com</td>
            <td>
                <img src="https://i.pravatar.cc/50?img=2" alt="thumb" />
            </td>
          </tr>
          <tr>
            <td>July</td>
            <td>Dooley</td>
            <td>july@example.com</td>
            <td>
                <img src="https://i.pravatar.cc/50?img=3" alt="thumb" />
            </td>
          </tr>
        </tbody>
      </table>
    );
  }
}

export default TableComponent;
Next, create the ExportPdfComponent with the file named export-pdf.component.js under the src folder.
import React from 'react';
import ReactToPrint from 'react-to-print';
import TableComponent from './table.component';

class ExportPdfComponent extends React.Component {

    render() {
      return (
        <div>

           <h1>Export HTMl Table in PDF File</h1>

          <TableComponent ref={(response) => (this.componentRef = response)} />

          <ReactToPrint
            content={() => this.componentRef}
            trigger={() => <button className="btn btn-primary">Print to PDF!</button>}
          />
        </div>
      );
    }
}

export default ExportPdfComponent;
The important component to notice here is <ReactToPrint />, which is taking the reference of our TableComponent to generate and export it as a PDF file.
We are getting the TableComponent reference in the componentRef variable, then that is getting passed as content to the ReactToPrint component as a prop. The trigger prop is taking the button template to trigger the Export and print command.
Adding PDF Generate Component in App
Finally, import the ExportPdfComponent inside the App.js class component as shown below.
import { Component } from "react";
import "./App.css";
import "../node_modules/bootstrap/dist/css/bootstrap.min.css";
import ExportPdfComponent from "./export-pdf.component";

class App extends Component {

  render() {
    return (
      <div className="App container">
        <ExportPdfComponent/>
      </div>
    );
  }
}
export default App;
Run React Application
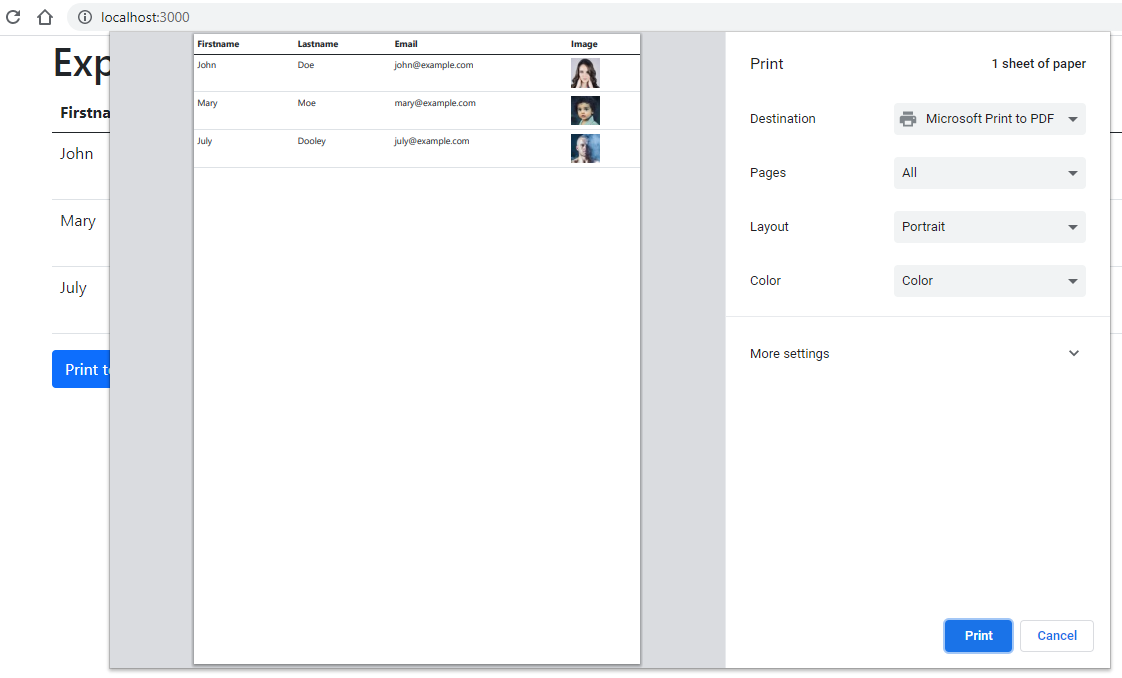
You can now run the React application to the HTML to PDF working in action. Execute the following npm command to run the react app
$ npm startIt will run the application to the browser at default port 3000 at the following URL
http://localhost:3000
Conclusion
We have completed our tutorial on how to generate or export the React component into a PDF file. Using the ReactToPDF library, we can easily integrate the PDF generate functionality even for images on pages.