Bootstrap Dropdown Selectbox implementation example is going to be discussed in this guide; In this tutorial, we will add a bootstrap dropdown with dynamic options in React JS application.
Bootstrap is a very common and widely used library due to its profound component collection. One of the most common components is a Dropdown. A dropdown or select box component is used in multiple forms across applications. We will create a dynamic Dropdown React component; that can be easily used in any part of an application without repeating the code.
We will fetch a dynamic list of items from a remote API then feed the list to our DropdownComponent as props. Also, we will get the onChange event handler from the component to show the value in the App component. The componentWillMount() example will be discussed to fetch dynamic data into the App component.
How to create a Dynamic Bootstrap Dropdown Component in React JS?
In a dynamic component, we just pass the options object and the component will create dynamic options into the dropdown.
Let’s have a look at the quick steps.
- Create React App (Skip if you already have)
- Install Bootstrap Package
- Create Dynamic Bootstrap Dropdown Component
- Using Dropdown Component
- Run React Application
Create React App (Skip if you already have)
To begin, create a new React application by executing the below npx command. You can skip this step if you already having an application up and running.
$ npx create-react-app bootstrap-dropdown-appMove inside the application directory
$ cd bootstrap-dropdown-app
Install Bootstrap Package
After creating the application, install the bootstrap package by hitting the below command
$ npm install bootstrap --save
Create Dynamic Bootstrap Dropdown Component
Now, we will create a Bootstrap dropdown component under the src folder. Create a dropdown.component.js file and update it with the following code.
import React from 'react'

export const DropdownComponent = props => (
    <div className="form-group col-md-6">
        <label>{props.labelName} :</label>
        <select className="form-control" name="{props.labelName}" onChange={props.onChange}>
            <option defaultValue>Select {props.labelName}</option>
            {
                props.options.map(option => (
                    <option key={option.id} value={option.id}>{option.name}</option>
                ))
            }
        </select>
    </div>
);
Above we create a functional react component. This component is fetching props from the parent component where it is getting used. In props we’re passing few values including the LabelName, Options list and onChange event as well.
The list of options is getting dynamically traversed using the Javascript map() function. The defaultValue is used to select the default value in selection.
Using Dropdown Component
Let,s look at the App.js class component, where we are adding our DropdownComponent. Open the App.js and update with the following code.
import "./App.css";
import "../node_modules/bootstrap/dist/css/bootstrap.min.css";
import { Component } from "react";
import { DropdownComponent } from "./dropdown.component";
class App extends Component {
constructor() {
super();
this.state = {
options: [],
selectedValue:'',
labelName:'Users List'
};
}
componentDidMount(){
fetch('https://jsonplaceholder.typicode.com/users')
.then(response => response.json())
.then(users => this.setState({options:users}))
}
onChange = event => {
console.log(event);
this.setState({ selectedValue: event.target.value });
};
render() {
return (
<div className="App container">
<div>
<div className="row">
<div className="col-md-6 offset-md-3">
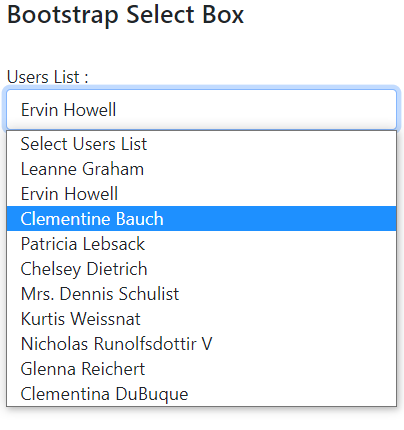
<h3>Bootstrap Select Box</h3><br />
<div className="form-row">
<DropdownComponent
labelName={this.state.labelName}
options={this.state.options}
onSearchChange={this.onChange}
/>
</div>
Selected Value: {this.state.selectedValue}
</div>
</div>
</div>
</div>
);
}
}
export default App;Here we have the state with options, labelName and selectedValue initials. Inside the componentDidMount hook, we are loading the dynamic list of users using the promise fetch() method.
The componentDidMount is triggered when the component is loaded by not yet visible to the user. This hook is mainly used to do similar kinds of stuff like creating subscriptions, loading data from remote APIs, etc.
The onChange handler is passed to the <DropdownComponent> with other props dynamically. The onChange is getting value from the component and updating the local state variable and show its value.
Run React Application
Finally, run the React application by executing the below command,
$ npm startIt will run the application browser at http://localhost:3000 port.
Conclusion
We discussed how to a dynamic list of values in a Bootstrap styles dropdown component. We passed onChange event handler as a props and list of items. The componentWillMount() hook is used to fetch a dynamic list of values from the remote server.