React Form with Custom Validation Message using Pattern rule example will discuss; Onto this tutorial, you will learn how to add form controls with custom validation rules and show error messages in React js application.
Firstly, we will create a form with a submit button as a component in react app. Secondly, the form will have validation rules set using patterns. On top of that, on submitting the form, red error messages will show up if validation is not fulfilled.
In addition, to make our form more re-usable, we will emit the form data back into the parent component App.js. So that, you can easily control how data will flow out of your form.
Thereafter, to style our form field controls, we will use the Bootstrap 4 form styles. Finally, you will learn step by step quick implementation of form in React application with setup validation rules.
How to Add Form with Custom Validation in React App?
On the way, follow these quick steps to set up a form with custom validation in react js application:
- Create React Application
- Install Bootstrap Library
- Create Form Component with Validation Pattern
- Using Form Component in App.js
- Run React App
Create React Application
Start by creating a new React app, head towards the terminal window and execute following command:
npx create-react-app react-demo-appMove into the application directory:
cd react-demo-appInstall Bootstrap Library
Next, we install the Bootstrap library package to quickly style our app. Execute the following npm command to install the bootstrap package:
npm install bootstrap --saveCreate Form Component with Validation Pattern
Next, move into the src directory and create a new file named formvalidation.component.js. This will have our form component with validation. It will validate the form controls defined and show errors to validate before submitting the values to the parent.
Open the src/formvalidation.component.js file and update it with below code:
import React from "react";
const defaultState = {
  name: '',
  email: '',
  password: '',
  nameError: '',
  emailError: '',
  passwordError: '',
};
class FormValidationComponent extends React.Component {
  constructor() {
    super();
    this.state = defaultState;
    this.handleInputChange = this.handleInputChange.bind(this);
  }
  handleInputChange(event) {
    const target = event.target;
    var value = target.value;
    const name = target.name;
    this.setState({
      [name]: value,
    });
  }
  validate() {
    let nameError = "";
    let emailError = "";
    let passwordError = "";
    if (!this.state.name) {
      nameError = "Name field is required";
    }
    const reg = /^\w+([\.-]?\w+)*@\w+([\.-]?\w+)*(\.\w{2,3})+$/;
    if (!this.state.email || reg.test(this.state.email) === false) {
      emailError = "Email Field is Invalid ";
    }
    if (!this.state.password) {
      passwordError = "Password field is required";
    }
    if (emailError || nameError || passwordError) {
      this.setState({ nameError, emailError, passwordError });
      return false;
    }
    return true;
  }
  submit() {
    if (this.validate()) {

      //Send back the form values to the parent i.e App.js
      this.props.onSubmit([this.state]);

      this.setState(defaultState);
    }
  }
  render() {
    return (
      <div>
        <div className="row">
          <div className="col-md-6 offset-md-3">
            <h3>React Custom Form Validation Example - FreakyJolly.com</h3>
            <br />
            <div className="form-row">
              <div className="form-group col-md-6">
                <label>Name :</label>
                <input
                  type="text"
                  className="form-control"
                  name="name"
                  value={this.state.name}
                  onChange={this.handleInputChange}
                />
                <span className="text-danger">{this.state.nameError}</span>
              </div>
            </div>
            <div className="form-row">
              <div className="form-group col-md-6">
                <label>Email :</label>
                <input
                  type="email"
                  className="form-control"
                  name="email"
                  value={this.state.email}
                  onChange={this.handleInputChange}
                />
                <span className="text-danger">{this.state.emailError}</span>
              </div>
            </div>
            <div className="form-row">
              <div className="form-group col-md-6">
                <label>Password :</label>
                <input
                  type="password"
                  className="form-control"
                  name="password"
                  value={this.state.password}
                  onChange={this.handleInputChange}
                />
                <span className="text-danger">{this.state.passwordError}</span>
              </div>
            </div>
            <div className="form-row">
              <div className="col-md-12 text-center">
                <button
                  type="submit"
                  className="btn btn-primary"
                  onClick={() => this.submit()}
                >
                  Submit
                </button>
              </div>
            </div>
          </div>
        </div>
      </div>
    );
  }
}
export default FormValidationComponent;
Using Form Component in App.js
Now, we will import our FormValidationComponent into the App.js file. In the App component, we also define a onFormSubmit the event handler, that will be passed to our compoennt to emit the form values when submitted.
In addition, we also have used the bootstrap.min.css file to style our form with bootstrap classes.
Open the App.js file and update it as shown below:
import { Component } from "react";
import "./App.css";
import "../node_modules/bootstrap/dist/css/bootstrap.min.css";
import FormValidationComponent from "./formvalidation.component";

class App extends Component {

  constructor() {
    super();
    this.state = {
      formValues:''
    };
  }

  onFormSubmit = event => {
    // Get Form Values
    console.log(event);
    this.setState({formValues:JSON.stringify(event)})
  };

  render() {
    return (
      <div className="App container">
        <FormValidationComponent onSubmit={this.onFormSubmit}/>

        <div>
          <h5>Submited values</h5>
          <code>{this.state.formValues}</code>
        </div>
      </div>
    );
  }
}
export default App;
Run React App
Finally, run the application by hitting the below command:
npm startit will open the application at the following URL:
http://localhost:3000Conclusion
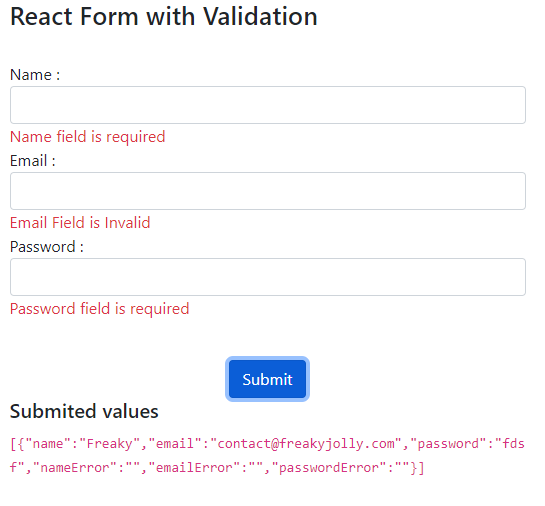
We discussed how to add a custom form in React js application. Also, implemented the custom validation with error messages to inform the user if fields are invalid. In addition to that, we emitted the from values back to the App.js component.