You read it right! Today we are going to discuss the implementation of an extra ordinary plugin named FilePond. It is the best visual experience, I have ever seen in a simple yet complicated component like a File Uploader.
In this tutorial, you will learn how to FilePond file uploader component in Angular application. Thereafter, we will add a submit button to details of files added. Finally, the files selected can be uploaded to the server in the required formats.
What is FilePond?
FilePond provided the web component, which adds a file uploader component in a web application. It is unique due to its support of multiple features. From initializing to adding, removing the files is crafted with amazing animation effects. Moreover, each image file can see with a preview to providing more convenience to the users.
Not only to UI, but it supports server-side hooks and event support to easily configure as per requirements. Each added file can be uploaded separately or instantly when added to the component.
It is well supported with a wide range of adapters for Angular, React, Vue, jQuery and many popular platforms.
Features of FilePond
FilePond provides a unique looking File Uploader component with lots of pleasing features and user experience. Lets have a look at FilePond’s list of amazing features:
- Multiple Input Formats: Accepts directories, files, blobs, local URLs, remote URLs and Data URIs.
- Multiple File Sources: Drop files, select files from the file system, add files using the API, or copy and paste files.
- Async or Sync Uploading: Send files to the server using XMLHttpRequest or store and submit with form post as base64 using the File Encode plugin.
- Image Optimization: Automatic resizing and cropping of images on the client saves server bandwidth and dramatically increases upload speed.
- Responsive: Automatically scales to available space. Is functional on both mobile and desktop devices.
- Validations: File size, File types, Number of files
- Sorting of Selected Files.
You can check more details on features here…
How to Add FilePond in Angular Application?
Let’s go ahead and follow these quick steps to implement the FilePond file uploader in the Angular application:
- Step 1 – Create Angular App
- Step 2 – Install FilePond Packages
- Step 3 – Update App Module
- Step 4 – Import FilePond CSS Files
- Step 5 – Add FilePond Component in Template HTML
- Step 6 – Update Component Class
- Step 7 – Run Application
Step 1 – Create Angular App
To begin, let’s create a new Angular application. Make sure you have the latest version of Angular CLI is installed. Execute the following command to create the application:
ng new angular-filepond-exampleThen, move inside the application directory:
cd angular-filepond-exampleStep 2 – Install FilePond Packages
Next, we will install the core and supporting FilePond library packages. Let’s have a look on different packages we’re going to install:
filepond: Core FilePond Libraryngx-filepond: Adapter node package to use FilePond in Angular apps.filepond-plugin-file-validate-type: (Optional) when adding validation to file selection.filepond-plugin-image-edit: (Optional) when adding file editing.filepond-plugin-image-preview: (Optional) when adding file preview when added.
To demonstrate most of the useful features, execute below NPM command in the terminal window to install the packages in your application:
npm install filepond --save
npm install ngx-filepond --save
npm install filepond-plugin-file-validate-type
npm install filepond-plugin-image-edit
npm install filepond-plugin-image-previewOR, just hit in a single command
npm install filepond ngx-filepond filepond-plugin-file-validate-type filepond-plugin-image-edit filepond-plugin-image-preview --saveStep 3 – Update App Module
Now, we need to import the FilePondModule and register other plugins as well by calling the registerPlugin() method.
Open the app.module.ts file, update it with following code:
import { BrowserModule } from '@angular/platform-browser';
import { NgModule } from '@angular/core';

import { AppComponent } from './app.component';

// import filepond module
import { FilePondModule, registerPlugin } from 'ngx-filepond';

// import and register filepond file type validation plugin
import  * as FilePondPluginFileValidateType from 'filepond-plugin-file-validate-type';
import  * as FilepondPluginImageEdit from 'filepond-plugin-image-edit';
import  * as FilepondPluginImagePreview from 'filepond-plugin-image-preview';
registerPlugin(FilePondPluginFileValidateType,FilepondPluginImageEdit,FilepondPluginImagePreview);

@NgModule({
  declarations: [
    AppComponent
  ],
  imports: [
    BrowserModule,
    FilePondModule
  ],
  providers: [],
  bootstrap: [AppComponent]
})
export class AppModule { }
Step 4 – Import FilePond CSS Files
After installing the required packages, we need to include the CSS style files.
Open the angular.json file and update the "styles" property array:
"styles": [
  "src/styles.css",
  "./node_modules/filepond/dist/filepond.min.css",
  "./node_modules/filepond-plugin-image-preview/dist/filepond-plugin-image-preview.min.css"
],
Step 5 – Add FilePond Component in Template HTML
Its time to load your guns!!!
FilePond uploader component is created by adding the <file-pond/> component directive. It support number of input properties with output event handlers.
Open the app.component.html file, and update with following code:
<!-- app.component.html -->
<file-pond #myPond
    [options]="pondOptions"
    [files]="pondFiles"
    (onInit)="pondHandleInit()"
    (onAddfile)="pondHandleAddFile($event)"
    (onActivatefile)="pondHandleActivateFile($event)"
    (onRemovefile)="pondHandleRemoveFile($event)">
</file-pond>

<button (click)="uploadFiles()">Submit</button>
The button is calling the uploadFiles() method to console all the added or current files in our pond. We will discuss the properties and callback methods in more details ahead.
Step 6 – Update Component ts Class
Now, open the component class, to define all callback methods and default file to show when FilePond is initialisezed.
Open the app.component.ts file and update it:
import { Component, ViewChild } from '@angular/core';
import { FilePond, FilePondOptions} from 'filepond';
@Component({
  selector: 'app-root',
  templateUrl: './app.component.html',
  styleUrls: ['./app.component.css'],
})
export class AppComponent {
  title = 'angular-demo-app';

  @ViewChild('myPond')
  myPond!: FilePond;

  pondOptions: FilePondOptions = {
    allowMultiple: true,
    labelIdle: 'Drop files here...',
    acceptedFileTypes: ['image/jpeg, image/png'],
    allowReorder:true,
    maxFiles:5,
  }

  pondFiles: FilePondOptions["files"] = [
    {
      source: 'assets/photo.jpeg',
      options: {
        type: 'local'
      }
    }
  ]

  pondHandleInit() {
    console.log('FilePond has initialised', this.myPond);
  }

  pondHandleAddFile(event: any) {
    console.log('A file was added', event);
  }

  pondHandleRemoveFile(event: any) {
    console.log('A file was removed', event);
  }

  pondHandleActivateFile(event: any) {
    console.log('A file was activated', event)
  }

  uploadFiles(){
    console.log(this.myPond.getFiles());
  }

}
Step 7 – Run Application
Finally, run the application by hitting the below command:
ng serve –open
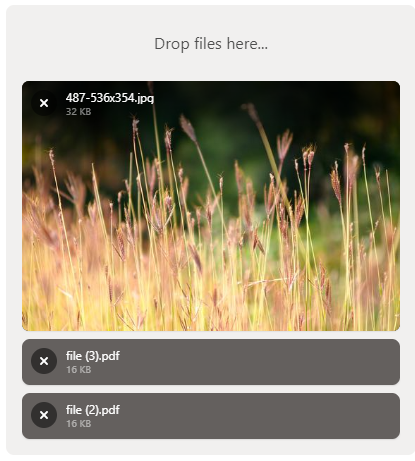
It will open the application at following URL:
http://localhost:4200The FilePond file uploader will look like this:
Conclusion
We have completed the implementation of File Uploader component in Angular application using the profound FilePond plugin. We discussed how easily and quickly implement it by using its feature plugins. On the submit button we got the list of selected files in the filePond component to upload on a server.
You can get ore details on available options and other features on the official documentation.