In this guide, we are going to discuss how to create a real-time Todo application by combining React and Firebase. The React Firebase Todo App will allow users to add, list, update, and delete todos directly to the NoSQL database provided by Firebase.
Firebase is a popular platform which provides a number of cloud-based services and features like real-time databases, authentication services, crash analysis, and hosting. In this tutorial, we will focus on using the NoSQL database and hosting service provided by Firebase.
In our React Firebase Todo List application, we will enable users to perform CRUD (Create, Read, Update, and Delete) operations in real-time which will make our Todo App React Firebase highly interactive and user-friendly.
We will use the material UI and Icons in our Todo application. Material UI helps to quickly style the application and beautify the components like form fields, buttons, modals grids etc. This will make out Firebase React todo application not only functional but also visually good.
So, let’s dive into the world of React Todo Firebase and start building our interactive, real-time Todo application.
How to Todo App in React using Firebase?
We will follow these quick steps to develop a Todo application in React js using Firebase services and hooks:
Step 1 – Create React App
Step 2 – Setup Firebase and Get an App Credential
Step 3 – Install Required Libraries
Step 4 – Firebase Config in Application
Step 5 – Create a TodoApp Component
Step 6 – Using Todo Component in App
Step 7 – Run the Application
Step 8 – Deploy Todo App to Firebase Hosting
Step 1 – Create React App
First, we’ll create a new React application using npx create-react-app command:
$ npx create-react-app react-firebase-materialui-todo-app
Move inside the React app
$ cd react-firebase-materialui-todo-app
Step 2 – Setup Firebase and Get an App Credential
Before creating the Nextjs application, let’s head towards the Firebase and create a new project and web application in it. If you already have one, just skip this step and jump to the next.
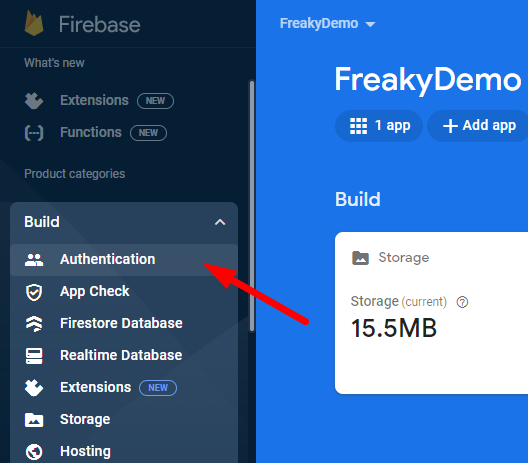
Create a Firebase project
Go to the Firebase console, then click on “Add project“, and follow the screen to fill in details about your project.

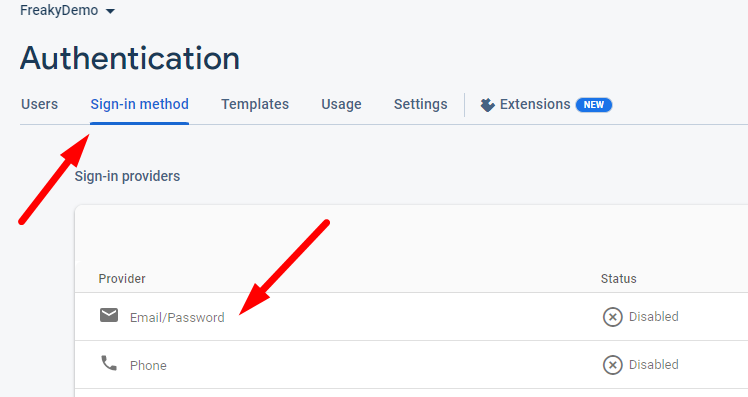
Enable the Authentication service
Next, click on your Firebase project, click on the “Authentication” tab in the left side nav and click on “Get Started”.
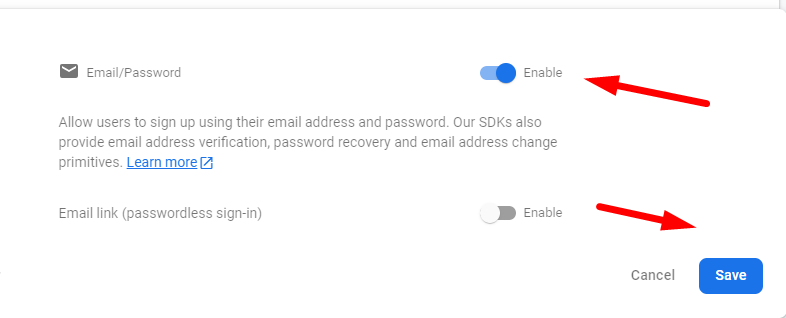
Here, you can enable the sign-in methods you want to use e.g., Email/Password that we will use in our app.
Get your Firebase project’s configuration details
In your project’s dashboard, click on the gear icon on the left side menu to open the “Project settings“.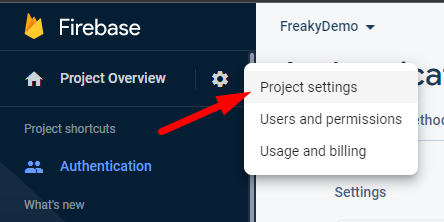
In the “Project settings” page, you’ll see a section called “Your apps“. If you haven’t added an app to your project yet, click on the “</>” button to add a web app.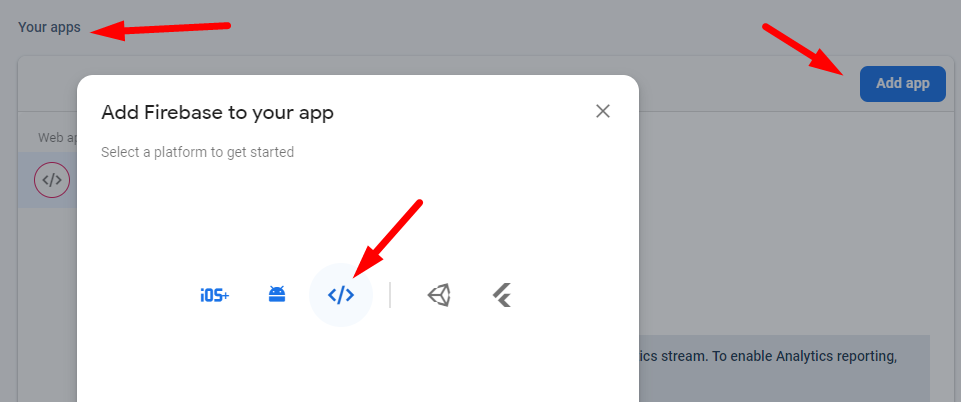
After adding a web app, you’ll see a code snippet that looks like this:
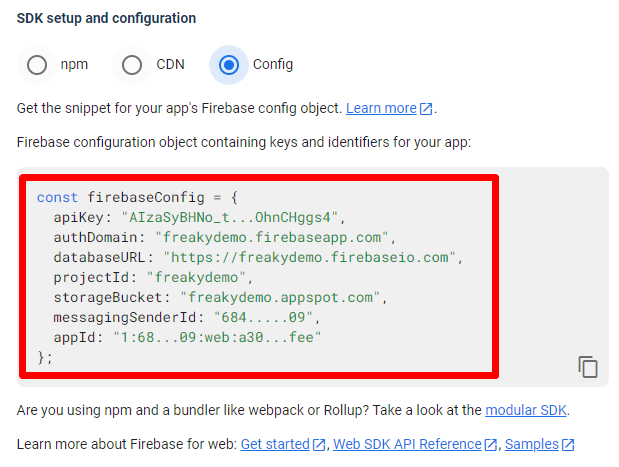
Keep these configuration values handy, which we will use in our Next js app’s auth configuration.
Step 3 – Install Required Libraries
Now, we need to install the necessary libraries for our project. Navigate to the project directory and run the following commands to install Firebase, Material UI and Material Icons. The Material UI library we used is optional. You can you any other UI library of your choice:
npm install firebase
npm install @material-ui/core
npm install @material-ui/icons
Step 4 – Firebase Config in Application
Create a new file in your src directory named firebase-config.js. In this file, paste the Firebase configuration which we fetched from the Firebase application we created in the previous step. Thereafter update the firebase-config.js file as follows:
//~src/firebase-config.js

import { initializeApp } from 'firebase/app';
import { getFirestore } from 'firebase/firestore';

const firebaseConfig = {
  apiKey: "AIzaSyB___Hggs4",
  authDomain: "freakydemo.firebaseapp.com",
  databaseURL: "https://freakydemo.firebaseio.com",
  projectId: "freakydemo",
  storageBucket: "freakydemo.appspot.com",
  messagingSenderId: "684___09",
  appId: "1:68___9:web:a30____ee",
};

const app = initializeApp(firebaseConfig);
const db = getFirestore(app);

export default db;
Step 5 – Create a TodoApp Component
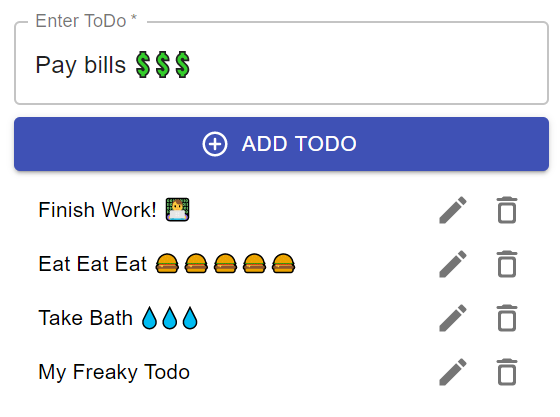
Next, we will create the TodoApp component, which is the core component that will interact with the Firebase database to Create, Delete, Edit or Read a list of Todos direct from the Firebase NoSQL database.
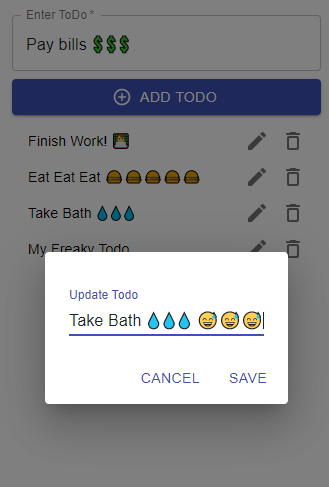
This component will have a form to add new todos and will display a list of todos with action buttons like Edit and Delete.
In the src directory, create a new file TodoApp.js and update it with the following code:
// ~src/TodoApp.js

import React, { useState, useEffect } from "react";
import {
  collection,
  addDoc,
  onSnapshot,
  deleteDoc,
  doc,
  updateDoc,
} from "firebase/firestore";
import db from "./firebase-config";
import {
  Button,
  TextField,
  List,
  ListItem,
  ListItemText,
  Dialog,
  DialogTitle,
  DialogContent,
  DialogActions,
  IconButton,
  ListItemSecondaryAction,
  Container,
} from "@material-ui/core";
import {
  AddCircleOutlineRounded,
  Edit,
  DeleteOutlineRounded,
} from "@material-ui/icons";
import "./TodoApp.css";

function TodoApp() {
  const [todos, setTodos] = useState([]);
  const [newTodo, setNewTodo] = useState("");
  const [open, setOpen] = useState(false);
  const [update, setUpdate] = useState("");
  const [toUpdateId, setToUpdateId] = useState("");

  useEffect(() => {
    const unsubscribe = onSnapshot(collection(db, "todos"), (snapshot) => {
      const todos = snapshot.docs.map((doc) => ({
        id: doc.id,
        ...doc.data(),
      }));
      setTodos(todos);
    });

    return () => {
      unsubscribe();
    };
  }, []);

  const addTodo = async (e) => {
    e.preventDefault();
    await addDoc(collection(db, "todos"), {
      title: newTodo,
      complete: false,
    });
    setNewTodo("");
  };

  const deleteTodo = async (id) => {
    await deleteDoc(doc(db, "todos", id));
  };

  const openUpdateDialog = (id, title) => {
    setOpen(true);
    setToUpdateId(id);
    setUpdate(title);
  };

  const updateTodo = async () => {
    await updateDoc(doc(db, "todos", toUpdateId), {
      title: update,
    });
    setOpen(false);
  };

  return (
    <Container maxWidth="sm" className="app-wrapper">
      <h3>React Firbase Todo App with Material UI - FreakyJolly</h3>
      <form noValidate>
        <TextField
          variant="outlined"
          margin="normal"
          required
          fullWidth
          id="todo"
          label="Enter Todo"
          name="todo"
          autoFocus
          value={newTodo}
          onChange={(e) => setNewTodo(e.target.value)}
        />

        <Button
          type="submit"
          variant="contained"
          color="primary"
          fullWidth
          onClick={addTodo}
          disabled={!newTodo}
          startIcon={<AddCircleOutlineRounded />}
        >
          Add Todo
        </Button>
      </form>

      <List dense={true}>
        {todos.map((todo, index) => (
          <ListItem key={index}>
            <ListItemText primary={todo.title} />

            <ListItemSecondaryAction>
              <IconButton
                edge="end"
                aria-label="Edit"
                onClick={() => openUpdateDialog(todo.id, todo.title)}
              >
                <Edit />
              </IconButton>
              <IconButton
                edge="end"
                aria-label="delete"
                onClick={() => deleteTodo(todo.id)}
              >
                <DeleteOutlineRounded />
              </IconButton>
            </ListItemSecondaryAction>
          </ListItem>
        ))}
      </List>

      <Dialog open={open} onClose={() => setOpen(false)}>
        <DialogTitle>Edit Todo</DialogTitle>
        <DialogContent>
          <TextField
            autoFocus
            margin="dense"
            label="Update Todo"
            fullWidth
            value={update}
            onChange={(e) => setUpdate(e.target.value)}
          />
        </DialogContent>
        <DialogActions>
          <Button onClick={() => setOpen(false)} color="primary">
            Cancel
          </Button>
          <Button onClick={updateTodo} color="primary">
            Update
          </Button>
        </DialogActions>
      </Dialog>
    </Container>
  );
}

export default TodoApp;
Step 6 – Using Todo Component in App
After creating the core Todo component, we will add it to the App component. The App component is the starting point of React js application by default.
Open the App.js file and update it with the following:
import './App.css';
import TodoApp from './TodoApp';

function App() {
  return (
    <div className="App">
      <TodoApp />
    </div>
  );
}

export default App;
Step 7 – Run the Application
You can now run your application by executing the following command in your project directory:
npm start

Step 8 – Deploy Todo App to Firebase Hosting
Now, we will have a look at quick steps to deploy our Todo application on the Firebase Hosting server, so that it will be available to view worldwide:
- First, we need to build our React app for production by executing below command:
npm run build
This will create a build directory with a production build of the app.
- Next, install the Firebase CLI:
npm install -g firebase-tools
- Once the Firebase CLI is installed, log in to your Firebase account:
firebase login
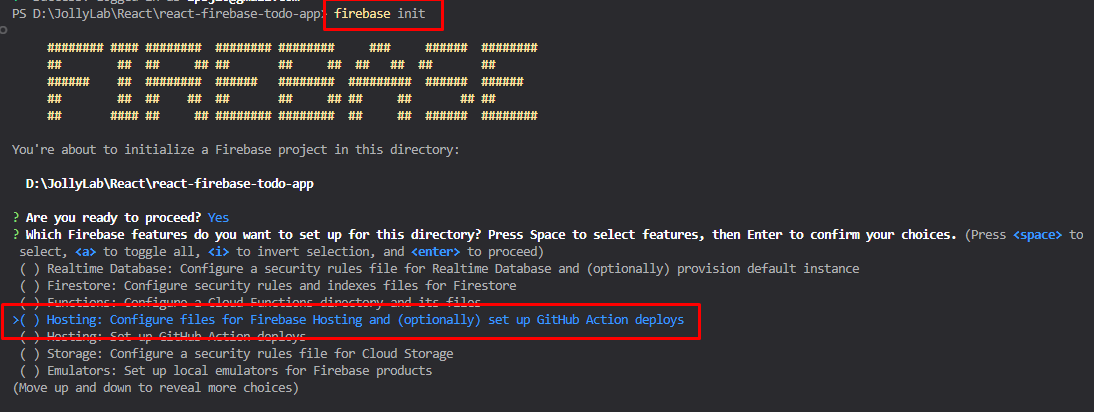
- After logging in, we need to initialize your project:
firebase init
- In the Firebase CLI, select the Hosting: Configure and deploy Firebase Hosting sites by hitting SPACEBAR then press Enter to proceed.
- Select the Firebase project and press Enter.
- When asked for your public directory, type build.
- Choose Yes for the following questions: Configure as a single-page app (rewrite all urls to /index.html)? and File build/index.html already exists. Overwrite?
- Now, you can deploy your app to Firebase by running the deploy command:
firebase deploy
- After the command runs successfully, you will be able to see a Hosting URL which will have your deployed app.
Conclusion
We have created a simple Todo application in React JS by using Firebase services like NoSQL database and additionally, we used the hosting service of Firebase to deploy the application on a live server.
In our Todo app, we discussed how to easily implement the CRUD operations to read the list, edit, delete and add new todo directly in Firebase DB.
Hope this will be helpful…