Today, we are going to learn How to add jQuery Data-tables and populate them with dynamic data in a Vue js application. You will get to know how to implement features like pagination, sorting, search-filter etc on dynamically populated data in data tables.
Datatables are used to represent the data in a tabular form. Tables are provided with features like sorting, pagination, edit, search etc that makes the viewability of large data sets a comfort for users.
Users can easily traverse the data rows even if the data is very huge in terms of total records. For added convenience, these rows can be easily selected by users based on calculated offset and landing on a specific page.
In this today’s session, we are going to implement the jQuery Datatable in the Vue js application. The jQuery Datatable is a reputed library that is widely used across multiple platform applications.
How to Implement jQuery Datatable in Vue App?
- Step 1 – Create Vue Application
- Step 2 – Install Datatable Libraries and Dependencies
- Step 3 – Create Datatable Component
- Step 4 – Serve Vue App
Create Vue Application
To create a new Vue app, you need to first install the Vue CLI command-line tool:
npm install -g @vue/cliAfterwards, hit the create command to start downloading a new Vue js application. You will be asked to choose a version either from 2 or 3. You can go for the latest version 3.
vue create vue-datatable-appNow, move inside the application root:
cd vue-datatable-appInstall Datatable Libraries and Dependencies
We will install the data tables, bootstrap and jQuery packages in the application project.
npm install jquery datatables.net-dt bootstrapCreate Datatable Component
After the installation of required packages, we’re ready to bundle all these components and create the datatable by fetching the dynamic data from a remote API.
We will create a new component file at this location ~src/components/datatable.component.vue and update it with the following code in it:
<template>
  <div>
    <h2>User Info jQuery DataTable in Vue Js</h2>
    <table id="datatable">
      <thead>
        <tr>
          <th>ID</th>
          <th>Name</th>
          <th>Username</th>
          <th>Email</th>
          <th>Phone</th>
          <th>Website</th>
        </tr>
      </thead>
      <tbody>
        <tr v-for="user in users" :key="user.id">
          <td>{{ user.id }}</td>
          <td>{{ user.name }}</td>
          <td>{{ user.username }}</td>
          <td>{{ user.email }}</td>
          <td>{{ user.phone }}</td>
          <td>{{ user.website }}</td>
        </tr>
      </tbody>
    </table>
  </div>
</template>

<script>
import "jquery/dist/jquery.min.js";
import "bootstrap/dist/css/bootstrap.min.css";
import "datatables.net-dt/js/dataTables.dataTables";
import "datatables.net-dt/css/jquery.dataTables.min.css";
import $ from "jquery";

export default {
  mounted() {
    fetch("https://jsonplaceholder.typicode.com/users")
      .then((response) => response.json())
      .then((data) => {
        this.users = data;
        setTimeout(() => {
          $("#datatable").DataTable({
            lengthMenu: [
              [5,10, 25, 50, -1],
              [5,10, 25, 50, "All"],
            ],
            pageLength: 5,
          });
        });
      });
  },
  data: function () {
    return {
      users: [],
    };
  },
};
</script>
Step 4 – Serve Vue App
Now, we will import the DatatableComponent in the App.vue file and update it as shown below:
<template>
  <div class="container">
    <DatatableComponent/>
  </div>
</template>

<script>
import DatatableComponent from './components/datatable.component.vue'

export default {
  name: 'App',
  components: {
    DatatableComponent
  }
}
</script>

<style>
  .container {
    max-width: 1000px;
  }
</style>
Serve Vue App
You are now ready to see the app in action. Head towards the terminal window and hit the following command:
npm run serveIt will start the deployment server and open your application super quickly at the following URL:
http://localhost:8080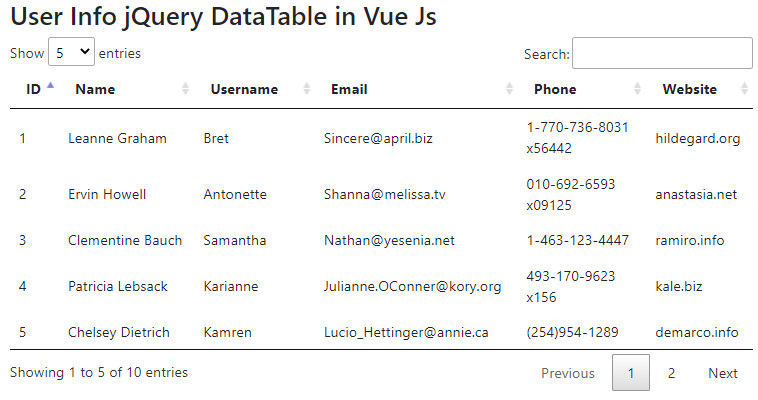
Conclusion
jQuery data tables are very tricky to be implemented in a single page application, but we discussed effectively add data tables by creating a separate component that can be easily used in any part of the application.
Adding jQuery Datatables in an application adds extra features which are already tried and tested at production eleven applications.