In this Angular tutorial, we’ll check 4 ways using which Angular 10/9/8/7/6/5/4 components in application with a relation like a parent or a child, non-relation components, and one to many components can communicate or pass data between them.
Components are the building blocks of an Angular application. Using components we break-down a complex application into multiple, reusable, minimally responsible components to make the application maintenance-friendly, testable, scalable, and more-performant.
4 Ways to Communicate Between Components
These components can communicate with each other in the following 5 ways:
- Parent to Child; Pass data from parent to child component using
@Inputdecorators and property binding. - Child to Parent; Using EventEmitter and passing data from child component to parent in the form of events with the help of
@Outputdecorators. - Use Child components methods and properties; The
@ViewChilddecorator can be used to access the child component’s public properties and methods. - One Component to Many or Other non-relational components by using RxJS
BehaviorSubjectandSubjectobservable services. - Browser Session Storage: We can also store data in the browser memory to access data access sessions in the persisted formats using
localStorageandsessionStorage.
Now let’s have a look at the above-mentioned methods to create a communication channel between components with some working examples.
1# Parent to Child Component
Data bound properties are passed from the parent component to its child components by using property binding. Any number or any type of values can be transferred from parent to child by assigning to a property.
To catch these property bound values from parent inside the child component, we use @Input() decorators which we are going to discuss.
Create a new ChildComponent inside the app folder by hitting below ng command:
$ ng generate component app/childInside the parent component which is AppComponent here, we’ll add the ChildComponent selector then add the [title]="'Make HTTP Calls'" property to it.
<!-- app.component.html -->
<div class="parent">
  <h1>App Component</h1>

  <app-child [title]="'Make HTTP Calls'"></app-child>
</div>
Here we’re passing a simple string value inside the ChildComponent using property binding.
To get this property value inside the ChildComponent, we need to import the Input decorator as shown below:
// child.component.ts
import { Component, Input, OnInit } from '@angular/core';

@Component({
  selector: 'app-child',
  templateUrl: './child.component.html',
  styleUrls: ['./child.component.scss']
})
export class ChildComponent implements OnInit {
  constructor() { }

  @Input() title: string;

  ngOnInit(): void {
  }
}
The @Input() decorator will have the string we passed from Parent. Now we can display this string value in the title variable to the Child template.
<!-- child.component.html -->
<div class="child">
    <h6>Child Component</h6>

    <h4>{{title}}</h4>
</div>
Add following CSS style
Style for AppComponent
// app.component.scss
.parent {
    background: #fdc1c1;
    border: 1px solid #ff9393;
    padding: 40px;
}
Style for ChildComponent
// child.component.scss
.child {
    background: #bbffbb;
    border: 1px solid #7aff7a;
    padding: 40px;
}
Now run the application by hitting $ ng serve --open to see it working

Passing Multiple Properties to Child Components
In the above section, we got to know how to pass data from parent to child.
Case: Now let’s take a real scenario in which we need to make some HTTP get calls inside the ChildComponent based on which property is changed.
So here we have the following tasks to achieve:
- Use Component Hook
ngOnChangesto detect the change in the properties passed. - Check which property is changed by using
SimpleChangesinterface to make an appropriate HTTP call.
Let’s make few changes in the AppComponents to trigger changes in the two more properties passes other then [title].
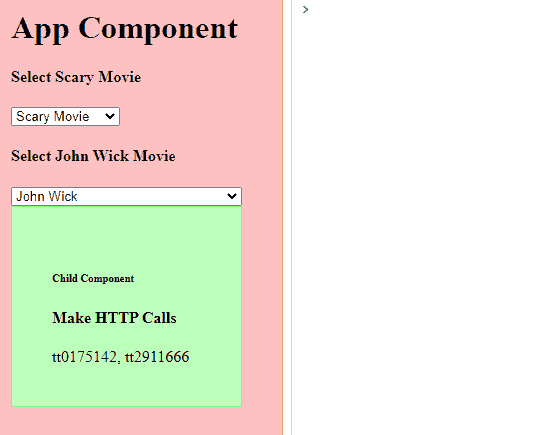
<!-- app.component.html -->
<div class="parent">

  <h1>App Component</h1>

  <h4>Select Scary Movie</h4>
  <select [(ngModel)]="scaryName">
    <option value="tt0175142">Scary Movie</option>
    <option value="tt0257106">Scary Movie 2</option>
    <option value="tt0306047">Scary Movie 3</option>
    <option value="tt0362120">Scary Movie 4</option>
    <option value="tt0795461">Scary Movie 5</option>
  </select>


  <h4>Select John Wick Movie</h4>
  <select [(ngModel)]="johnName">
    <option value="tt2911666">John Wick</option>
    <option value="tt4425200">John Wick: Chapter 2</option>
    <option value="tt6146586">John Wick: Chapter 3 - Parabellum</option>
  </select>


  <app-child [title]="'Make HTTP Calls'" [scaryMovies]="scaryName" [johnMovies]="johnName"></app-child>

</div>
There are also two select components to choose a value. These values are getting passed to child using property binding [scaryMovies] and [johnMovies].
Check Which Property is Changed using the SimpleChanges Interface.
Inside the ChildComponent, add the ngOnChanges hook which implements the SimpleChanges interface to get details of the property changed.
// child.component.ts
import { Component, Input, SimpleChanges } from '@angular/core';


@Component({
  selector: 'app-child',
  templateUrl: './child.component.html',
  styleUrls: ['./child.component.scss']
})
export class ChildComponent {

  constructor() { }

  @Input() title: string;
  @Input() scaryMovies: string;
  @Input() johnMovies: string;

  ngOnChanges(changes: SimpleChanges): void {

    if (changes.scaryMovies) {
      // MAKE HTTP CALL
      console.log('Get Scary Movie Details');
    }

    if (changes.johnMovies) {
      // MAKE HTTP CALL
      console.log('Get John Wick Movie Details');
    }
  }
}
Inside the ngOnChanges hook, there are conditional expressions to check which Input property is changed.
2# Pass Data from Child to Parent by Emitting Events
Child components can also pass data back to parent components in which they are getting used. The information from Child to Parent can be passed using triggers or events by emitting data to parents.
This is done by using a combination of @Output() decorator and EventEmitter() interface.
Case: Suppose we have 5 movie names on the child component, and we want to show the selected movie name on the parent component when the user clicks on it.
Configure Parent to Get Child Values
To start getting selected movie names from the child, let’s configure AppComponent. Add the event emitter output property (selectedMovie)="onMovieSelection($event)" where (selectedMovie) is connected with child and onMovieSelection is the parent’s local handler.
<!-- app.component.html -->
<div class="parent">
  <h1>App Component</h1>

  <h3>Selected Movie: {{selectedMovieName}}</h3>

  <app-child (selectedMovie)="onMovieSelection($event)"></app-child>
</div>
Now define the handler method and selectedMovieName variable in App class
// app.component.ts
import { Component } from '@angular/core';

@Component({
  selector: 'app-root',
  templateUrl: './app.component.html',
  styleUrls: ['./app.component.scss']
})
export class AppComponent {
  title = 'angular-component-communication-app';

  selectedMovieName: string;

  onMovieSelection(movie: string) {
    this.selectedMovieName = movie;
  }

}
Configure Child Component to Emit Values
Inside the Child component, define the @Output() decorator of type EventEmitter() and local method to emit() the local selected value to the parent.
// child.component.ts
import { Component, EventEmitter, Output } from '@angular/core';

@Component({
  selector: 'app-child',
  templateUrl: './child.component.html',
  styleUrls: ['./child.component.scss']
})
export class ChildComponent {

  selectedMatrixMovie: string;

  constructor() { }

  @Output() selectedMovie = new EventEmitter();

  SendSelectedMovie() {
    this.selectedMovie.emit(this.selectedMatrixMovie);
  }
}
Update the Child template to show a Select component with (change) handler
<!-- child.component.html -->
<div class="child">

    <h6>Child Component</h6>

    <h4>Select a Matrix Movie for Parent</h4>

    <select [(ngModel)]="selectedMatrixMovie" (change)="SendSelectedMovie()">
        <option value="The Matrix">The Matrix</option>
        <option value="The Matrix Revisited">The Matrix Revisited</option>
        <option value="The Matrix Reloaded">The Matrix Reloaded</option>
        <option value="The Matrix Revolutions">The Matrix Revolutions</option>
    </select>

</div>
The change event will emit the selected value to the parent component via the @Output() decorator.

3# Use @ViewChild() to getting Component Reference
The @ViewChild() decorator can be used to get the reference of a child component.
@ViewChild(ChildComponent) child_ref_component: ChildComponent;Case: We want to get the movie name assigned in the child component inside the parent component by referencing it.
Update the AppComponent with @ViewChild() decorator referencing to the ChildComponent.
// app.component.ts
import { Component, ViewChild } from '@angular/core';
import { ChildComponent } from './child/child.component';

@Component({
  selector: 'app-root',
  templateUrl: './app.component.html',
  styleUrls: ['./app.component.scss']
})
export class AppComponent {
  title = 'angular-component-communication-app';
  movieFromChild: string;

  @ViewChild(ChildComponent) child_ref_component: ChildComponent;

  constructor() {
    console.log(this.child_ref_component); // OUTPUT undefined
  }

  ngOnInit(): void {
    console.log(this.child_ref_component); // OUTPUT undefined
  }

  ngAfterViewInit(): void {
    console.log(this.child_ref_component.myFavoriteMovieInChild); // OUTPUT The Shawshank Redemption
    console.log(this.child_ref_component.getMovie()); // OUTPUT The Shawshank Redemption
  }
}
The important thing to be noted here is the reference to the ChildCompoennt will only be available inside the ngAfterViewInit() which is triggered when child components are initialized.
Another thing that should be fulfilled that the ChildComponent to be referenced must be a part of the parent component.
<!-- app.component.html -->
<div class="parent">

  <h1>App Component</h1>

  <app-child></app-child>

</div>
The child component is having a variable and a simple method
// child.component.ts
import { Component } from '@angular/core';

@Component({
  selector: 'app-child',
  templateUrl: './child.component.html',
  styleUrls: ['./child.component.scss']
})
export class ChildComponent {

  myFavoriteMovieInChild: string;

  constructor() {
    this.myFavoriteMovieInChild = "The Shawshank Redemption";
  }

  getMovie() {
    return this.myFavoriteMovieInChild;
  }
}
4# BehaviorSubject Service to Broadcast Data Between Non-relational Components
In such a case where we don’t have a direct relation between components, we can set up a communication channel via services. These reusable serves can have BehaviorSubject and Subject observable methods to easily broadcast data information of any type to one or more connected components.
BehaviourSubject will return the initial value or the current value on Subscription
Subject does not return the current value on Subscription. It triggers only on .next(value) call and return/output the value
Case: Adding a product in the cart and show the updated product count on the application’s navigation bar.
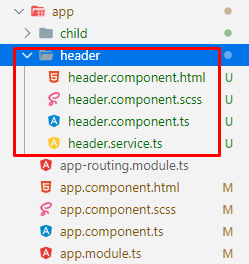
Here we’ll create a new component header and a service to use RxJS Subject. Run the following ng command to create.
Create a new Service
$ ng generate component header
$ ng generate service header/header
This will create a new HeaderComponent and HeaderService
Update HeaderService with Subject Class
In the HeaderService, we’ll add two Subject observables to handle Login/ Logout and Product Count
// header.service.ts
import { Injectable } from '@angular/core';
import { Subject } from 'rxjs';

@Injectable({
  providedIn: 'root'
})
export class HeaderService {

  setAuth = new Subject<{}>();
  setCount = new Subject<Number>();

  constructor() { }
}
Adding HeaderService in HeaderComponent and ChildComponent
We are going to send values from ChildComponent to HeaderComponent by importing the common HeaderService. These two components are not having any relation between them but still by using a common HeaderService we’ll emit values.
Update the HeaderComponet and Template HTML
// header.component.ts
import { Component, OnInit } from '@angular/core';
import { HeaderService } from './header.service';

@Component({
  selector: 'app-header',
  templateUrl: './header.component.html',
  styleUrls: ['./header.component.scss']
})
export class HeaderComponent implements OnInit {

  isLoggedIn: boolean;
  itemCount: number = 0;

  constructor(
    private headerService: HeaderService,
  ) { }

  ngOnInit(): void {
    // Set Login Status
    this.headerService.setAuth.subscribe((msg: any) => {
      this.isLoggedIn = msg.loginStatus;
    })

    // Set Product Count
    this.headerService.setCount.subscribe((msg: any) => {
      this.itemCount = (this.itemCount + (msg)) < 1 ? 0 : this.itemCount + (msg);
    })
  }

}
Here we have imported the HeaderService and subscribed to the Subject Observables. Whenever the value is updated by Service observable, it will be emitted by our subscription here.
Update the header.component.html file with following
<div class="header">

    <ng-container *ngIf="isLoggedIn; else elseTemplate">
        Welcome Admin!
    </ng-container>
    <ng-template #elseTemplate>
        Login
    </ng-template>

    Items in cart : {{itemCount}}

</div>
Update ChildComponent and Template HTML
In the ChildComponent we’ll import the same HeaderService and emit updated values to the Subject observables which will be caught by Subscription inside the Header class component.
// child.component.ts
import { Component } from '@angular/core';
import { HeaderService } from '../header/header.service';

@Component({
  selector: 'app-child',
  templateUrl: './child.component.html',
  styleUrls: ['./child.component.scss']
})
export class ChildComponent {


  constructor(
    private headerService: HeaderService
  ) { }

  login() {
    this.headerService.setAuth.next({ loginStatus: true });
  }

  logout() {
    this.headerService.setAuth.next({ loginStatus: false });
  }

  add() {
    this.headerService.setCount.next(1);
  }

  remove() {
    this.headerService.setCount.next(-1);
  }

}
Update the child.component.html file with the following code
<!-- child.component.html -->
<div class="child">

    <h6>Child Component</h6>

    <button (click)="login()">Login</button>
    <button (click)="logout()">Logout</button>

    <h4>Change Product Count</h4>
    <button (click)="add()">Add</button>
    <button (click)="remove()">Remove</button>


</div>
That’s it we have successfully implemented the Service to update the value inside the header component.

Conclusion
Finally, we are done with exploration and working examples to see how to communicate between components in the Angular project. We discussed @Input() and @Output() decorators to using which we can easily Pass data and Emit event from child to parent.
We also discuss the working example of BehaviorSubject using which we can pass data between non-relation components with the help of a common service.
Hope you enjoyed this tutorial. Do share your feedback and comments. Thanks for reading!
Stay safe!