How to validate an email address in the react js form; In this tutorial, you will learn how to validate the email address using the regex pattern in React application. We will use the regex pattern to validate the email address value in JavaScript.
What is ReGEX or Rational Expression?
The Regex is the short form of regular or rational expression string, it represents a combination of characters to filter on the string provided. The regex expression performs a search algorithm operation on the input value and returns the output based on validation.
A regex pattern is used to validate a string for its required format. it is mainly used to validate values like phone numbers, email addresses, website URLs etc.
Email Address Validation in React App
In this guide, you will learn how to validate the email address in React application. The input form fields will validate the value if it’s a valid email address or not.
We will create a reusable abstracted component to take an email address and return its validation status to the parent component.
Adding Email Address ReGEX Validation in React App
Step 1 – Create React App
Step 2 – Add Bootstrap (Optional)
Step 3 – Create Email Validation Component
Step 4 – Using Email Input in App.js
Step 5 – See in Action
Step 1 – Create React App
if you already have an app, skip this step. Else execute the below command to download and create a new react application.
npx create-react-app react-email-validation-appMove inside the application root
cd react-email-validation-appStep 2 – Add Bootstrap (Optional)
Adding bootstrap is optional. You can install it in your app by executing the below command:
npm install bootstrapNow, import the bootstrap.min.css file in the main App.js component:
import React from "react";
import "../node_modules/bootstrap/dist/css/bootstrap.min.css";
import "./App.css";

export default function App() {

  return (
    <div className="container">
      ...
    </div>
  );
}
Step 3 – Create Email Validation Component
Now, we will create a reusable Email Validation component, that will maintain an internal state as well as emit the validation status to the parent component via a prop callback function.
Head towards the src folder and create a new file named form-email.component.js with the final location as ~src/form-email.component.js with following code in it:
import React from "react";

class FormEmailComponent extends React.Component {
  constructor() {
    super();
    this.state = {
      email: "",
      isvalid: false,
      message: "",
    };
    this.onChange = this.onChange.bind(this);
  }

  onChange(e) {
    this.setState({
      email: e.target.value,
    });
  }

  emailValidation() {
    const regex =
      /^(([^<>()[\]\.,;:\s@\"]+(\.[^<>()[\]\.,;:\s@\"]+)*)|(\".+\"))@(([^<>()[\]\.,;:\s@\"]+\.)+[^<>()[\]\.,;:\s@\"]{2,})$/i;
    return !(!this.state.email || regex.test(this.state.email) === false);
  }

  onSubmit() {
    const isEmailValid = this.emailValidation();
    this.setState(
      {
        isvalid: isEmailValid,
        message: isEmailValid
          ? "Email Address is Valid!"
          : "Email Address not valid!",
      },
      () => this.props.onEmailSubmit(this.state)
    );

    // Check if email is valid
    if (this.state.isvalid) {
      console.log(this.state);
    }
  }

  render() {
    const messageTemplate = this.state.message ? (
      <div
        className={"alert alert-" + (this.state.isvalid ? "success" : "danger")}
        role="alert"
      >
        {this.state.message}
      </div>
    ) : (
      ""
    );

    return (
      <div className="child-component">
        <div className="form-group mb-3">
          <label>
            <strong>Email</strong>
          </label>
          <input
            type="email"
            name="email"
            value={this.state.email}
            onChange={this.onChange}
            className="form-control"
          />
        </div>

        <div className="d-grid">
          <button
            type="submit"
            className="btn btn-primary"
            onClick={() => this.onSubmit()}
          >
            Submit
          </button>
        </div>
        <br />
        {messageTemplate}
      </div>
    );
  }
}

export default FormEmailComponent;
The internal state is carrying email, isvalid and message variable to depict the input email control validation state.
The class component is having an emailValidation() function which is validating the email variable in the state and returning true or false after matching the string to the provided Regex patter.
The onChange() function is called when the input email control value is changed and updated the state’s email variable.
The onSubmit() function is doing heavy-load stuff, by updating the internal state and also passing back via props.onEmailSubmit() to the parent.
One thing to note is we’re using the callback of setState due to its asynchronous behaviour. if you skip such implementation, you will notice the parent is not getting the updated state
Step 4 – Using Email Input in App.js
Now, adding the FormEmailComponent in the App.js file and also passing the onEmailSubmit callback props to fetch child’s state.
Open App.js file and update it with the following code:
import React, { useEffect } from "react";
import { useState } from "react";
import "../node_modules/bootstrap/dist/css/bootstrap.min.css";
import "./App.css";
import FormEmailComponent from "./form-email.component";

export default function App() {
  const [emailstatus, setEmailstatus] = useState({});

  function onSubmit(res) {
    setEmailstatus(res);
  }

  useEffect(() => {
    console.log("From App.js ", emailstatus);
  }, [emailstatus]);

  return (
    <div className="container parent-component">
      <h1>Email Validation ReGEX in React @ FreakyJolly.com</h1>
      {JSON.stringify(emailstatus)}

      <FormEmailComponent onEmailSubmit={onSubmit} />
    </div>
  );
}
To reflect the updated state of the App component, we used useEffect hook, it will help to reflect the latest state. Otherwise, you won’t be able to see immediate changes in the state due to its asynchronous behaviour as we discussed earlier in the case of the class component as well.
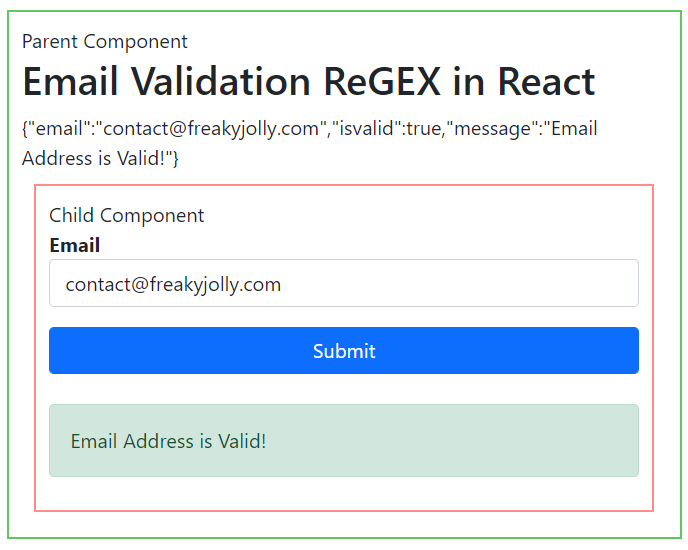
As a part of the Parent and Child border style, to make it more distinguishable, I added the following style in the App.css file. This one is optional stuff. Just added to make thing more clear at first glance 🙂
.parent-component{
  border: 2px solid #60c760;
  padding: 10px;
  margin:10px;
}
.parent-component::before{
  content: "Parent Component";
}

.child-component{
  border: 2px solid #ff8b8b;
  padding: 10px;
  margin:10px;
}
.child-component::before{
  content: "Child Component";
}
Step 5 – See in Action
Finally, you can run the application by hitting npm start to start the application at the following URL:
http://localhost:3000Check working demo @ StackBlitz here: