In this Angular Material tutorial, we’ll discuss how to create a dynamic list of Checkboxes control using Material UI and components in the Angular 12 project.
Checkbox control is used to allow a user to select or deselect a particular option provided. There can be a list of items from which a user can select on few or all items. A master checkbox can also be added over a huge list so that all items can be selected or deselected at once for convenience.
Other than a Checked, Unchecked or Disabled state, the Indeterminate state of the checkbox can also be applied using Material UI in Angular.
For creating Material UI checkboxes in the Angular project we add mat-checkbox component by importing the MatCheckboxModule API.
Let’s start creating a Material Checkbox list.
How to Add a Dynamic list of Material checkboxes in the Angular App?
Create a New Angular Application
Run the following ng command to create a new Angular project
$ ng new angular-material-checkbox-list
# ? Would you like to add Angular routing? No
# ? Which stylesheet format would you like to use? SCSS
Enter the project directory
$ cd angular-material-checkbox-listRun the application
$ ng serve --open
Install Material Package
After creating the Angular project, install the Material UI library by hitting the following ng command
$ ng add @angular/material
? Choose a prebuilt theme name, or "custom" for a custom theme: Indigo/Pink
? Set up global Angular Material typography styles? No
? Set up browser animations for Angular Material? Yes
Update App Module
To use Material Checkboxes in the Angular project, we need to import the required API modules. Also import FormsModule to use ngModel on form controls.
Open the app.module.ts file then import the MatCheckboxModule then add in the imports array:
// app.module.ts

import { BrowserModule } from '@angular/platform-browser';
import { NgModule } from '@angular/core';

import { AppComponent } from './app.component';
import { BrowserAnimationsModule } from '@angular/platform-browser/animations';

import { MatCheckboxModule } from '@angular/material/checkbox';
import { FormsModule } from '@angular/forms';


@NgModule({
  declarations: [
    AppComponent
  ],
  imports: [
    BrowserModule,
    BrowserAnimationsModule,
    FormsModule,

    MatCheckboxModule
  ],
  providers: [],
  bootstrap: [AppComponent]
})
export class AppModule { }
Adding Checkbox Control
A Material checkbox is created by adding the mat-checkbox component in the HTML template
<mat-checkbox>I am Checkbox</mat-checkbox>
Create a List of Checkboxes
For creating a list of checkboxes, we’ll add a collection object inside the component class named skill
skill: Skill = {
    name: 'All Skills',
    selected: false,
    disabled: false,
    subskills: [
      { name: 'HTML', selected: false, disabled: false },
      { name: 'CSS', selected: false, disabled: false },
      { name: 'JavaScript', selected: false, disabled: false }
    ]
};
Having this interface Skill type
interface Skill {
  name: string;
  selected: boolean;
  disabled: boolean;
  subskills?: Skill[];
}
Update the HTML template to have a master checkbox on top and a list of checkboxes to create dynamically using *ngFor Angular directive using subskills object.
<mat-checkbox>
    {{skill.name}}
  </mat-checkbox>

  <ul>
    <li *ngFor="let subskill of skill.subskills">
      <mat-checkbox>
        {{subskill.name}} = {{subskill.selected}}
      </mat-checkbox>
    </li>
  </ul>
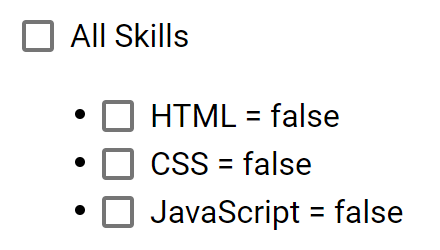
A simple not so functional list of checkboxes will be created:

Adding Properties and Event Handling on Checkbox List
To make out checkbox list with the master checkbox fully-functional, we need to add few properties and event handling methods.
The Master Checkbox
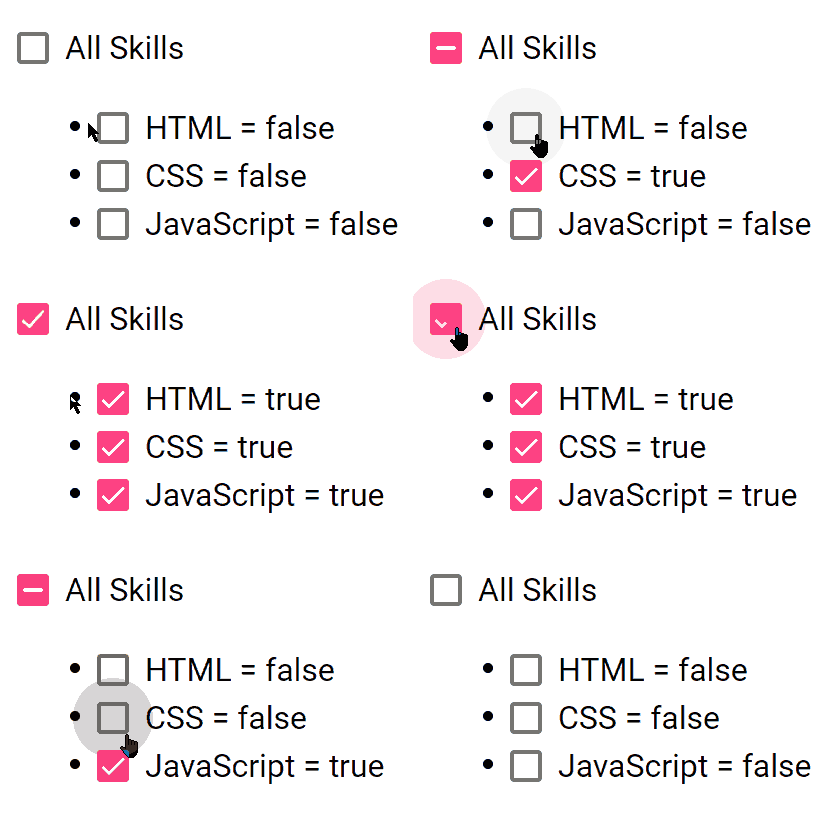
On the master checkbox, we need a boolean variable to handle the Checked and Indeterminate state to indicate if all or only a few items are checked.
The (change) event binding will update the list checkboxes state. So the master checkbox mat-checkbox will look like this:
<mat-checkbox
           [checked]="allChecked"
           [indeterminate]="isFewSelected()"
           (change)="setAll($event.checked)">
                    {{skill.name}}
 </mat-checkbox>
The isFewSelected() method returns a boolean after checking the status of items checked.
The List Checkboxes
The checkboxes on the list will have two-way binding using [(ngModel)] and (ngModelChange) event-handler triggered after the state of the checkbox model is changed.
<li *ngFor="let subskill of skill.subskills">
      <mat-checkbox
           [(ngModel)]="subskill.selected"
           (ngModelChange)="updateAllComplete()">
               {{subskill.name}} = {{subskill.selected}}
      </mat-checkbox>
</li>
Update Component Class with Methods and Variables
Now update the component class with isFewSelected(), setAll() and updateAllComplete() methods.
import { Component } from '@angular/core';

interface Skill {
  name: string;
  selected: boolean;
  disabled: boolean;
  subskills?: Skill[];
}

@Component({
  selector: 'app-root',
  templateUrl: './app.component.html',
  styleUrls: ['./app.component.scss']
})
export class AppComponent {
  title = 'angular-material-checkbox-list';

  allChecked: boolean = false;

  skill: Skill = {
    name: 'All Skills',
    selected: false,
    disabled: false,
    subskills: [
      { name: 'HTML', selected: false, disabled: false },
      { name: 'CSS', selected: false, disabled: false },
      { name: 'JavaScript', selected: false, disabled: false }
    ]
  };

  // Return true if selected items are less then total(allChecked) but more then 0
  isFewSelected(): boolean {
    return this.skill.subskills.filter(t => t.selected).length > 0 && !this.allChecked;
  }

  // Update Master and list checkboxes
  setAll(selected: boolean) {
    this.allChecked = selected;
    if (this.skill.subskills == null) {
      return;
    }
    this.skill.subskills.forEach(t => t.selected = selected);
  }

  // Check master checkbox if all items selected
  updateAllComplete() {
    this.allChecked = this.skill.subskills != null && this.skill.subskills.every(t => t.selected);
  }

}
Unable to Get Current Checkbox Model State using (change) Event
If we have [(ngModel)] on a checkbox control, then (change) event doesn’t reflect the current model state. In that case, (ngModelChange) event is used, which is triggered after the model state of checkbox control is updated.
That’s it now run the application by hitting $ ng serve --open to see it working
Conclusion
Finally, we’re done with the Checkbox list by using Material mat-checkbox control. Here we used the Indeterminate state of the checkbox to make out the list more interactive. There are many more properties available for the mat-checkbox component to make this control more flexible like labelPosition( Position of label text), ripple( Remove ripple effect) etc.


Leave a Reply