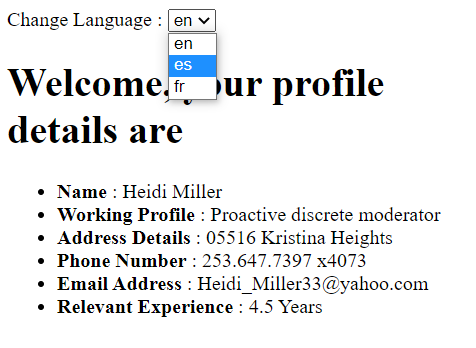
Integration of multiple language support in Angular application tutorial; In this tutorial, you will learn how to add the Internationalization or i18n in Angular app by utilizing the ngx-translate plugin.
Web application, having multilingual users, deploy internationalization aka i18n support in the application. Using which a web application switches to the native language by analysing the browser or system setting.
What is Internationalization or i18n?
Internationalization is used to support multiple languages in the application. That allows the same application to get translated into a specific language at a particular locale.
For an application, one of the most important things is to be user-friendly and easy to access. Adding internationalisation support makes the product reachable for multilingual users and helps in building native level trust.
Using Ngx Translate for Translation Support
We will be using a third-party plugin named ngx-translate, that will make the implementation super smooth and easy. Ngx Translate plugin is already being used extensively by a number of production-level applications. It is well supported to apply translation on static and dynamic data-driven Angular applications.
The Ngx Translate plugin provides methods in form of service, directive and pipe to load the textual data into any language.

How to Add Translation (i18n) in Angular Application?
We will be going through step by step tutorial, learn how to implement internationalization with examples and various use-cases.
- Step 1 – Create Angular App
- Step 2 – Install Ngx Translate and HTTP Loader Plugins
- Step 3 – Update App Module
- Step 4 – Setup Translation JSON Files
- Step 5 – Inject TranslateService in Component
- Step 6 – Update HTML with TranslatePipe and Language Switch
- Step 7 – Run Application
Step 1 – Create Angular Application
To begin with, create a new Angular application. Using Angular CLI is the easiest way to do it. Make sure you have installed the latest version by executing the below command:
npm install -g @angular/cliNow, run the following command to create a new application:
ng new angular-ngx-translate-demo-appMove into the application directory:
cd angular-ngx-translate-demo-appStep 2 – Install Ngx Translate and HTTP Loader Plugins
Next, install the ngx-translate core and http-loader plugins in the application:
npm install @ngx-translate/core --save
npm install @ngx-translate/http-loader --save
The core package provides the services, pipe and directives used to perform translation into various languages.
While the http-loader helps in loading the translation resource files either from the local assets folder or a remote webserver.
Step 3 – Update App Module
After installation of required packages, we need to import them into the App Module of our application.
Open the app.module.ts file and update it as shown:
import { BrowserModule } from '@angular/platform-browser';
import { NgModule } from '@angular/core';
import { AppComponent } from './app.component';

import { TranslateLoader, TranslateModule } from '@ngx-translate/core';
import { TranslateHttpLoader } from '@ngx-translate/http-loader';
import { HttpClient, HttpClientModule } from '@angular/common/http';

// Factory function required during AOT compilation
export function httpTranslateLoaderFactory(http: HttpClient) {
  return new TranslateHttpLoader(http);
}

@NgModule({
  declarations: [
    AppComponent
  ],
  imports: [
    BrowserModule,
    HttpClientModule,
    TranslateModule.forRoot({
      loader: {
        provide: TranslateLoader,
        useFactory: httpTranslateLoaderFactory,
        deps: [HttpClient]
      }
    })
  ],
  providers: [],
  bootstrap: [AppComponent]
})

export class AppModule { }
We have imported the TranslateModule as forRoot and providing the TranslateLoader as a Factory function httpTranslateLoaderFactory.
A factory function is required by AOT build stage. With that, we provided the dependencies required for our factory inside the deps array.
You can modify the factory function httpTranslateLoaderFactory to return a value from your own service loader that will implement the TranslateLoader interface.
Step 4 – Setup Translation JSON Files
Now, we will create the JSON files, having the key-value pairs for each language that we want to load in our application.
Ideally, we keep these translation files at ~src/assets/i18n/[lang].json folder location. Where the [lang] is the name of the language file to load its translation version.
For our application, the translation will be available in English, Spanish and French. So the i18n folder will be keeping the following JSON files into it.
You can check all i18n language codes on this page.
For English (en) the key-value pair JSON object in src/assets/i18n/en.json file.
{
    "TITLE": "Welcome, your profile details are",
    "USER_INFO":{
        "NAME":"Name",
        "WORKING_PROFILE":"Working Profile",
        "ADDRESS_DETAILS":"Address Details",
        "PHONE_NUMBER":"Phone Number",
        "EMAIL_ADDRESS":"Email Address",
        "RELEVANT_EXPERIENCE":"Relevant Experience"
    }
}
For Spanish (es) the key-value pair JSON object in src/assets/i18n/es.json file.
{
    "TITLE": "Bienvenido, los detalles de su perfil son",
    "USER_INFO":{
        "NAME":"Nombre",
        "WORKING_PROFILE":"Perfil de trabajo",
        "ADDRESS_DETAILS":"Detalles de dirección",
        "PHONE_NUMBER":"Número de teléfono",
        "EMAIL_ADDRESS":"Dirección de correo electrónico",
        "RELEVANT_EXPERIENCE":"Experiencia relevante"
    }
}
For French (fr) the key-value pair JSON object in src/assets/i18n/fr.json file.
{
    "TITLE": "Bienvenue, les détails de votre profil sont",
    "USER_INFO":{
        "NAME":"Nom",
        "WORKING_PROFILE":"Profil de travail",
        "ADDRESS_DETAILS":"Détails de l'adresse",
        "PHONE_NUMBER":"Numéro de téléphone",
        "EMAIL_ADDRESS":"Adresse e-mail",
        "RELEVANT_EXPERIENCE":"Expérience pertinente"
    }
}
Step 5 – Inject TranslateService in Component
Now, open the app.component.ts file to import the TranslateService and inject it in the component’s constructor.
import { Component } from '@angular/core';
import { TranslateService } from '@ngx-translate/core';

@Component({
  selector: 'app-root',
  templateUrl: './app.component.html',
  styleUrls: ['./app.component.css']
})
export class AppComponent {

  constructor(
    public translate: TranslateService
  ){
    // Register translation languages
    translate.addLangs(['en', 'es', 'fr']);
    // Set default language
    translate.setDefaultLang('en');
  }
}
The addLangs() method takes an array of language code, to register inside the service. These languages now will be available for translation.
The setDefaultLang() method is used to set a default out of available translation options.
Step 6 – Add Translation Switch to Change Language
In the AppComponent add the translateLanguageTo() method which in turn calling the use() method.
//Switch language
  translateLanguageTo(lang: string) {
    this.translate.use(lang);
  }
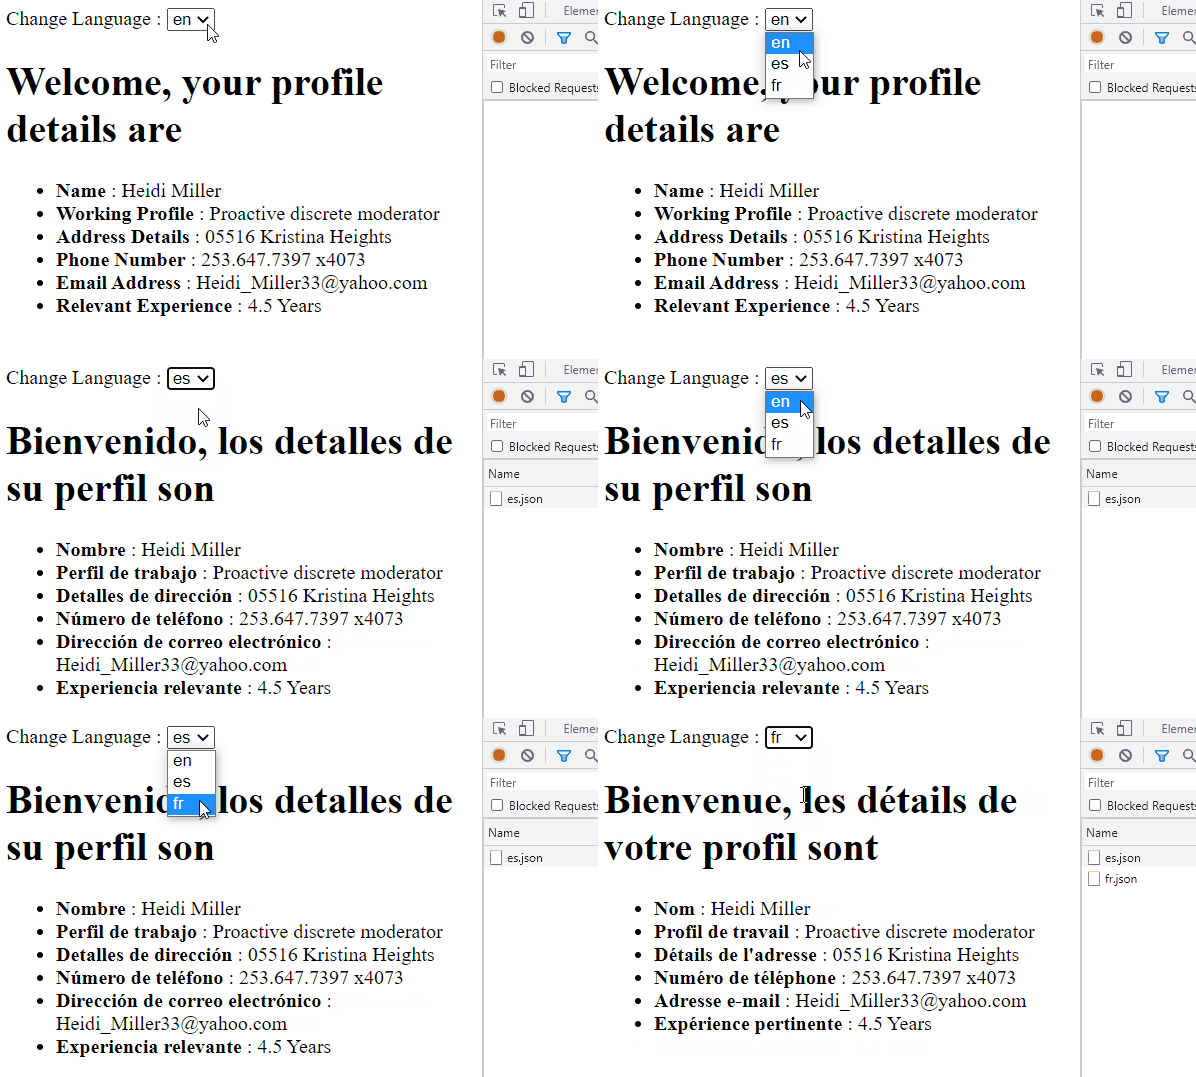
The TranslateService provides use() method, which takes language code. Calling this method loads the corresponding [lang].json file and update the language on the page without reloading the application.
We will call the translateLanguageTo() method on changing the language select box, that we will add in the next section.
Step 7 – Update HTML with Translate Pipe and Language Switch
The TranslateModule provides translate pipe, which can be added in the HTML template to translate the key provided.
For example, we have the TITLE key to display value in different languages. So in the HTML, we will add interpolation with translate pipe as follows:
<h1>{{'TITLE' | translate}}</h1>Even if properties are available in hierarchy then they will be used as follows:
<li> {{'USER_INFO.NAME' | translate}} : Heidi Miller </li>Now, open the app.component.html file and update it with the following code:
Change Language : <select #selLang (change)="translateLanguageTo(selLang.value)">
  <option *ngFor="let language of translate.getLangs()" [value]="language">{{ language }}</option>
</select>
<h1>{{'TITLE' | translate}}</h1>
  <ul>
    <li>
      <b>{{'USER_INFO.NAME' | translate}}</b> : Heidi Miller
    </li>
    <li>
      <b>{{'USER_INFO.WORKING_PROFILE' | translate}}</b> : Proactive discrete moderator
    </li>
    <li>
      <b>{{'USER_INFO.ADDRESS_DETAILS' | translate}}</b> : 05516 Kristina Heights
    </li>
    <li>
      <b>{{'USER_INFO.PHONE_NUMBER' | translate}}</b> : 253.647.7397 x4073
    </li>
    <li>
      <b>{{'USER_INFO.EMAIL_ADDRESS' | translate}}</b> : [email protected]
    </li>
    <li>
      <b>{{'USER_INFO.RELEVANT_EXPERIENCE' | translate}}</b> : 4.5 Years
    </li>
  </ul>
The selection is iterating over the registered language codes in the TranslateService. We can get those values by calling the getLangs() method.
On switching the language, its respective JSON file is loaded using the HTTP Get call under the hood to replace the textual interpolation information using the translate pipe.
Translate using Directive
In the above example, we used the translate pipe. But we can also use the [translate] directive takes the key name defined in the [lang].json file. One of the list items can be rendered using directive as shown below:
...
<li>
      <b translate="USER_INFO.ADDRESS_DETAILS"></b> : 05516 Kristina Heights
</li>
...
We have assigned the key to the translate directive above.
Translate using get() and instant() Service methods
Sometimes, we may need to get the translation done inside the component class itself. In that case, the TranslateService provides two useful methods.
The get() method is an asynchronous method that returns an Observable. It takes an array of key names to return their corresponding translated textual values as show below:
export class AppComponent {

  title!: string;
  emailId!: string;

  constructor(
    public translate: TranslateService
  ) {
    // Register translation languages
    translate.addLangs(['en', 'es', 'fr']);
    // Set default language
    translate.setDefaultLang('en');

    this.getTitleString();
  }

  getTitleString() {
    // asynchronous - gets translations then completes.
    this.translate.get(['TITLE', 'USER_INFO.EMAIL_ADDRESS'])
      .subscribe(translations => {
        this.title = translations['TITLE'];
        this.emailId = translations['USER_INFO.EMAIL_ADDRESS'];
      });
  }
}
The getTitleString() method is calling the get() method to return the translated values and assigning to title and emailId in-class itself.
The instant() method is used to get translation synchronously. The get() method is preferred over instant() due to its synchronous blocking nature. it works well on loaded translation files.
How to render Interpolation in JSON key-value file?
Suppose, in the [lang].json file, we changed the "title" property to take a dynamic value as shown below:
{
    "TITLE": "Welcome {{loggedInUser}}, your profile details are",
   ...
}
Now, we need to display the value of loggedInUser merged with value. You can provide a variable besides the translate pipe.
<h1>{{'TITLE' | translate: user}}</h1>In the class component, assign the value to the user variable as shown below:
export class AppComponent {
  user!: { loggedInUser: string };

  ....

  ngOnInit(): void {
    this.user = { loggedInUser: 'John Steve'}; // Defining static value for demo
  }
}
In this case, the string rendered in the Title will have loggedInUser value as well.
Step 8 – Run Application
Now, serve the application to see the translation feature in action. Execute the following command to run the application and open it in the default browser:
npm serve –open
It will open the application at following URL:
http://localhost:4200
Summery
Finally, we have completed the implementation of the internationalization or i18n feature in the Angular application. To easily and quickly add the translate feature we used the Ngx Translate library plugin. Which provides easy to configure and maintain API service methods.
Firstly, we created the JSON files with translation key-value pairs, which are used to swape the selected language on the go. After that, we registered the languages we want in our application to translate.
Furthermore, we added a use-friendly select box using which a user can easily switch the translation version of the application.
Hope you enjoyed the tutorial, feel free to reach out with your feedback and suggestions… Thanks…


Leave a Reply