In this tutorial, you will learn how to quickly integrate Stripe checkout payment gateway in Angular application through an example tutorial. We will discuss various configurations and methods to add one of the most popular payment gateways into your app.
Thinking about adding a payment gateway, seems a cumbersome job. But integrating the reputed and reliable payment gateway like Stripe is very easy and straightforward into the Angular application.
Having a payment solution is very common these days when everything is available to buy online. Stripe is a financial oriented service provider, which allows different types of payment solutions around the globe.
Let’s go ahead and start the integration of Stripe payment gateways in our Angular app.
How to Integrate Stripe Payment Gateway in Angular?
Follow these quick steps to add Stripe to the Angular app.
- Step 1 – Setup Angular Application
- Step 2 – Fetch Stripe API Public Key
- Step 3 – Update Component Class
- Step 4 – Update Template HTML File
- Step 5 – Run Application
Step 1 – Setup Angular Application
To begin with, let’s set up a new Angular application. Open the terminal window and execute the following ng command. Make sure you have Angular CLI installed.
$ ng new angualr-stripe-payment-appMove inside the application directory
$ cd angualr-stripe-payment-appStep 2 – Fetch Stripe API Public Key
Before starting the Stripe integration, you need to have a public stripe key. After that we can continue the integration part.
Let’s follow these steps to get Strip keys:
- Visit the Stripe portal.
- Create a Stripe developer account, then log in.
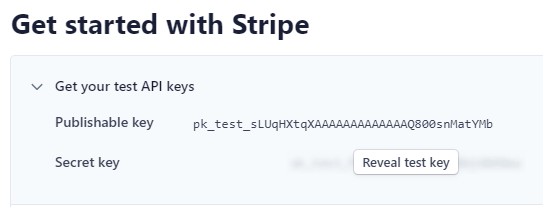
- On Dashboard, click on the “Get your test API keys” and copy the Publishable key
Step 3 – Update Component Class
Now, open the app.component.ts file and update the class as shown below:
import { Component } from '@angular/core';

@Component({
  selector: 'app-root',
  templateUrl: './app.component.html',
  styleUrls: ['./app.component.css']
})

export class AppComponent {

  paymentHandler:any = null;

  constructor() { }

  ngOnInit() {
    this.invokeStripe();
  }

  initializePayment(amount: number) {
    const paymentHandler = (<any>window).StripeCheckout.configure({
      key: 'pk_test_sLUqHXtqXOkwSdPosC8ZikQ800snMatYMb',
      locale: 'auto',
      token: function (stripeToken: any) {
        console.log({stripeToken})
        alert('Stripe token generated!');
      }
    });

    paymentHandler.open({
      name: 'FreakyJolly',
      description: 'Buying a Hot Coffee',
      amount: amount * 100
    });
  }

  invokeStripe() {
    if(!window.document.getElementById('stripe-script')) {
      const script = window.document.createElement("script");
      script.id = "stripe-script";
      script.type = "text/javascript";
      script.src = "https://checkout.stripe.com/checkout.js";
      script.onload = () => {
        this.paymentHandler = (<any>window).StripeCheckout.configure({
          key: 'pk_test_sLUqHXtqXOkwSdPosC8ZikQ800snMatYMb',
          locale: 'auto',
          token: function (stripeToken: any) {
            console.log(stripeToken)
            alert('Payment has been successfull!');
          }
        });
      }
      window.document.body.appendChild(script);
    }
  }

}
Step 4 – Update Template HTML File
Next, update the HTML template with payment controls. Open the app.component.html file and update it with the following template HTML.
<div>
  <h2>Angular Stripe Checkout Page</h2>

  <div>
    <button (click)="initializePayment(2)" >Paymant of $2</button>
  </div>
  <div>
    <button (click)="initializePayment(25)" >Payment $25</button>
  </div>
  <div>
    <button (click)="initializePayment(35)" >Payment of $35</button>
  </div>
</div>
Step 5 – Run Application
Thereafter implementing the above changes, test the Stripe payment gateway. Run the application by hitting the below command:
$ ng serve --open --ssl trueThe --ssl true will open the app on a secure URL. If asked you can allow the app to open at the following URL:
https://localhost:4200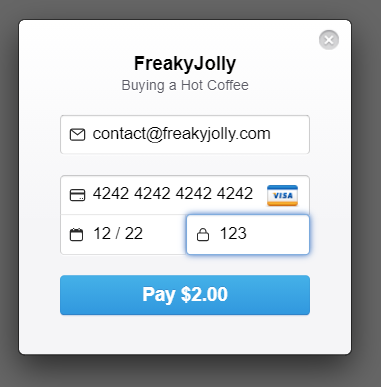
Step 6 – Test Card Data
You can try adding the following test card numbers provided by Stripe for development purposes.
4242424242424242: Succeeds and immediately processes the payment.
4000000000009995: Always fails with a decline code of insufficient_funds.
4000002500003155: Requires authentication, which in this integration will fail with a decline code of authentication_not_handled.
CVV: Any 3 digit number
Date: Any future date.
Conclusion
We have successfully integrated the Stripe Checkout Payment gateway in the Angular application in quick steps.