File upload example using FormData in React application; In this guide, you will get to know how to select single or multiple files in HTML 5 React form then upload it using the PHP backend server. The file upload component in React will create formData and send it to the backend using POST call.
In React application, we usually use HTML native controls. To select and upload the selected file, we will assign the file object to a FormData. After that, the payload will be sent to the PHP backend using the HTTP Post call. To enable the HTTP communication from React app to the server we will utilize the Axios library package.
To save the uploaded files of the file system, we will use the PHP service at the backend. A FormData object with multiple selected files will be sent to the PHP server file. Each file in the form object will be parsed using the For loop, then each file will be renamed with the random file name and saved into a defined directory path. For our example application, you can upload any type of file.
How to Upload Single/ Multiple Files in React App Using PHP?
Walkthrough the following step by step tutorial on uploading the file to a folder using the PHP backend in React app:
- Step 1 – Setup React Application
- Step 2 – Install Axios and Bootstrap Packages
- Step 3 – Create File Upload Component in React App
- Step 4 – Setup PHP Backend Server File
- Step 5 – Import File Upload Component in App.js
- Step 6 – Run React App and PHP Server
Step 1 – Setup React Application
To begin, create a new react application by executing the following command in the terminal window:
npx create-react-app react-fileupload-appThereafter, move inside the application directory:
cd react-fileupload-appStep 2 – Install Axios and Bootstrap Packages
Next, install Axios to enable HTTP calls and Bootstrap to provide styling to our form. Execute the following npm command to install both packages.
npm install axios --save
npm install bootstrap --save
Step 3 – Create File Upload Component in React App
Now, head towards the src folder and create a new file named fileuploader.component.js in it. This file will have our reusable File Uploader Component that will have the following content in it:
import React from "react";
import axios from "axios";
class FileUploader extends React.Component {
constructor() {
super();
this.state = {
selectedFile: "",
responseArray: [],
};
this.handleInputChange = this.handleInputChange.bind(this);
}
handleInputChange(event) {
this.setState({
selectedFile: event.target.files,
responseArray:[]
});
}
onSubmit() {
if (!this.state.selectedFile) {
alert("Please select a file!");
return false;
}
const data = new FormData();
for (let i = 0; i < this.state.selectedFile.length; i++) {
data.append("file[]", this.state.selectedFile[i]);
}
let url = "http://127.0.0.1:8080/upload.php";
axios
.post(url, data, {
// receive two parameter endpoint url ,form data
})
.then((res) => {
// then print response status
this.setState({ responseArray: res.data });
this.resetFile();
},error=>{
alert(error);
});
}
resetFile() {
// Reset file input control
document.getElementsByName("file")[0].value = null;
}
render() {
return (
<div className="row">
<div className="col-md-12">
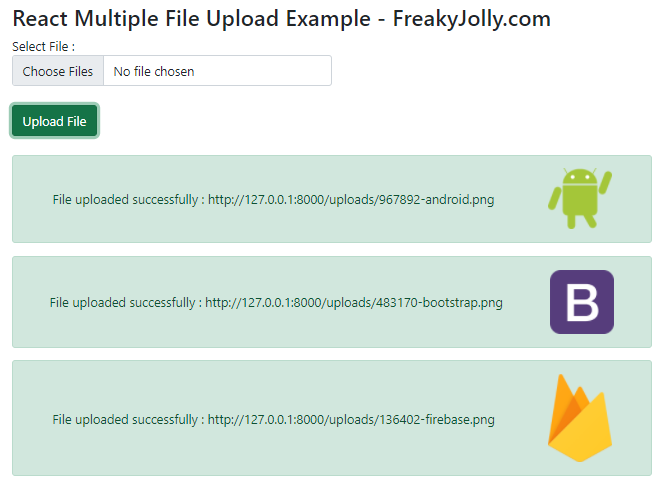
<h3>React Multiple File Upload Example - FreakyJolly.com</h3>
<div className="form-row">
<div className="form-group col-md-6">
<label>Select File :</label>
<input
type="file"
className="form-control"
multiple
name="file"
onChange={this.handleInputChange}
/>
</div>
</div>
<br />
<div className="form-row">
<div className="col-md-6">
<button
type="submit"
className="btn btn-success"
onClick={() => this.onSubmit()}
>
Upload File
</button>
</div>
</div>
<br />
{this.state.responseArray.map((res, i) => (
<div key={i}>
<div className={'img-alert alert alert-'+res.status}>
<div>{res.message} : {res.url}</div>
<img src={res.base64} />
</div>
</div>
))}
</div>
</div>
);
}
}
export default FileUploader;The selectedFile state will update the selected files object by calling the handleInputChange() method.
The onSubmit() method will loop over the selected files and append each file to the file[] array. Each file will be appended to the object as FormData and post the payload to the specified URL.
After the file is uploaded the resetFile() method will reset the HTML file control.
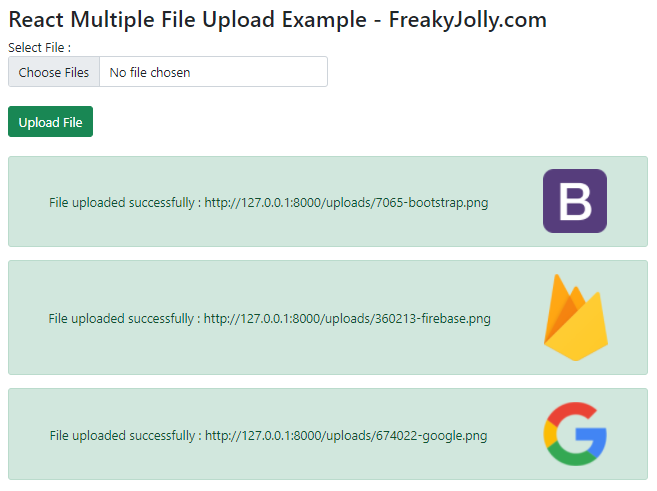
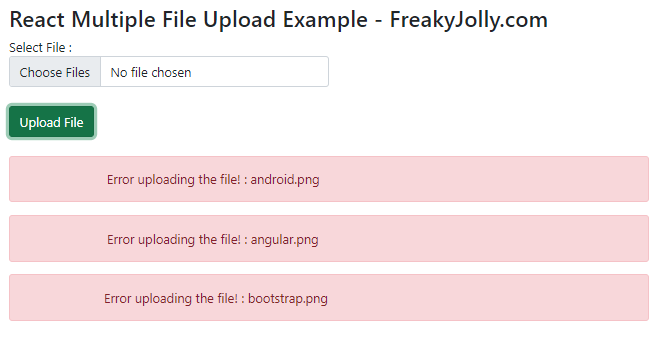
We will receive the response as an array, and display the status of each selected file using the Bootstrap alert box. The success and error messages will be displayed accordingly.
Step 4 – Setup PHP Backend Server File
After creating the FileUploader component, create a new PHP file to handle and save the file received. The PHP file will get multiple files as FormData from React Javascript HTML form and loop over each file to save them and record its status in a PHP array.
The uploaded file is getting converted into a Base64 string in the PHP, which will be sent back to the client-side to display in the status alert.
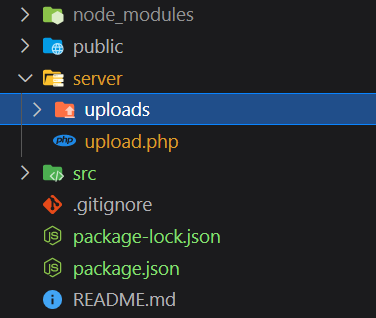
Create the server/uploads folder at the application root to keep the uploaded files. Also, create a file named upload.php inside the server folder to handle the uploaded files and save them inside the uploads folder.
After creating folders and PHP files, the directory structure will look like this:
Now. open the server/upload.php file and update it with the following code:
<?php
header('Content-Type: application/json; charset=utf-8');
header("Access-Control-Allow-Origin: *");
header("Access-Control-Allow-Methods: PUT, GET, POST");

$response = array();
$upload_dir = 'uploads/';
$server_url = 'http://127.0.0.1:8000';

if($_FILES['file'])
{
    $count = count($_FILES['file']['name']);
    for ($i = 0; $i < $count; $i++) {

        $file_name = $_FILES["file"]["name"][$i];
        $file_tmp_name = $_FILES["file"]["tmp_name"][$i];
        $error = $_FILES["file"]["error"][$i];

        if($error > 0){
            array_push($response,array(
                "status" => "error",
                "error" => true,
                "message" => "Error uploading the file!"
            ));
        }else
        {
            $random_name = rand(1000,1000000)."-".$file_name;
            $upload_name = $upload_dir.strtolower($random_name);
            $upload_name = preg_replace('/\s+/', '-', $upload_name);

            if(move_uploaded_file($file_tmp_name , $upload_name)) {

                // Convert uploaded file into Base64
                $path = './'.$upload_name;
                $type = pathinfo($path, PATHINFO_EXTENSION);
                $data = file_get_contents($path);
                $base64URL = 'data:image/' . $type . ';base64,' . base64_encode($data);

                  array_push($response,array(
                    "status" => "success",
                    "error" => false,
                    "message" => "File uploaded successfully",
                    "url" => $server_url."/".$upload_name,
                    "base64" => $base64URL,
                    "total" => $count
                  ));
            }else
            {
                array_push($response,array(
                    "status" => "danger",
                    "error" => true,
                    "url" =>  $file_name,
                    "message" => "Error uploading the file!"
                ));
            }
        }
    }

}else{
    $response = array(
        "status" => "error",
        "error" => true,
        "message" => print_r($_FILES['file'])
    );
}

echo json_encode($response);
?>
We are looping over the files object using a for a loop. The PHP Array is maintaining the status of each file for success or error. Then send back the array to the client display each status their.
Step 5 – Import File Upload Component in App.js
In this step, we will import the FileUploader component into the App.js file as shown below:
import React, { Component } from "react";
import "./App.css";
import "../node_modules/bootstrap/dist/css/bootstrap.min.css";
import FileUploader from "./fileuploader.component";

class App extends Component {
  render() {
    return (
      <div className="App">
        <FileUploader />
      </div>
    );
  }
}
export default App;
Step 6 – Run React App and PHP Server
We are done with implementation stuff, finally, run the React front-end application and PHP backend server as directed below:
Run React Application:
Execute the following command in the terminal to start and run the React app:
npm startit will open the react app at the following URL:
http://localhost:3000
Run PHP Backend Service
Open the new terminal window, and execute the following PHP command to run the server:
php -S 127.0.0.1:8080It will run the server at the following url:
http://127.0.0.1:8080
Conclusion
We have completed the tutorial on how to upload any file to the folder in React app using PHP backend. We demonstrated how to add a native HTML form and POST the selected file object as FormData. Similarly, you can modify to upload multiple files and parse all the files at the PHP server and save them together in the folder. In the next tutorial, I will demonstrate a multiple file upload tutorial.