In this React Native tutorial, you will learn how to create code confirmation fields when users can enter the OTP or verification number codes or Alfabets to proceed with the verification using the react-native-confirmation-code-field package module.
The Conformation or Verification boxes field is used in various applications where the application can get the user’s phone number or email address and send some verification information like code or OTP in SMS or emails. Then users are requested to enter that information which is then confirmed for verification.
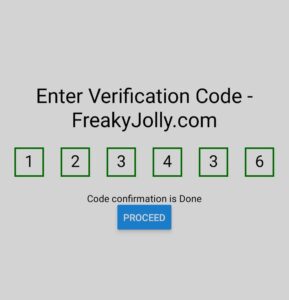
In our example React native tutorial, we will create a similar verification field where the user will enter the numbers, after all the values are entered, all the boxes will turn green and show a message with a proceed button.
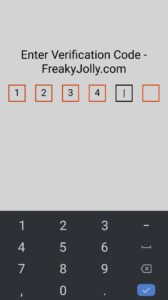
Moreover, a user can also delete the values or enter new information from the keypad itself. To achieve this functionality, we will use the react-native-confirmation-code-field package in our application.
How to Create Confirmation Code Field in React Native?
Here’s a step-by-step guide on how to set up a React Native application with a confirmation code field:
Step 1: Setting up the React Native project
Step 2: Installing the Packages
Step 3: Creating Confirmation Code Field
Step 4: Running the app
Step 5: Testing the app
Step 1: Setting up the React Native project
Before creating a new React Native app, make sure you have installed the Expo CLI on your system and Expo Go for your Android testing.
npm install -g expo-cliThereafter, let’s create a new React Native project using Expo CLI. Open your terminal and run the following command:
expo init ConfirmationCodeApp
It will ask you to choose a template for your project, you can just select the blank template for this tutorial, then navigate into your new project’s directory:
cd ConfirmationCodeApp
Step 2: Installing the Packages
For this tutorial, we’ll use the react-native-confirmation-code-field package. You can install it using npm:
npm install react-native-confirmation-code-field
Step 3: Creating Confirmation Code Field
Now, let’s create a confirmation code field in our app. Open your project in your code editor and navigate to App.js. Replace the existing code with the following:
import React from "react";
import { SafeAreaView, StyleSheet, Text, Button, View } from "react-native";
import {
  CodeField,
  Cursor,
  useBlurOnFulfill,
  useClearByFocusCell,
} from "react-native-confirmation-code-field";

const CELL_COUNT = 6;

const App = () => {
  const [value, setValue] = React.useState("");
  const [isFull, setIsFull] = React.useState(false);
  const ref = useBlurOnFulfill({ value, cellCount: CELL_COUNT, setIsFull });
  const [props, getCellOnLayoutHandler] = useClearByFocusCell({
    value,
    setValue,
  });

  const handleFulfill = (code) => {
    if (code.length === CELL_COUNT) {
      setIsFull(true);
    }
  };

  return (
    <SafeAreaView style={styles.root}>
      <Text style={styles.title}>
        Enter Verification Code - FreakyJolly.com
      </Text>
      <CodeField
        ref={ref}
        {...props}
        value={value}
        onChangeText={(code) => {
          setValue(code);
          handleFulfill(code);
        }}
        cellCount={CELL_COUNT}
        rootStyle={styles.codeFiledRoot}
        keyboardType="number-pad"
        textContentType="oneTimeCode"
        renderCell={({ index, symbol, isFocused }) => (
          <Text
            key={index}
            style={[
              styles.cell,
              isFocused && styles.focusCell,
              isFull && styles.full,
            ]}
            onLayout={getCellOnLayoutHandler(index)}
          >
            {symbol || (isFocused ? <Cursor /> : null)}
          </Text>
        )}
      />
      {isFull && (
        <View style={styles.fullMessage}>
          <Text>Code confirmation is Done</Text>
          <Button title="Proceed" onPress={() => console.log("Proceed")} />
        </View>
      )}
    </SafeAreaView>
  );
};

const styles = StyleSheet.create({
  root: {
    flex: 1,
    padding: 20,
    justifyContent: "center",
  },
  title: { textAlign: "center", fontSize: 30 },
  codeFiledRoot: { marginTop: 20 },
  cell: {
    width: 40,
    height: 40,
    lineHeight: 38,
    fontSize: 24,
    borderWidth: 2,
    borderColor: "#FF4C00",
    textAlign: "center",
  },
  focusCell: {
    borderColor: "#000",
  },
  full: {
    borderColor: "green",
  },
  fullMessage: {
    marginTop: 20,
    alignItems: "center",
  },
});

export default App;
Above code will create a confirmation code field to enter the values. After all the values are entered by the user, all the box color will turn green and a message will showing with the proceed button.
Step 4: Running the app
Finally, you can run your app to see the confirmation code field in action. In your terminal, run the following command:
expo start
This will start a development server for you and print a QR code in your terminal.
Step 5: Testing the app
To test the app, you need to download the Expo client app installed on your iOS or Android phone. Once it is installed, open and scan the QR code printed by expo start.
You should now see your app running on your device! Try typing in the confirmation code field to see how it works.
Conclusion
In this tutorial, we have created a simple React Native app with a confirmation code field. This is a basic example, but you can customize the field for your needs by using the different props and methods provided by the react-native-confirmation-code-field package. You can check more information about these in the package’s documentation. Hope this helps as a kickstart feature.