Material UI Datatbales in React application with custom pagination styling tutorial; In this guide, you will learn how to implement material styled datatable in React application by using a popular npm package named mui-datatables.
MUI Datatables provides a lot of features including filter row data, resizable and draggable columns, export, printing, rows selection, expand-collapse rows, soring etc. Moreover, we can easily customise the UI style and have three responsive modes.
Firstly, we will go through a step-by-step tutorial on adding datatable in React application. Secondly, will discuss how to perform various customization including pagination, columns, filter, CSS styles and how to handle the available events.
Let’s get started!
How to Add MUI Datatable in React Application?
Step 1 – Create React Application
Step 2 – Install MUI Datatable Package
Step 3 – Adding Simple MUI Datatable in App.js
Step 4 – Run React Application
Step 1 – Create React Application
To start, let’s create a new React Js application. Execute the following command in the terminal window:
npx create-react-app react-mui-datatable-appThen, move inside the application directory:
cd react-mui-datatable-appStep 2 – Install MUI Datatable Package
Now, we will install the MUI Datatable package in the react application. Execute the following npm command at application root:
npm install mui-datatables --saveStep 3 – Adding Simple MUI Datatable in App.js
To create the MUI Datatable, open the App.js file then import the MUIDataTable component.
import React, { Component } from "react";
import "./App.css";
import MUIDataTable from "mui-datatables";

class App extends Component {
  render() {
    const columns = ["Name", "Company", "City", "State"];

    const data = [
      ["Joe James", "Test Corp", "Yonkers", "NY"],
      ["John Walsh", "Test Corp", "Hartford", "CT"],
      ["Bob Herm", "Test Corp", "Tampa", "FL"],
      ["James Houston", "Test Corp", "Dallas", "TX"],
    ];

    const options = {
      filterType: "checkbox",
    };

    return (
      <div className="App wrapper">
        <h4>React MUI Datatable - FreakyJolly.com</h4>

        <MUIDataTable
          title={"Employee List"}
          data={data}
          columns={columns}
          options={options}
        />
      </div>
    );
  }
}
export default App;
The MUIDataTable have the following props to populate datatable items.
- title: Title used to caption table
- columns: Columns used to describe a table. Must be either an array of simple strings or objects describing a column
- data: Data used to describe a table. Must be either an array containing objects of key/value pairs with values that are strings or numbers, or arrays of strings or numbers.
- options: Options used to describe table
- components: Custom components used to render the table.
Step 4 – Run React Application
To see the simple implementation of MUI Datatable, you can now run the application by executing below command:
npm startIt will start the webserver and open the react application at following URL:
http://localhost:3000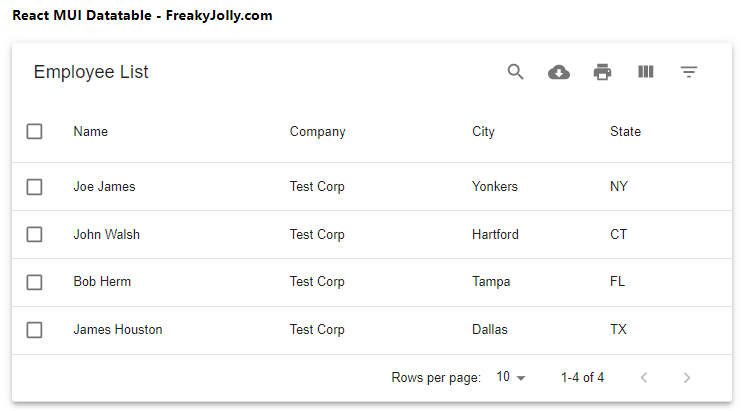
How to Customise MUI Datatable Pagination?
After creating the simple MUI datatable, next, we will look into more details on how to customise the pagination of the table.
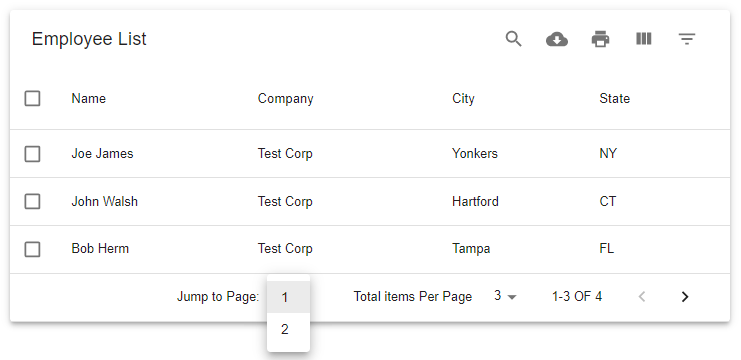
Change Pagination Labels and Event handling
You can easily customise the labels of pagination by adding the options.textLabels.pagination properties. Similarly we can add the onChnagePage and onChnageRowsPerPage event handlers to the options object as shown below:
...
    const options = {
      filterType: "checkbox",
      rowsPerPage:[3],
      rowsPerPageOptions:[1,3,5,6],
      jumpToPage: true,
      textLabels:{
        pagination: {
          next: "Next >",
          previous: "< Previous",
          rowsPerPage: "Total items Per Page",
          displayRows: "OF"
        }
      },
      onChangePage (currentPage) {
        console.log({currentPage});
      },
      onChangeRowsPerPage (numberOfRows) {
        console.log({numberOfRows});
      }
    };

    return (
      <div className="App wrapper">
        <h4>React MUI Datatable - FreakyJolly.com</h4>

        <MUIDataTable
          title={"Employee List"}
          data={data}
          columns={columns}
          options={options}
        />
      </div>
    );
...
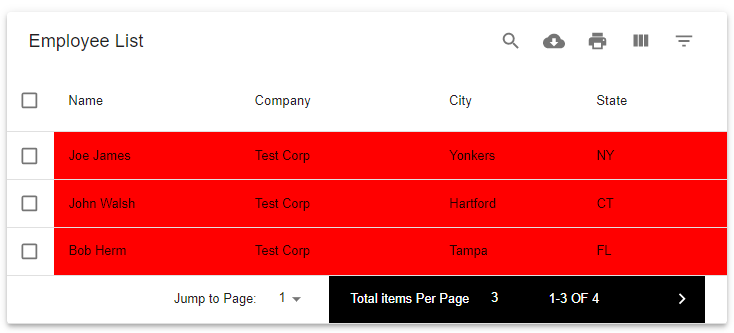
How to Customize UI Style on MUI Datatgable?
To apply a custom theming to the MUI components, we need to import the createTheme, MuiThemeProvider functions. Using the createTheme function we can apply our custom style.
import React, { Component } from "react";
import "./App.css";
import MUIDataTable from "mui-datatables";
import { createTheme, MuiThemeProvider } from "@material-ui/core/styles";

class App extends Component {
  getMuiTheme = () =>
    createTheme({
      overrides: {
        MUIDataTableBodyCell: {
          root: {
            backgroundColor: "#FF0000",
          },
        },
        MUIDataTablePagination: {
          root: {
            backgroundColor: "#000",
            color: "#fff",
          },
        },
      },
    });

  render() {
    const columns = ["Name", "Company", "City", "State"];

    const data = [
      ["Joe James", "Test Corp", "Yonkers", "NY"],
      ["John Walsh", "Test Corp", "Hartford", "CT"],
      ["Bob Herm", "Test Corp", "Tampa", "FL"],
      ["James Houston", "Test Corp", "Dallas", "TX"],
    ];

    const options = {
      filterType: "checkbox",
      rowsPerPage: [3],
      rowsPerPageOptions: [1, 3, 5, 6],
      jumpToPage: true,
      textLabels: {
        pagination: {
          next: "Next >",
          previous: "< Previous",
          rowsPerPage: "Total items Per Page",
          displayRows: "OF",
        },
      },
      onChangePage(currentPage) {
        console.log({ currentPage });
      },
      onChangeRowsPerPage(numberOfRows) {
        console.log({ numberOfRows });
      },
    };

    return (
      <div className="App wrapper">
        <h4>React MUI Datatable - FreakyJolly.com</h4>
        <MuiThemeProvider theme={this.getMuiTheme()}>
          <MUIDataTable
            title={"Employee List"}
            data={data}
            columns={columns}
            options={options}
          />
        </MuiThemeProvider>
      </div>
    );
  }
}
export default App;
The <MUIDataTable/> component will be wrapped inside the <MuiThemeprovider> to override the default style.
Dynamically Load Server Data in MUI Datatable
Now, you will learn how to control remote data and populate it inside the MUI Datatable. By mocking the server call, we will use the events available to keep local state variables for data, columns, sort order, loading boolean, pagination values.
Using the onTableChange event handler, we can check of action triggered to manipulate the data. In case remote API we simply need to pass the sort order and items required per page.
import React, {Component} from 'react';
import { CircularProgress, Typography } from '@material-ui/core';
import MUIDataTable from 'mui-datatables';

class App extends Component {
  state = {
    page: 0,
    count: 1,
    rowsPerPage: 5,
    sortOrder: {},
    data: [['Loading Data...']],
    columns: [
      {
        name: 'fullName',
        label: 'Full Name',
        options: {
          customBodyRender: (value, tableMeta, updateValue) => {
            // Here you can render a more complex display.
            // You're given access to tableMeta, which has
            // the rowData (as well as the original object data).
            // See the console for a detailed look at this object.

            console.log('customBodyRender');
            console.dir(tableMeta);
            return value;
          },
        },
      },
      {
        name: 'title',
        label: 'Title',
        options: {},
      },
      {
        name: 'location',
        label: 'Location',
        options: {},
      },
    ],
    isLoading: false,
  };

  componentDidMount() {
    this.getData('', 0);
  }

  // get data
  getData = async (url, page) => {
    this.setState({ isLoading: true });
    const res = await this.xhrRequest(url, page);
    this.setState({ data: res.data, isLoading: false, count: res.total });
  };

  getSrcData = () => {
    return [
      { fullName: 'Gabby George', title: 'Business Analyst', location: 'Minneapolis' },
      { fullName: 'Aiden Lloyd', title: 'Business Consultant', location: 'Dallas' },
      { fullName: 'Jaden Collins', title: 'Attorney', location: 'Santa Ana' },
      { fullName: 'Franky Rees', title: 'Business Analyst', location: 'St. Petersburg' },
      { fullName: 'Aaren Rose', title: 'Business Analyst', location: 'Toledo' },

      { fullName: 'John George', title: 'Business Analyst', location: 'Washington DC' },
      { fullName: 'Pat Lloyd', title: 'Computer Programmer', location: 'Baltimore' },
      { fullName: 'Joe Joe Collins', title: 'Attorney', location: 'Las Cruces' },
      { fullName: 'Franky Hershy', title: 'Paper Boy', location: 'El Paso' },
      { fullName: 'Aaren Smalls', title: 'Business Analyst', location: 'Tokyo' },

      { fullName: 'Boogie G', title: 'Police Officer', location: 'Unknown' },
      { fullName: 'James Roulf', title: 'Business Consultant', location: 'Video Game Land' },
      { fullName: 'Mike Moocow', title: 'Burger King Employee', location: 'New York' },
      { fullName: 'Mimi Gerock', title: 'Business Analyst', location: 'McCloud' },
      { fullName: 'Jason Evans', title: 'Business Analyst', location: 'Mt Shasta' },

      { fullName: 'Simple Sam', title: 'Business Analyst', location: 'Mt Shasta' },
      { fullName: 'Marky Mark', title: 'Business Consultant', location: 'Las Cruces' },
      { fullName: 'Jaden Jam', title: 'Attorney', location: 'El Paso' },
      { fullName: 'Holly Jo', title: 'Business Analyst', location: 'St. Petersburg' },
      { fullName: 'Suzie Q', title: 'Business Analyst', location: 'New York' },
    ];
  };

  sort = (page, sortOrder) => {
    this.setState({ isLoading: true });
    this.xhrRequest('', page, sortOrder).then(res => {
      this.setState({
        data: res.data,
        page: res.page,
        sortOrder,
        isLoading: false,
        count: res.total,
      });
    });
  };

  // mock async function
  xhrRequest = (url, page, sortOrder = {}) => {
    return new Promise((resolve, reject) => {
      // mock page data
      let fullData = this.getSrcData();
      const total = fullData.length; // mock record count from server - normally this would be a number attached to the return data

      let sortField = sortOrder.name;
      let sortDir = sortOrder.direction;

      if (sortField) {
        fullData = fullData.sort((a, b) => {
          if (a[sortField] < b[sortField]) {
            return 1 * (sortDir === 'asc' ? -1 : 1);
          } else if (a[sortField] > b[sortField]) {
            return -1 * (sortDir === 'asc' ? -1 : 1);
          } else {
            return 0;
          }
        });
      }

      const srcData = fullData.slice(page * this.state.rowsPerPage, (page + 1) * this.state.rowsPerPage);
      let data = srcData;

      setTimeout(() => {
        resolve({
          data,
          total,
          page,
        });
      }, 500);
    });
  };

  changePage = (page, sortOrder) => {
    this.setState({
      isLoading: true,
    });
    this.xhrRequest(`/myApiServer?page=${page}`, page, sortOrder).then(res => {
      this.setState({
        isLoading: false,
        page: res.page,
        sortOrder,
        data: res.data,
        count: res.total,
      });
    });
  };

  render() {
    const { data, page, count, isLoading, rowsPerPage, sortOrder } = this.state;

    const options = {
      filter: true,
      filterType: 'dropdown',
      responsive: 'vertical',
      serverSide: true,
      count: count,
      rowsPerPage: rowsPerPage,
      rowsPerPageOptions: [],
      sortOrder: sortOrder,
      onTableChange: (action, tableState) => {
        console.log(action, tableState);

        // a developer could react to change on an action basis or
        // examine the state as a whole and do whatever they want

        switch (action) {
          case 'changePage':
            this.changePage(tableState.page, tableState.sortOrder);
            break;
          case 'sort':
            this.sort(tableState.page, tableState.sortOrder);
            break;
          default:
            console.log('action not handled.');
        }
      },
    };

    console.log('COLUMNS');
    console.dir(JSON.parse(JSON.stringify(this.state.columns)));

    return (
      <div>
        <MUIDataTable
          title={
            <Typography variant="h6">
              ACME Employee list
              {isLoading && <CircularProgress size={24} style={{ marginLeft: 15, position: 'relative', top: 4 }} />}
            </Typography>
          }
          data={data}
          columns={this.state.columns}
          options={options}
        />
      </div>
    );
  }
}
export default App;
Conclusion
In this guide, we discussed some important sections for the implementation of the MUI Datatable using the mui-datatable package. You can check more details for available options and events on official documentation.