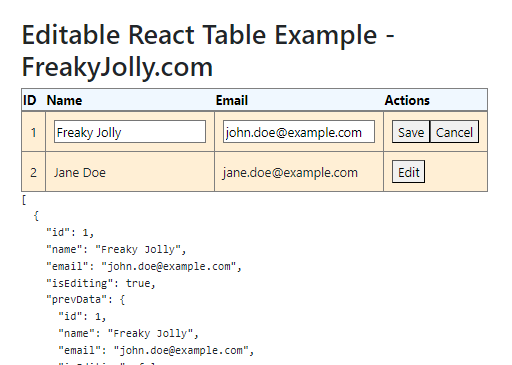
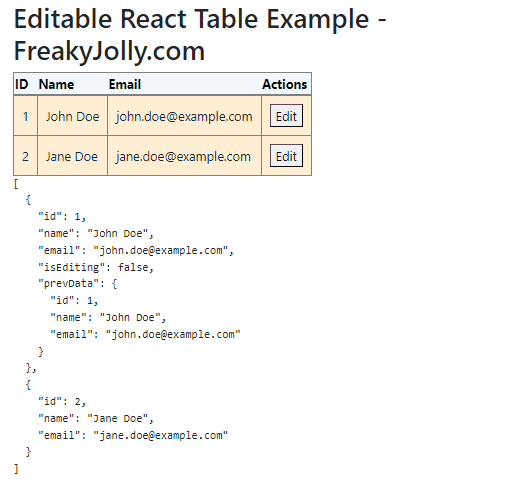
In this React tutorial, you will learn how to create React Table with inline editable rows. Each row of the table will have an Edit button, after clicking the Edit action there will be the Cancel and Save buttons. The React Datatable will be created using the popular react-table npm package module.
Moreover, you will also learn how to fetch table headers and rows data from a remote API using a dummy JSON server. In our example application tutorial, we will walk through each step to create a reusable react table component which will be consumed back into the main App js component.
The data for headers and table rows will be passed from the App or parent component to our React table component. In this way, our React table component will act as a reusable Table component that can be used at many places in your application.
So let’s get started with the implementation steps…
How to Create an Inline Editable Reusable React Table Component?
Follow these quick steps to create an editable reusable React table in the application:
Step 1: Install react-table
Step 2: Create the EditableTable component
Step 3: Set up the parent component (App.js)
Step 4: Run the project
Step 1: Install react-table
Now install the react-table npm package. This package allows to create of a full features React data table with features like pagination, sorting, filter etc.
npm install react-table
Step 2: Create the EditableTable component
Next, we will create the EditableTable component, which will contain the table with inline editable rows. Our table will have and Action column where the Edit, Save and Cancel actions will control the row data.
The interesting part is that this component will be a reusable class that can be a user at any part of your application.
We will pass the actual table data like the Header column and its row data from the App.js file.
Now Create a new file EditableTable.js inside the src folder and update with following code:
import React, { useState } from "react";
import { useTable } from "react-table";

const EditableTable = ({ columns, data, setData, handleButtonClick }) => {
  const { getTableProps, getTableBodyProps, headerGroups, rows, prepareRow } =
    useTable({
      columns,
      data,
    });

  const handleInputChange = (event, row, columnId) => {
    const newData = data.map((rowData) => {
      if (rowData.id === row.original.id) {
        return { ...rowData, [columnId]: event.target.value };
      }
      return rowData;
    });
    setData(newData);
  };

  return (
    <table {...getTableProps()} style={{ border: "solid 1px gray" }}>
      <thead>
        {headerGroups.map((headerGroup) => (
          <tr {...headerGroup.getHeaderGroupProps()}>
            {headerGroup.headers.map((column) => (
              <th
                {...column.getHeaderProps()}
                style={{
                  borderBottom: "solid 3px gray",
                  background: "aliceblue",
                  color: "black",
                  fontWeight: "bold",
                }}
              >
                {column.render("Header")}
              </th>
            ))}
          </tr>
        ))}
      </thead>
      <tbody {...getTableBodyProps()}>
        {rows.map((row) => {
          prepareRow(row);
          return (
            <tr {...row.getRowProps()}>
              {row.cells.map((cell) => {
                return (
                  <td
                    {...cell.getCellProps()}
                    style={{
                      padding: "10px",
                      border: "solid 1px gray",
                      background: "papayawhip",
                    }}
                  >
                    {cell.column.editEnable ? (
                      row.original.isEditing ? (
                        <input
                          type="text"
                          defaultValue={cell.value}
                          onChange={(e) =>
                            handleInputChange(e, row, cell.column.id)
                          }
                        />
                      ) : (
                        cell.render("Cell")
                      )
                    ) : (
                      cell.render("Cell")
                    )}
                  </td>
                );
              })}
            </tr>
          );
        })}
      </tbody>
    </table>
  );
};

export default EditableTable;
Step 3: Set up the parent component (App.js)
Now open the App.js file and update it with the following code in it:
import React, { useState, useEffect } from "react";
import EditableTable from "./EditableTable";

const App = () => {
  const columns = [
    {
      Header: "ID",
      accessor: "id",
    },
    {
      Header: "Name",
      accessor: "name",
      editEnable: true,
    },
    {
      Header: "Email",
      accessor: "email",
      editEnable: true,
    },
    {
      Header: "Actions",
      id: "actions",
      disableSortBy: true,
      Cell: ({ row, column, cell }) =>
        row.original.isEditing ? (
          <>
            <button onClick={() => handleButtonClick("save", row.original)}>
              Save
            </button>
            <button onClick={() => handleButtonClick("cancel", row.original)}>
              Cancel
            </button>
          </>
        ) : (
          <button onClick={() => handleButtonClick("edit", row.original)}>
            Edit
          </button>
        ),
    },
  ];

  const [data, setData] = useState([
    {
      id: 1,
      name: "John Doe",
      email: "john.doe@example.com",
    },
    {
      id: 2,
      name: "Jane Doe",
      email: "jane.doe@example.com",
    },
    // ... more data
  ]);

  useEffect(() => {
    console.log("Data updated:", data);
  }, [data]);

  const handleButtonClick = (action, row) => {
    const newData = data.map((rowData) => {
      if (rowData.id === row.id) {
        if (action === "edit") {
          return { ...rowData, isEditing: true, prevData: { ...rowData } };
        } else if (action === "cancel") {
          return { ...rowData, isEditing: false, ...rowData.prevData };
        } else if (action === "save") {
          const { prevData, ...updatedRowData } = rowData;
          return { ...updatedRowData, isEditing: false };
        }
      }
      return rowData;
    });
    setData(newData);
  };

  return (
    <div className="App">
      <EditableTable
        columns={columns}
        data={data}
        setData={setData}
        handleButtonClick={handleButtonClick}
      />

      <pre>{JSON.stringify(data, null, 2)}</pre>
    </div>
  );
};

export default App;
The handleButtonClick button even handler we are passing as a prop into out EditableTable component to handle the action button clicks events.
Step 4: Run the project
Now execute the npm start command to run the application and see it in action.
Conclusion
We discussed how to create a React Table using the react-table npm package and make its rows editable. Each row can be edited inline using the Action button like Edit, Save and Cancel. You can easily use this functionality to the extent based on your needs. This table can have remote data from a remote server using the REST apis.
To keep the tutorial simple, the UI design is native but you can easily style it using the bootstrap class. hoep this will help to kick start you inline editable feature in your datatables.