Get the value of checked checkboxes list on change or submit event with an example; In this tutorial, we will create a dynamic list of checkboxes that will fetch all checked checkboxes state using the onChange event.
In the forms, sometimes we have a list of checkboxes from which, we want to get the selected checkboxes or multiple selected checkbox lists on change or submit events. In this example tutorial, we will create a dynamic checkbox component, which will accept a list of checkbox items and also the onChange event handler as props.
The dynamic checkbox list component can be used anywhere, as it will take dynamic list items also emit the changed items state to the parent component. Moreover, this will also teach how to pass events dynamically to the child component and get the response inside the parent component to update the internal state.
How to Get Multiple Checked Checkbox Values in React App?
Let’s have look at the quick steps we are going to follow to create a dynamic checkbox list and get multiple values.
- Create React Application
- Install Bootstrap Package
- Creating Dynamic Checkbox Component
- Adding Checkbox Component in App
- Run React Application
Create React Application
Head towards the CLI terminal, and execute the following command to create a new React application
$ npx create-react-app react-checkbox-list-appMove inside the React application directory
$ cd react-checkbox-list-app
Install Bootstrap Package
To give polished style to our app, install the bootstrap package by executing the below command
$ npm install bootstrap --saveNow, import the bootstrap.min.css file into the App.js file as shown.
import { Component } from "react";
import "./App.css";
import "../node_modules/bootstrap/dist/css/bootstrap.min.css";

class App extends Component {
  constructor() {
    super();
  }

  render() {
    return (
      <div className="App container">
         My React Checkbox List App
      </div>
    );
  }
}
export default App;
Creating Dynamic Checkbox Component
Next, move to the src folder in your application and create the checkbox.component.js file. Update it with the following code.
import React from "react";
class CheckboxComponent extends React.Component {

  render() {
    const checkboxList = this.props.checkboxList;
    return (
      <>
        {checkboxList.map((option) => (
          <div className="form-check" key={option.id}>
            <input
            className="form-check-input"
              type="checkbox"
              name="hobbies"
              id={option.id}
              value={option.id}
              checked={option.isChecked}
              onChange={(e) => this.props.onChange(e,option)}
            />
            <label className="form-check-label" htmlFor={option.id}>
              {option.name}
            </label>
          </div>
        ))}
      </>
    );
  }
}
export default CheckboxComponent;
Above, we have input form control of the type checkbox. The map() function is used to iterate over the checkboxList items, to create multiple checkbox lists dynamically.
The onChange event on each checkbox will send back the state to the parent component. Here we represented the example of using function as props to child component and then passing the reference to the parent.
Adding Checkbox Component in App
Now, update the App.js file to consume our Checkbox Component. Update the file as shown below.
import { Component } from "react";
import "./App.css";
import "../node_modules/bootstrap/dist/css/bootstrap.min.css";
import CheckboxComponent from "./checkbox.component";
class App extends Component {
constructor() {
super();
this.handleOnChange = this.handleOnChange.bind(this);
this.state = {
checkboxList: [
{
id:'1',
name:'Apple',
isChecked:false
},{
id:'2',
name:'Banana',
isChecked:true
},{
id:'3',
name:'Orange',
isChecked:false
},{
id:'4',
name:'Grapes',
isChecked:false
},{
id:'5',
name:'Pine',
isChecked:false
},
],
};
}
componentDidMount() {
// Example of fetching response from API // Not used in example
fetch("https://jsonplaceholder.typicode.com/fruits")
.then((response) => response.json())
.then((users) => this.setState({ checkboxList: fruits }));
}
onChange = (event) => {
console.log(event);
this.setState({ selectedValue: event.target.value });
};
handleOnChange(event,option) {
console.log(event.target.checked);
let checkboxList = this.state.checkboxList;
checkboxList.forEach(chkItem=>{
if(chkItem === option){
chkItem.isChecked = event.target.checked;
}
})
this.setState({
checkboxList: checkboxList
});
}
handleOnSubmit(){
console.table(this.state.checkboxList);
}
render() {
return (
<div className="App container">
<div>
<div className="row">
<div className="col-md-6 offset-md-3">
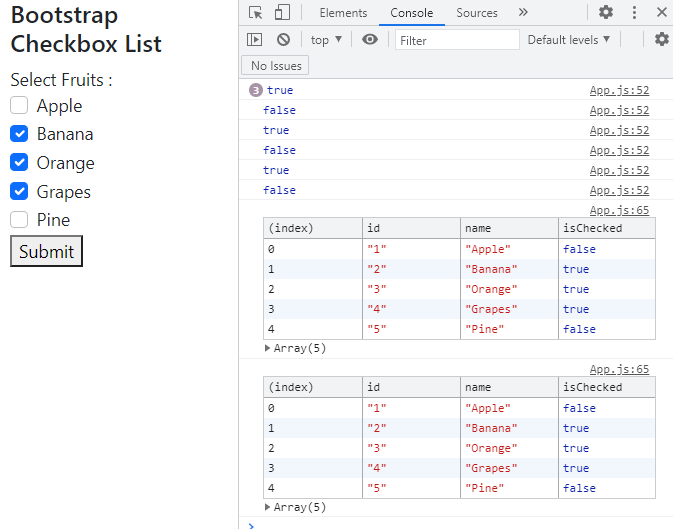
<h3>Bootstrap Checkbox List</h3>
<div className="form-row">
<div className="form-group col-md-6">
<label>Select Fruits :</label>
<CheckboxComponent
checkboxList={this.state.checkboxList}
onChange={this.handleOnChange}
/>
</div>
</div>
<button onClick={()=>this.handleOnSubmit()}>Submit</button>
</div>
</div>
</div>
</div>
);
}
}
export default App;Inside the state, there is a list of items we want to populate in the Checkbox list. There is also a reference example of the componentWillMount() hook if you are looking to fetch records from a remote API.
We are passing the handleOnChange() event handler as a prop to the CheckboxComponent. Which in turn, provides the checkbox checked state of the changed checkbox and using a forEach we’re updating the list state.
The handleOnSubmit() event is getting triggered on click of submit button to get all checkbox values.
Run React Application
Now, run the React application by hitting below npm
$ npm start
It will open your React application at HTTP:localhost:3000 port in your default browser.
Conclusion
We discussed how to create a dynamic checkbox React component, wherein we passed the CheckboxList and onChangehandler to get the state of a checkbox. We also fetch the values of all checkboxes on submitting the form.