Form handling is a common task in web development and Formik is a popular library for handling forms in React. React Bootstrap is a library that allows you to use Bootstrap components in React. In this tutorial, we will create a sample student form using Formik and Yup in a separate functional component and demonstrate how to get the form values on submit and show them on the parent App component. Additionally, we will use React Bootstrap for styling the form and also add a reset button and error handling messages for each field.
Step 1: Install Formik, React Bootstrap and Yup
First, we need to install Formik, React Bootstrap and Yup by running the following command in the terminal:
npm install formik react-bootstrap bootstrap yupYup is a library that is used for object schema validation. It is often used in conjunction with the Formik library to handle form validation. Yup provides a simple and powerful way to validate the shape and values of JavaScript objects, which is particularly useful for validating forms in React.
Yup allows you to define a validation schema for your form, which is an object that describes the validation rules for each field. The validation schema is passed to the Formik component as a prop and is used to validate the form values as they change.
Step 2: Create the Form Component
Create a new file called StudentForm.js in your project’s src folder and add the following code:
import React from "react";
import { Formik, Field, Form, ErrorMessage } from "formik";
import * as Yup from "yup";
import { Button, Form as FormBS } from "react-bootstrap";

const StudentForm = (props) => {
  return (
    <Formik
      onSubmit={(values, { setSubmitting }) => {
        props.onFormSubmit(values);
        setSubmitting(false);
      }}
      initialValues={{
        name: "",
        phone: "",
        email: "",
        website: "",
        address: "",
      }}
      validationSchema={Yup.object({
        name: Yup.string()
          .max(15, "Must be 15 characters or less")
          .required("Required"),
        phone: Yup.string()
          .min(10, "Must be 10 characters")
          .max(10, "Must be 10 characters")
          .required("Required"),
        email: Yup.string()
          .email("Invalid email address")
          .required("Required"),
        website: Yup.string()
          .url("Invalid URL")
          .required("Required"),
        address: Yup.string().required("Required"),
      })}
    >
      {({ isSubmitting }) => (
        <Form>
          <Field
            type="text"
            name="name"
            placeholder="Name"
            as={FormBS.Control}
          />
          <ErrorMessage name="name" component={FormBS.Text} />

          <Field
            type="text"
            name="phone"
            placeholder="Phone"
            as={FormBS.Control}
          />
          <ErrorMessage name="phone" component={FormBS.Text} />

          <Field
            type="email"
            name="email"
            placeholder="Email"
            as={FormBS.Control}
          />
          <ErrorMessage name="email" component={FormBS.Text} />

          <Field
            type="text"
            name="website"
            placeholder="Website"
            as={FormBS.Control}
          />
          <ErrorMessage name="website" component={FormBS.Text} />

          <Field
            type="text"
            name="address"
            placeholder="Address"
            as={FormBS.Control}
          />
          <ErrorMessage name="address" component={FormBS.Text} />

          <Button disabled={isSubmitting} type="submit">
            Submit
          </Button>
          <Button type="reset">Reset</Button>
        </Form>
      )}
    </Formik>
  );
};

export default StudentForm;
In the StudentForm component, we are using Formik library to handle the form and its submission.
We have the following fields in the form:
name: a text field for the student’s name, which is required and has a maximum of 15 characters.phone: a text field for the student’s phone number, which is required and must be exactly 10 characters long.email: a text field for the student’s email address, which is required and must be a valid email format.website: a text field for the student’s website, which is required and must be a valid URL format.address: a text field for the student’s address, which is required.
We are using Yup library to validate the form fields. For each field, we are defining the validation rules in the validationSchema object.
For example, for the name field, we are saying that it is required and must be 15 characters or less. For the phone field, we are saying that it is required and must be 10 characters long.
We are also using ErrorMessage component from formik to show the error message for each field when validation fails.
We are also using react-bootstrap library to style the form fields and buttons.
We have a submit button and a reset button in the form, which will be used to submit the form and reset the form fields respectively.
On submit we are calling onFormSubmit props and passing values to the parent component.
On reset we are calling onFormReset props.
Step 3: Use the Form Component in App.js
In your App.js file, import the StudentForm component and render it in the JSX:
import React, { useState } from "react";
import StudentForm from "./StudentForm";
function App() {
const [formValues, setFormValues] = useState({});
const handleFormSubmit = (values) => {
setFormValues(values);
};
return (
<div>
<div className="form-container">
<StudentForm onFormSubmit={handleFormSubmit} />
</div>
<div>
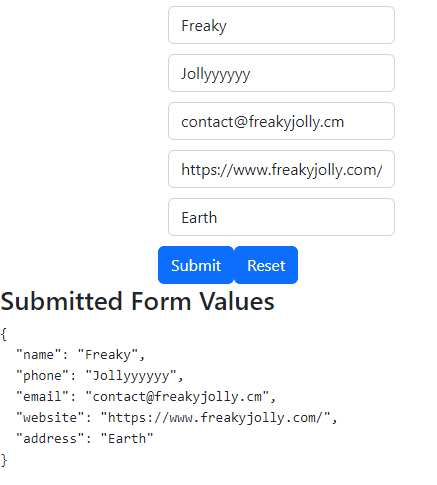
<h2>Submitted Form Values</h2>
<pre>{JSON.stringify(formValues, null, 2)}</pre>
</div>
</div>
);
}
export default App;In the App component, we are importing the StudentForm component and rendering it.
We are also passing down two props onFormSubmit and onFormReset to the StudentForm component. These props are callback functions that will be called when the form is submitted or reset.
In the onFormSubmit function, we are receiving the form values from StudentForm component and setting them to the state variables formValues.
In the onFormReset function, we are resetting the formValues state.
We also have a render method that is rendering the StudentForm component and displaying the form values received from the StudentForm component.
Conclusion
In this tutorial, we have built a student form using the Formik library in a React functional component. We have added several fields including name, phone, email, website, and address, and validated them using Yup library. We also added error handling and reset button functionality to the form. We have also used react-bootstrap library to style the form fields and buttons.
We passed the form values to parent component onSubmit and also passed reset functionality to parent component. By the end of this tutorial, you should have a basic understanding of how to use Formik to create a functional form in a React app with validation, error handling, and reset functionality.