In today’s digital age, payment gateways have become an integral part of e-commerce websites and mobile applications. PayPal is one of the most popular payment gateways that allows users to make secure online payments. If you’re building an e-commerce app or website with Angular, integrating PayPal using ngx-paypal can significantly improve the checkout experience for your users.
This blog will guide you through the steps of integrating PayPal in your Angular application with the ngx-paypal library.
How to Add PayPal Payment Gateway in Angular App?
Follow these quick steps to create Paypal gateway in Angular app:
Step 1 – Install ngx-paypal Liberary
Step 2 – Import NGX-Paypal in AppModule
Step 3 – Update AppComponent to Create Payment Gateway
Step 4 – Create App with Cart and Buy Button
Step 5 – Get PayPal ClientID
Step 6 – See In Action
Step 1 – Install ngx-paypal Library
First, you need to install ngx-paypal in your Angular application. Open the terminal, navigate to the project directory, and run the following command:
npm install ngx-paypal --save
Step 2 – Import NGX-Paypal in AppModule
After the installation, you need to import the ngx-paypal module in your app.module.ts file.
import { NgModule } from '@angular/core';
import { BrowserModule } from '@angular/platform-browser';

import { NgxPayPalModule } from 'ngx-paypal';
import { AppComponent } from './app.component';
import { FormsModule } from '@angular/forms';

@NgModule({
  declarations: [AppComponent],
  imports: [BrowserModule, FormsModule, NgxPayPalModule],
  providers: [],
  bootstrap: [AppComponent],
})
export class AppModule {}
Step 3 – Update Component to Create Payment Gateway
Next, you need to set up your PayPal payment options, such as the payment amount, currency, and payment intent, in your component.ts file.
import { Component } from '@angular/core';
import { PayPalConfig, PayPalEnvironment, PayPalIntegrationType } from 'ngx-paypal';

@Component({
  selector: 'app-paypal',
  template: `
    <div>
      <button (click)="makePayment()">Buy Now</button>
    </div>
  `
})
export class PaypalComponent {
  public payPalConfig ? : PayPalConfig;

  ngOnInit() {
    this.initConfig();
  }

  private initConfig(): void {
    this.payPalConfig = new PayPalConfig({
      env: PayPalEnvironment.Sandbox,
      client: {
        sandbox: '<sandbox-client-id>',
        production: '<production-client-id>'
      },
      commit: true,
      payment: (data, actions) => {
        return actions.payment.create({
          payment: {
            transactions: [
              {
                amount: {
                  total: '10.00',
                  currency: 'USD'
                }
              }
            ]
          }
        });
      },
      onAuthorize: (data, actions) => {
        return actions.payment.execute().then(() => {
          alert('Payment Successfull');
        });
      }
    });
  }

  makePayment() {
    this.payPalConfig = Object.assign({}, this.payPalConfig);
  }
}
Add payment button in the template HTML:
<div>
  <ngx-paypal [config]="payPalConfig"></ngx-paypal>
</div>
Step 4 – Create an App with Cart and Buy Button
Now, we will create a sample component, that will have sample products, add remove product feature in cart and a user information form.
Open the app.component.ts file and update it as shown below:
import { Component, ElementRef, ViewChild } from '@angular/core';
import { ICreateOrderRequest, IPayPalConfig } from 'ngx-paypal';

@Component({
  selector: 'app-root',
  templateUrl: './app.component.html',
  styleUrls: ['./app.component.css'],
})
export class AppComponent {
  public defaultPrice: string = '9.99';
  public payPalConfig?: IPayPalConfig;

  public customerName = '';
  public customerEmail = '';
  public customerAddress = '';
  public selectedPaymentMethod = '';
  public cart: any[] = [];
  public showSuccess: boolean = false;
  public showCancel: boolean = false;
  public showError: boolean = false;

  items: {
    name: any;
    quantity: any;
    category: string;
    unit_amount: { currency_code: string; value: any };
  }[] = [];
  total = 0;

  @ViewChild('priceElem', { static: false }) priceElem?: ElementRef;

  constructor() {}

  ngOnInit(): void {
    this.initConfig('0');
  }

  addItemToCart(item: any): void {
    let itemIndex = this.cart.findIndex((cartItem) => cartItem.id === item.id);
    if (itemIndex === -1) {
      this.cart.push({ ...item, quantity: 1 });
    } else {
      this.cart[itemIndex].quantity++;
    }
    this.updateTotal();
  }

  removeItemFromCart(item: any): void {
    let itemIndex = this.cart.findIndex((cartItem) => cartItem.id === item.id);
    if (itemIndex > -1) {
      if (this.cart[itemIndex].quantity === 1) {
        this.cart.splice(itemIndex, 1);
      } else {
        this.cart[itemIndex].quantity--;
      }
    }
    this.updateTotal();
  }

  updateTotal() {
    this.cart.forEach((cartItem) => {
      this.items.push({
        name: cartItem.name,
        quantity: cartItem.quantity,
        category: 'DIGITAL_GOODS',
        unit_amount: {
          currency_code: 'USD',
          value: cartItem.price,
        },
      });
      this.total += parseFloat(cartItem.price) * cartItem.quantity;
    });
    this.initConfig(this.total + '');
  }

  private initConfig(price: string): void {
    this.payPalConfig = {
      currency: 'USD',
      clientId: 'YOUR_KEY_HERE',
      createOrderOnClient: (data: any) =>
        <ICreateOrderRequest>{
          intent: 'CAPTURE',
          purchase_units: [
            {
              amount: {
                currency_code: 'USD',
                value: price,
                breakdown: {
                  item_total: {
                    currency_code: 'USD',
                    value: price,
                  },
                },
              },
              items: this.items,
            },
          ],
        },
      advanced: {
        commit: 'true',
      },
      style: {
        shape: 'pill',
        color: 'blue',
        label: 'paypal',
        layout: 'vertical',
      },
      onApprove: (
        data: any,
        actions: { order: { get: () => Promise<any> } }
      ) => {
        console.log(
          'onApprove - transaction was approved, but not authorized',
          data,
          actions
        );
        actions.order.get().then((details: any) => {
          console.log(
            'onApprove - you can get full order details inside onApprove: ',
            details
          );
        });
      },
      onClientAuthorization: (data: any) => {
        console.log(
          'onClientAuthorization - you should probably inform your server about completed transaction at this point',
          data
        );
        this.showSuccess = true;
      },
      onCancel: (data: any, actions: any) => {
        console.log('OnCancel', data, actions);
        this.showCancel = true;
      },
      onError: (err: any) => {
        console.log('OnError', err);
        this.showError = true;
      },
      onClick: (data: any, actions: any) => {
        console.log('onClick', data, actions);
        this.resetStatus();
      },
      onInit: (data: any, actions: any) => {
        console.log('onInit', data, actions);
      },
    };
  }

  private resetStatus(): void {
    this.items = [];
    this.total = 0;
    this.showError = false;
    this.showSuccess = false;
  }
}
Now, update the template HTML with following:
<div class="container">
  <h1>Angular Payment Gateway Page using NGX-Paypal at FreakyJolly.com</h1>
  <div class="row">
    <div class="col-sm-4">
      <div class="card">
        <img src="https://via.placeholder.com/300x200" class="card-img-top" alt="..." />
        <div class="card-body">
          <h5 class="card-title">Product 1</h5>
          <p class="card-text">
            Lorem ipsum dolor sit amet, consectetur adipiscing elit.
          </p>
          <button class="btn btn-primary" (click)="
                  addItemToCart({
                    id: 1,
                    name: 'Product 1',
                    price: defaultPrice
                  })
                ">
            Add to Cart
          </button>
        </div>
      </div>
    </div>
    <div class="col-sm-4">
      <div class="card">
        <img src="https://via.placeholder.com/300x200" class="card-img-top" alt="..." />
        <div class="card-body">
          <h5 class="card-title">Product 2</h5>
          <p class="card-text">
            Sed do eiusmod tempor incididunt ut labore et dolore magna
            aliqua.
          </p>
          <button class="btn btn-primary" (click)="
                  addItemToCart({ id: 2, name: 'Product 2', price: '19.99' })
                ">
            Add to Cart
          </button>
        </div>
      </div>
    </div>
    <div class="col-sm-4">
      <div class="card">
        <img src="https://via.placeholder.com/300x200" class="card-img-top" alt="..." />
        <div class="card-body">
          <h5 class="card-title">Product 3</h5>
          <p class="card-text">
            Ut enim ad minim veniam, quis nostrud exercitation ullamco
            laboris nisi ut aliquip ex ea commodo consequat.
          </p>
          <button class="btn btn-primary" (click)="
                  addItemToCart({ id: 3, name: 'Product 3', price: '24.99' })
                ">
            Add to Cart
          </button>
        </div>
      </div>
    </div>
  </div>
  <br />
  <div class="row">
    <div class="col-sm-6">
      <h3>Shopping Cart</h3>
      <table class="table">
        <thead>
          <tr>
            <th scope="col">Product Name</th>
            <th scope="col">Price</th>
            <th scope="col">Quantity</th>
            <th scope="col">Total</th>
            <th scope="col"></th>
          </tr>
        </thead>
        <tbody>
          <tr *ngFor="let item of cart">
            <td>{{ item.name }}</td>
            <td>{{ item.price }}</td>
            <td>
              <button class="btn btn-secondary btn-sm" (click)="removeItemFromCart(item)">
                -
              </button>
              {{ item.quantity }}
              <button class="btn btn-secondary btn-sm" (click)="addItemToCart(item)">
                +
              </button>
            </td>
            <td>{{ item.price * item.quantity }}</td>
            <td>
              <button class="btn btn-danger btn-sm" (click)="removeItemFromCart(item)">
                Remove
              </button>
            </td>
          </tr>
        </tbody>
      </table>
    </div>
    <div class="col-sm-6">
      <h3>Checkout</h3>
      <div class="form-group">
        <label for="name">Name</label>
        <input type="text" class="form-control" id="name" [(ngModel)]="customerName" />
      </div>
      <div class="form-group">
        <label for="email">Email</label>
        <input type="email" class="form-control" id="email" [(ngModel)]="customerEmail" />
      </div>
      <div class="form-group">
        <label for="address">Address</label>
        <textarea class="form-control" id="address" rows="3" [(ngModel)]="customerAddress"></textarea>
      </div>
      <div class="form-group">
        <label for="paymentMethod">Payment Method</label>
        <select class="form-control" id="paymentMethod" [(ngModel)]="selectedPaymentMethod">
          <option>Credit Card</option>
          <option>PayPal</option>
          <option>Bank Transfer</option>
        </select>
      </div>
      <ng-container *ngIf="cart.length; else elseCartHas">
        <ngx-paypal [config]="payPalConfig"></ngx-paypal>
      </ng-container>
      <ng-template #elseCartHas>
        Select Product
      </ng-template>
      <p *ngIf="showSuccess" class="text-success mt-3">
        Checkout successful! Thank you for your purchase.
      </p>
      <p *ngIf="showError" class="text-error mt-3">
        Payment Failed! .
      </p>
    </div>
  </div>
</div>
Step 4 – Get PayPal ClientID
Here are the steps to get a client ID for the PayPal REST API:
Go to the PayPal Developer website at https://developer.paypal.com/.
If you don’t have a PayPal account, click on the “Sign Up” button to create a new account. If you already have an account, click on the “Log In” button and enter your credentials.
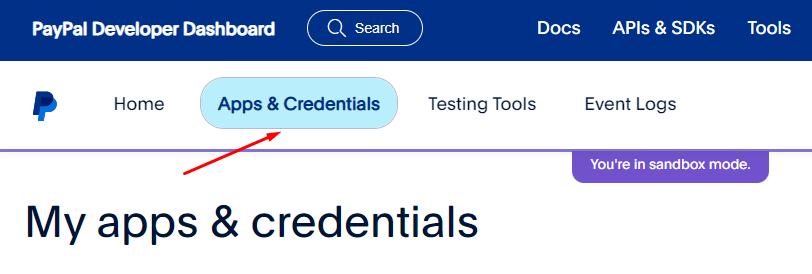
Once you’re logged in, click on the “Dashboard” button on the top-right corner of the screen.
On the dashboard, click on the “My Apps & Credentials” link under the “REST API” section.
Click on the “Create App” button to create a new app.
Enter a name for your app and select the account where you want the payments to be processed.
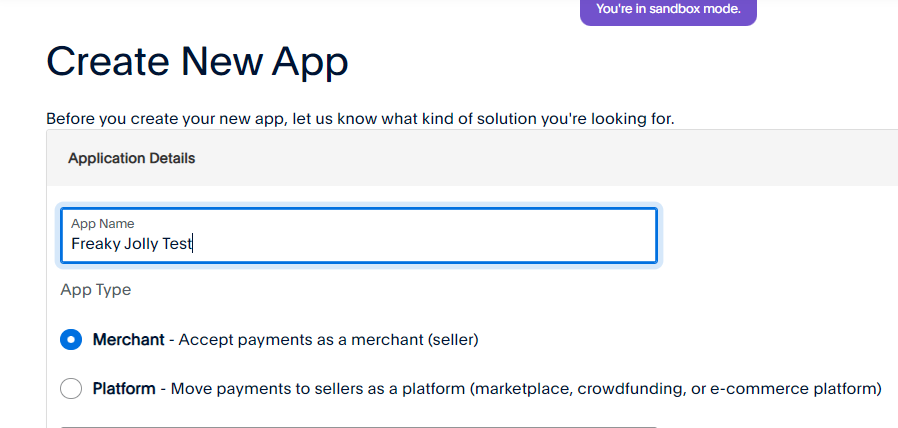
Click on the “Create App” button to create the app.
On the next screen, you’ll see your client ID and client secret. Make sure to copy the client ID as you’ll need it later.
That’s it! You now have a client ID that you can use to authenticate your Angular application with the PayPal REST API.
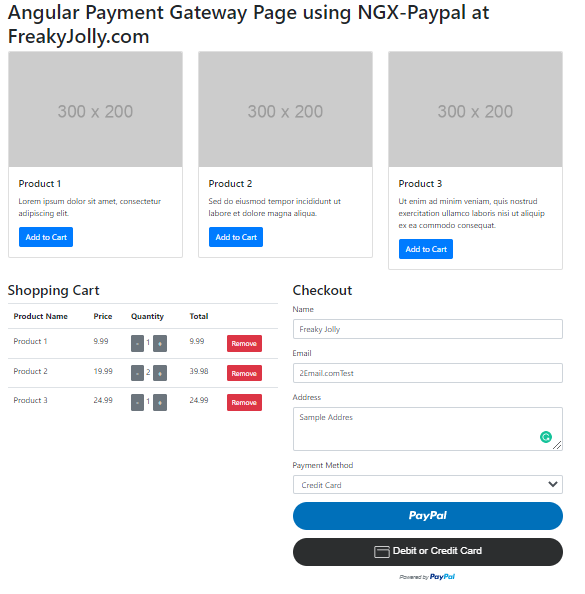
Step 5 – See In Action
We are ready to see our app in action. Execute the npm start command to run the application in browser by running the web server.
Common Issues and Solution
While integrating ngx-paypal into an Angular application, developers may face some issues that can cause problems during the development process. Here are some common issues and their solutions:
- Authentication: The first issue that developers may face is authentication. To authenticate a user, developers need to generate an access token and set it in the HTTP headers for each API call. If the access token is not valid, the API call will fail. Developers can solve this issue by generating a new access token using the client ID and secret.
- Sandbox vs Production Environment: Another issue that developers may face is confusion between the sandbox and production environments. In the sandbox environment, developers can test their integration without making real payments. On the other hand, in the production environment, real payments are made. Developers should ensure that they are using the correct environment for their integration.
- Customizing the PayPal Button: Developers may also face issues when customizing the PayPal button. To customize the button, developers need to pass a configuration object to the PayPalButton directive. If the configuration is not set correctly, the button may not appear or may not function correctly. Developers should ensure that the configuration object is set up correctly.
- Server-side Integration: Another issue that developers may face is server-side integration. Developers need to pass the client ID and secret to their server to generate an access token. If the server is not set up correctly, the integration may fail. Developers should ensure that their server is set up correctly to integrate with PayPal.
- Error Handling: Finally, developers may face issues with error handling. If an error occurs during the integration, developers need to handle it correctly to provide a good user experience. Developers can use the PayPal REST APIs to retrieve error messages and provide appropriate feedback to the user.
Conclusion
Integrating PayPal in your Angular application with ngx-paypal is a straightforward process that can be completed in just a few steps. Once you’ve set up your PayPal payment options, you can add a PayPal button to your app or website, allowing your users to make secure online payments. With this integration, you can significantly improve the checkout experience for your users and boost the overall user experience of your app.