Angular Material is an awesome UI framework which is fully compatible to work with Angular applications. It is fully loaded with a wide variety of awsome UI components which are supported for responsive and multi-device platforms. There are a number of easy to use components like Autocomplete, Datepicker, Stepper, Tree structures, DataTables, etc which can empower Ionic applications to the next level.
In this tutorial, we will get to know how to install Angular Material UI Components in an Ionic application.
We will first install Material packages in Ionic 5 application then try some of its components. For this, we will create a new Ionic application with a blank template.
Let’s get started!
#Install the latest @ionic/cli package
We’ll create an Ionic application using the latest version of @ionic/cli . Run following npm command to upgrade
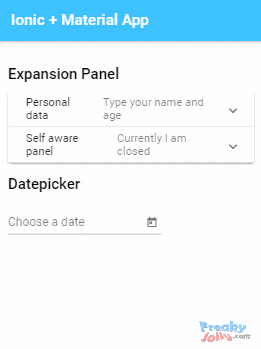
$ npm install -g @ionic/cli</pre> <h3>#Create a New Application</h3> To keep it simple, we'll create a new Ionic application with Angular framework using a <code>blanktemplate. Run this ionic command to create one.$ ionic start ionic-material-app blank --type=angular </pre> move to the application directory <pre class="wp-block-prismatic-blocks"><code class="language-javascript">$ cd ionic-material-app</pre> then open with Visual Studio Code by hitting below command <pre class="wp-block-prismatic-blocks"><code class="language-javascript">$ code .</pre> <h3>#Install Angular Material</h3> After creating the Ionic application, next, we'll install the <strong>Angular Material</strong> UI library to use its component. Run following npm command in the terminal and answer few configuration related question <pre class="wp-block-prismatic-blocks"><code class="language-javascript">$ ng add @angular/material</pre> Choose a theme <pre class="wp-block-prismatic-blocks"><code class="language-javascript">? Choose a prebuilt theme name, or "custom" for a custom theme: Indigo/Pink [ Preview: https://material.angular.io?theme=indigo-pink ]</pre> Select if you want to install HammerJS to support gesture event. <pre class="wp-block-prismatic-blocks"><code class="language-javascript">? Set up HammerJS for gesture recognition? Yes</pre> Answer yes to enable animation <pre class="wp-block-prismatic-blocks"><code class="language-javascript">? Set up browser animations for Angular Material? Yes</pre> <h4></h4> <h3>How to add Angular Material Components in Ionic?</h3> For adding Angular Material components we first need check their Modules then add them in Ionic component's module file. <h3>#Material Expansion Panel</h3> For example, we need to add <strong>Expansion</strong> panel, then you need to add <code>MatExpansionModulein home.module.ts file as shown below://home.module.ts import { NgModule } from '@angular/core'; import { CommonModule } from '@angular/common'; import { IonicModule } from '@ionic/angular'; import { FormsModule } from '@angular/forms'; import { RouterModule } from '@angular/router'; import { HomePage } from './home.page'; import { MatExpansionModule } from '@angular/material/expansion'; @NgModule({ imports: [ CommonModule, FormsModule, IonicModule, RouterModule.forChild([ { path: '', component: HomePage } ]), MatExpansionModule ], declarations: [HomePage] }) export class HomePageModule {}After adding in Module in home.page.html add following Expansion directive
<mat-accordion>and
<mat-expansion-panel>
<mat-expansion-panel-header>
<mat-panel-title>
Personal data
</mat-panel-title>
<mat-panel-description>
Type your name and age
</mat-panel-description>
</mat-expansion-panel-header>
Panel Content
</mat-expansion-panel>
<mat-expansion-panel (opened)="panelOpenState = true" (closed)="panelOpenState = false">
<mat-expansion-panel-header>
<mat-panel-title>
Self aware panel
</mat-panel-title>
<mat-panel-description>
Currently I am {{panelOpenState ? 'open' : 'closed'}}
</mat-panel-description>
</mat-expansion-panel-header>
<p>I'm visible because I am open</p>
</mat-expansion-panel>
</mat-accordion></pre>
<img class="alignnone wp-image-3933 size-full" src="https://www.freakyjolly.com/wp-content/uploads/2019/08/Pasted-into-Ionic-5-Angular-Material-9-How-to-Add-Angular-Material-in-Ionic-to-Use-its-Components-.png" />
<h3>#Material Datepicker in Ionic Application</h3>
To use Material Datepicker in Ionic Application update the <strong>home.module.ts</strong> file with these modules.
<pre class="lang:js mark:12-15,26-29 decode:true ">// home.module.ts
import { NgModule } from '@angular/core';
import { CommonModule } from '@angular/common';
import { IonicModule } from '@ionic/angular';
import { FormsModule } from '@angular/forms';
import { HomePage } from './home.page';import { HomePageRoutingModule } from './home-routing.module';
import { MatExpansionModule } from '@angular/material/expansion';
import { MatDatepickerModule } from '@angular/material/datepicker';
import { MatFormFieldModule } from '@angular/material/form-field';
import { MatInputModule } from '@angular/material/input';
import { MatNativeDateModule } from '@angular/material/core';@NgModule({
imports: [
CommonModule,
FormsModule,
IonicModule,
HomePageRoutingModule,MatExpansionModule,
MatDatepickerModule,
MatNativeDateModule,
MatFormFieldModule,
MatInputModule
],
declarations: [HomePage]
})
export class HomePageModule { }
</pre>
All these modules are required to use Material Datepicker. Now in the <strong>home.page.html</strong> add the <code>mat-datepickermat-datepicker-togglecomponents<ion-header [translucent]="true">to see it working.
<ion-toolbar color="secondary">
<ion-title>
Ionic + Material App
</ion-title>
</ion-toolbar>
</ion-header><ion-content [fullscreen]="true" class="ion-padding">
<h4>Expansion Panel</h4>
<mat-accordion>
<mat-expansion-panel>
<mat-expansion-panel-header>
<mat-panel-title>
Personal data
</mat-panel-title>
<mat-panel-description>
Type your name and age
</mat-panel-description>
</mat-expansion-panel-header>
Panel Content
</mat-expansion-panel>
<mat-expansion-panel (opened)="panelOpenState = true" (closed)="panelOpenState = false">
<mat-expansion-panel-header>
<mat-panel-title>
Self aware panel
</mat-panel-title>
<mat-panel-description>
Currently I am {{panelOpenState ? 'open' : 'closed'}}
</mat-panel-description>
</mat-expansion-panel-header>
<p>I'm visible because I am open</p>
</mat-expansion-panel>
</mat-accordion><h4>Datepicker</h4>
<mat-form-field>
<mat-label>Choose a date</mat-label>
<input matInput [matDatepicker]="picker">
<mat-datepicker-toggle matSuffix [for]="picker"></mat-datepicker-toggle>
<mat-datepicker #picker></mat-datepicker>
</mat-form-field></ion-content></pre>
That's it now you have successfully installed Material Ui library in Ionic 5 application and we also implemented the <strong>Expansion panel</strong> and <strong>Datepicker</strong> in the Home Page. You can now run your application by hitting <code>$ ionic serve --open
You can use any Material UI component in Ionic pages, the only thing you need to check about proper API need to be added in the page module file.
Category: Angular