In this tutorial, we will explore the Angular Material’s Tree structure UI component. A tree structure depicts a hierarchy of data in a parent-child relation. These tree nodes can be collapsed and expanded to deep drill over child items.
Material is an Angular compatible UI library which provides a wide variety of components following a Material design approach.
The Angular Material Tree can be added using the mat-tree component directive. This tree structure gives the ability to expand/ collapse data lists into multi-level nodes. Here we will get to know how to add the Angular material Tree UI component in the project using the latest version of Angular Material 9.
The Material Tree UI component will be dynamically created using a JSON object.
This tutorial is compatible with previous versions of Angular as well.
Create a new Angular project
Using Angular CLI tool create a new Angular 9 project by running below command in terminal
$ ng new angular-material-tree-tutorial #? Would you like to add Angular routing? Yes #? Which stylesheet format would you like to use? CSS</pre> <h3>Install Angular Material</h3> Install the latest version 9 of Material by running the following NPM command and select few configuration setting related to theme selection, typography styles and browser animation implementation <pre class="lang:js mark:1 decode:true ">$ ng add @angular/material ? Choose a prebuilt theme name, or "custom" for a custom theme: Indigo/Pink ? Set up global Angular Material typography styles? Yes ? Set up browser animations for Angular Material? Yes</pre> <h3>Using Material modules in the Angular project</h3> For implementing Material UI components in an Angular project, we need to import API modules of that particular component in the application's module. As we are going to use the <strong>Tree component</strong>, so we will import the <code>MatTreeModule. Also, we will use arrow icons and buttons for the expand/ collapse so also importMatIconModuleandMatButtonModulein the app.module.ts file as shown below// app.module.ts import { BrowserModule } from '@angular/platform-browser'; import { NgModule } from '@angular/core'; import { BrowserAnimationsModule } from '@angular/platform-browser/animations'; import { MatTreeModule } from '@angular/material/tree'; import { MatIconModule } from '@angular/material/icon'; import { MatButtonModule } from '@angular/material/button'; @NgModule({ declarations: [ AppComponent, MaterialTreeDemoComponent ], imports: [ BrowserModule, AppRoutingModule, BrowserAnimationsModule, MatTreeModule, MatIconModule, MatButtonModule ], providers: [], bootstrap: [AppComponent] }) export class AppModule { }Adding Tree Component
Next update component template with the
mat-treecomponent directive<mat-tree [dataSource]="dataSource" [treeControl]="treeControl"> <!-- This is the tree node template for leaf nodes --> <mat-tree-node *matTreeNodeDef="let node" matTreeNodePadding> <!-- use a disabled button to provide padding for tree leaf --> <button mat-icon-button disabled></button> {{node.name}} </mat-tree-node> <!-- This is the tree node template for expandable nodes --> <mat-tree-node *matTreeNodeDef="let node;when: hasChild" matTreeNodePadding> <button mat-icon-button matTreeNodeToggle [attr.aria-label]="'toggle ' + node.name"> <mat-icon class="mat-icon-rtl-mirror"> {{treeControl.isExpanded(node) ? 'expand_more' : 'chevron_right'}} </mat-icon> </button> {{node.name}} </mat-tree-node> </mat-tree>and update component class with the following code
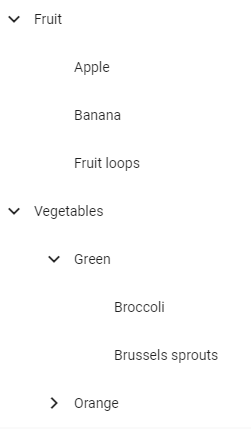
import { Component, OnInit } from '@angular/core'; import { FlatTreeControl } from '@angular/cdk/tree'; import { MatTreeFlatDataSource, MatTreeFlattener } from '@angular/material/tree'; interface FoodNode { name: string; children?: FoodNode[]; } interface ExampleFlatNode { expandable: boolean; name: string; level: number; } const TREE_DATA: FoodNode[] = [ { name: 'Fruit', children: [ { name: 'Apple' }, { name: 'Banana' }, { name: 'Fruit loops' }, ] }, { name: 'Vegetables', children: [ { name: 'Green', children: [ { name: 'Broccoli' }, { name: 'Brussels sprouts' }, ] }, { name: 'Orange', children: [ { name: 'Pumpkins' }, { name: 'Carrots' }, ] }, ] }, ]; @Component({ selector: 'app-material-tree-demo', templateUrl: './material-tree-demo.component.html', styleUrls: ['./material-tree-demo.component.scss'] }) export class MaterialTreeDemoComponent implements OnInit { private _transformer = (node: FoodNode, level: number) => { return { expandable: !!node.children && node.children.length > 0, name: node.name, level: level, }; } treeControl = new FlatTreeControl<ExampleFlatNode>( node => node.level, node => node.expandable); treeFlattener = new MatTreeFlattener( this._transformer, node => node.level, node => node.expandable, node => node.children); dataSource = new MatTreeFlatDataSource(this.treeControl, this.treeFlattener); constructor() { this.dataSource.data = TREE_DATA; } hasChild = (_: number, node: ExampleFlatNode) => node.expandable; ngOnInit(): void { } }
Category: Angular