In Photo galleries, we have multiple images to show at once, for looking into more details of a single image we need a view in which a user can select a single image and able to zoom, pan or share.
Now we do that in Ionic 3 application as well in a few simple steps. In this tutorial, we will create a simple Ionic 3 application using Ionic 3’s native plugin Photo-Viewer
Let’s start…
Also Read: Ionic 4| Crop Images using Ionic 4 native plugin with Image Picker
Also Read: Ionic 3 – Implement Image Viewer for Photos in the Assets folder
Create a new application from Ionic CLI
As Ionic CLI is updated for Ionic 4 please read this article before going through this
To create an application you must have NodeJS and Ionic Cordova CLI
$ npm install -g ionic cordovaRun the following command to create a new application
$ ionic start Ionic3PhotoImageViewerDemo blank --type=ionic-angularNote: We need to append —type=ionic-angular for Ionic 3 versions as the current stable version is Ionic 4 which is created by default
Install Photo Viewer Plugin
Now go to the root of the application by running the following
$ cd Ionic3PhotoImageViewerDemoInstall plugins in CLI using below commands one by one
$ ionic cordova plugin add com-sarriaroman-photoviewer
$ npm install --save @ionic-native/photo-viewer
Import plugin in Ionic App’s module app.module.ts
After import and adding in provider app.module.ts file will look like this
import { BrowserModule } from '@angular/platform-browser';
import { ErrorHandler, NgModule } from '@angular/core';
import { IonicApp, IonicErrorHandler, IonicModule } from 'ionic-angular';
import { SplashScreen } from '@ionic-native/splash-screen';
import { StatusBar } from '@ionic-native/status-bar';

import { PhotoViewer } from '@ionic-native/photo-viewer';

import { MyApp } from './app.component';
import { HomePage } from '../pages/home/home';

@NgModule({
  declarations: [
    MyApp,
    HomePage
  ],
  imports: [
    BrowserModule,
    IonicModule.forRoot(MyApp)
  ],
  bootstrap: [IonicApp],
  entryComponents: [
    MyApp,
    HomePage
  ],
  providers: [
    StatusBar,
    PhotoViewer,
    SplashScreen,
    {provide: ErrorHandler, useClass: IonicErrorHandler}
  ]
})
export class AppModule {}
Add methods in home.ts to view photo
In home.ts file add following three methods
import { Component } from '@angular/core';
import { NavController } from 'ionic-angular';
import { PhotoViewer } from '@ionic-native/photo-viewer';
@Component({
selector: 'page-home',
templateUrl: 'home.html'
})
export class HomePage {
constructor(public navCtrl: NavController,private photoViewer: PhotoViewer) {
}
//View only photo
viewPhoto(){
this.photoViewer.show('https://www.freakyjolly.com/wp-content/uploads/2017/08/cropped-fjlogo2.png');
}
//View only photo with title
viewPhotoWithTitle(){
this.photoViewer.show('https://www.freakyjolly.com/wp-content/uploads/2017/08/cropped-fjlogo2.png', 'My image title', {share: false});
}
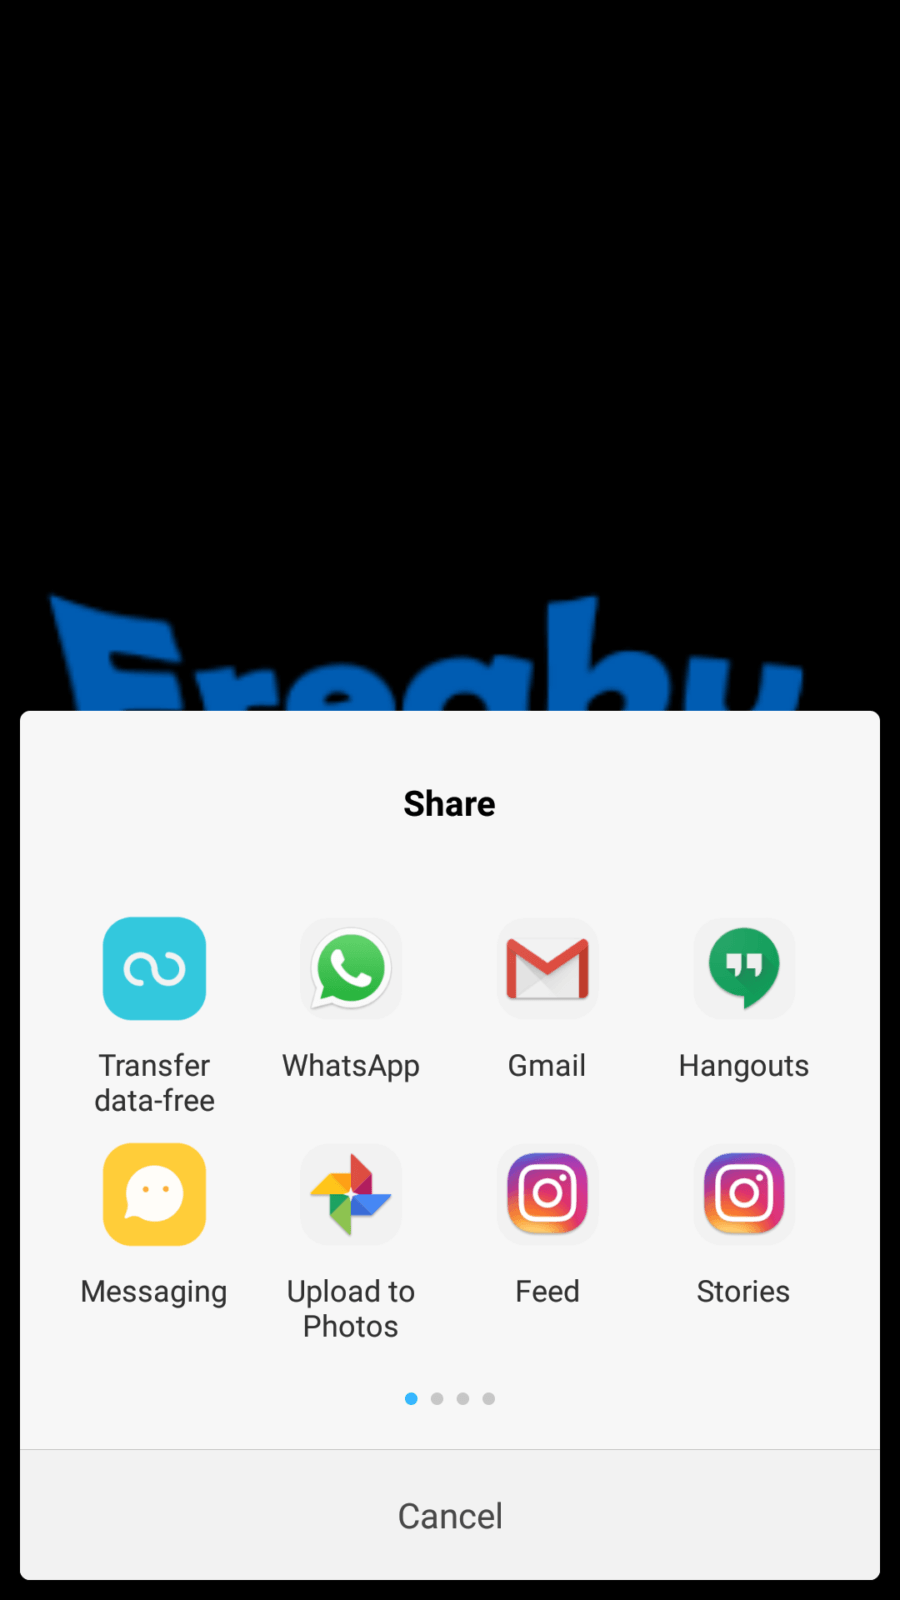
//View photo with sharing option
viewPhotoWithShare(){
this.photoViewer.show('https://www.freakyjolly.com/wp-content/uploads/2017/08/cropped-fjlogo2.png', 'Do you want to Share', {share: true});
}
}
In viewPhoto method, we are only viewing photo, in viewPhotoWithShare there is option string with share option set to true
This plugin also more option like
- share: Option is used to hide and show the share option.
- closeBtn: Option for close button visibility when share false [ONLY FOR iOS]
- copyToReference: If you need to copy image to reference before show then set it true [ONLY FOR iOS]
Implementation of options is simple you can check here
Let’s add buttons in home.html to call methods defined in home.ts
<ion-header>
  <ion-navbar>
    <ion-title>
      Photo Viewer Demo
    </ion-title>
  </ion-navbar>
</ion-header>

<ion-content padding>
  <p>
    Freaking with a Demo
  </p>
  <p>
    <button ion-button (click)="viewPhoto()">View Photo</button>
  </p>
  <p>
    <button ion-button (click)="viewPhotoWithTitle()">View Photo with Title</button>
  </p>
  <p>
    <button ion-button (click)="viewPhotoWithShare()">View Photo with Sharing</button>
  </p>
</ion-content>
To see the app working you need to build and run on a real device.


Leave a Reply