In this guide, you will learn how to create nested routing in a React JS application. We’ll be using the React Router DOM 6 to implement routing in React.
Multi-level nested routing allows having various components on a single page which can have a parent-child structure. In such representation, a single view can have multiple Outlets to project their child components.
This react application will have three levels of nested routing definition, each level will also have the default route definition that will open the default child page if nothing is defined in the URL.
How to Add Nested or Child Routing in React JS Application?
Step 1 – Create React App
Step 2 – Create Components
Step 3 – Create Routes in React
Step 4 – Add Nested or Child Routes
Step 5 – See In Action
Step 1 – Create React App
Before we start, make your you system is having the create react app that helps in creating new React js application
npm install create-react-app --global
After that create a new React app
npx create-react-app react-nested-routes-app
Now move inside the react app directory and open in your IDE
cd react-nested-routes-app

code .
Step 2 – Create Components
Next, head towards the src folder and create the components directory to have the following component files:
Create components/Dashboard.js file:
import React from "react";
function Dashboard() {
  return <div className="content">Dashboard</div>;
}
export default Dashboard;
Create components/ApplyLeaves.js file:
import React from "react";
function ApplyLeaves() {
  return <div className="content">ApplyLeaves</div>;
}
export default ApplyLeaves;
Create components/CasualBalance.js file:
import React from "react";
function CasualBalance() {
  return <div className="content">CasualBalance</div>;
}
export default CasualBalance;
Create components/EarnedBalance.js file:
import React from "react";
function EarnedBalance() {
  return <div className="content">EarnedBalance</div>;
}
export default EarnedBalance;
Create components/Leaves.js file:
import "../App.css";
import React from "react";
import { Link, Outlet } from "react-router-dom";
function Leaves() {
  return (
    <div>
      <h4>Check Your Leaves</h4>
      <div className="product-nav mb-5">
        <Link className="navbar-brand" to="/leaves/apply-leaves">
          Apply Leaves
        </Link>
        <Link className="navbar-brand" to="/leaves/check-leave-balance">
          Check Leave Balance
        </Link>
      </div>
      <Outlet />
    </div>
  );
}
export default Leaves;
Create components/CheckLeaveBalance.js file:
import "../App.css";
import React from "react";
import { Link, Outlet } from "react-router-dom";
function CheckLeaveBalance() {
  return (
    <div>
      <h5>Check Balance</h5>
      <div className="product-nav mb-5">
        <Link
          className="navbar-brand"
          to="/leaves/check-leave-balance/casual-balance"
        >
          Casual
        </Link>
        <Link
          className="navbar-brand"
          to="/leaves/check-leave-balance/earned-balance"
        >
          Earned
        </Link>
      </div>
      <Outlet />
    </div>
  );
}
export default CheckLeaveBalance;
Inside the Leaves and CheckLeaveBalance components, you will notice the Link and Outlet components.
The Link component helps in creating a router link, to navigate a page or child page in react js application
The Outlet component acts like a placeholder to project the content of routed component at that place.
As we are implemented nested child route navigation at three levels, you will notice these components at three components.
Step 3 – Install React Router DOM in React
To create and define routes in React application, we need to install the React Router DOM package module. Execute the following npm command to install the package in your react application.
npm install react-router-dom@6
Step 4 – Add Nested or Child Routes
Now open the App.js file to define the Routes for our application. We need to import BrowserRouter, Routes, Route and Link components from ‘react-router-dom’ as shown below:
import "./App.css";
import { BrowserRouter, Routes, Route, Link } from "react-router-dom";
import Dashboard from "./components/Dashboard";
import Leaves from "./components/Leaves";
import ApplyLeaves from "./components/ApplyLeaves";
import CheckLeaveBalance from "./components/CheckLeaveBalance";
import EarnedBalance from "./components/EarnedBalance";
import CasualBalance from "./components/CasualBalance";
export default function App() {
return (
<div className="outerwrap">
<BrowserRouter>
<nav>
<Link className="navbar-brand" to="dashboard">
Dashboard
</Link>
<Link className="navbar-brand" to="leaves">
Leaves
</Link>
</nav>
{/* Routes Definition */}
<Routes>
{/* Parent Navigation Routes */}
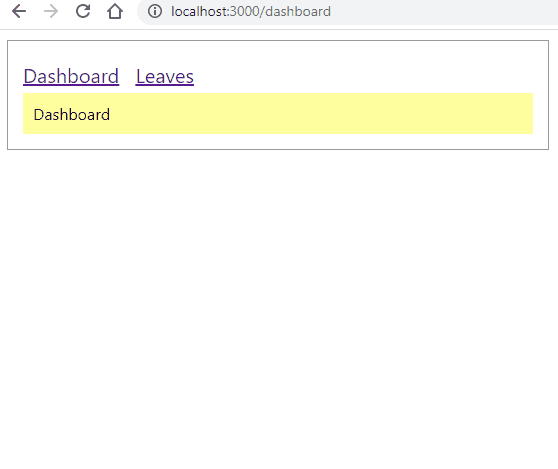
<Route path="/" element={<Dashboard />} />
<Route path="/dashboard" element={<Dashboard />} />
<Route path="/leaves" element={<Leaves />}>
{/* 2nd Level Navigation Routes */}
<Route path="/leaves" element={<ApplyLeaves />} />
<Route path="apply-leaves" element={<ApplyLeaves />} />
<Route path="check-leave-balance" element={<CheckLeaveBalance />}>
{/* 3rd Level Navigation Routes */}
<Route path="/leaves/check-leave-balance" element={<CasualBalance />} />
<Route path="casual-balance" element={<CasualBalance />} />
<Route path="earned-balance" element={<EarnedBalance />} />
</Route>
</Route>
</Routes>
</BrowserRouter>
</div>
);
}You will note above, that we have also defined the default path at each level, it will open the default route and its child component.
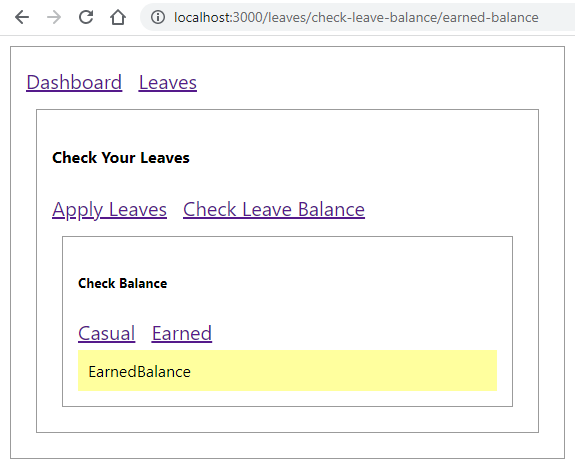
Step 5 – See In Action
Now run your react application to see nested router navigation in action. Execute following command to start the webserver.
npm startIt will open the webserver at following URL:
Conclusion
Using React Router DOM package, we can easily implement the routing at multiple levels with ease. In our application, we created child navigation at three levels and also defined the default URLs that will open the default component at the child level as well.