Creating a new build environment in the Angular application tutorial; In this tutorial, you will learn how to add a new environment in the Angular application and updated scripts in the package.json file.
In an Angular application, by default, we have a development and production environment file. Inside the environment folder at application root, you will see environment.ts and enviroment.prod.ts files referring to the development and production environment.
Development mode:
By default, the environment/environment.ts file is picked, when we serve or build the Angular application by executing the below commands:
# Running the application
ng serve

# Builing the application
ng build
Production mode:
When we create the production version of our application by using the –prod flat, then the environment.prod.ts file is picked.
# Creating production build
ng build --prod
In either of the use-cases, the switching of environment.ts and environment.prod.ts file is decided based automatically. If we add the –prod then prod version picked by default.
How to Add New Environments into the Angular application?
In large scale enterprise applications, we may need another type of environment as well for example the test, uat, sprint etc. In that case, we can create more environment files and pick corresponding environment files based on the –configuration flag.
Let’s go through from following quick steps to create two new environments including UAT (User Acceptance Test) and test environments.
- Step 1 – Create new environment files
- Step 2 – Configure angular.json file
- Step 3 – Update Scripts in package.json file
Step 1 – Create new environment files
First, head towards the environment folder and create two new files in it named enviroment.test.ts and enviroment.uat.ts as shown below:
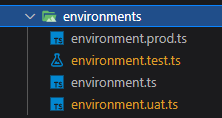
~src/environments/environment.test.ts
export const environment = {
  production: true,
  config:{
    apiUrl:'https//example.com/api-test/'
  }
};
~src/environments/environment.uat.ts
export const environment = {
  production: true,
  config:{
    apiUrl:'https//example.com/api-uat/'
  }
};
Step 2 – Configure angular.json file
Next, in the angular.json file, look for the "projects.angular-your-app-name.architect.build.configurations" property. Here, the "production" and "development" properties are available by default.
Under the "production", you will notice the "fileReplacements" as shown below:
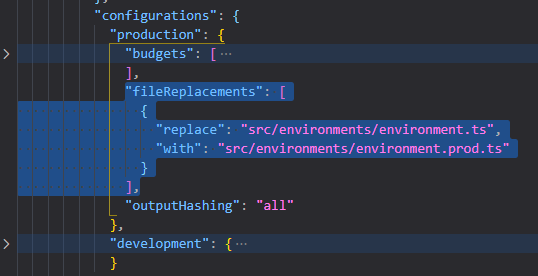
This does the replace of our environment files if running normal or prod build.
Let’s add two more properties "test" and "uat" as shown below:
"configurations": {
    "production": {
      ...
    },
    "development": {
      ...
    },
    "test":{
      "fileReplacements": [
        {
          "replace": "src/environments/environment.ts",
          "with": "src/environments/environment.test.ts"
        }
      ]
    },
    "uat":{
      "fileReplacements": [
        {
          "replace": "src/environments/environment.ts",
          "with": "src/environments/environment.uat.ts"
        }
      ]
    }
},
Step 3 – Update Scripts in package.json file
You can now run builds for the test or uat environment we just created above by adding the –configuration flag as shown below:
# Test build command
ng build --configuration test


# UAT build command
ng build --configuration uat
You can also update the scripts inside the package.json file. This is optional but preferred to add scripts which makes it easy to configure and use in the Jenkins pipeline.
Open the package.json file at the root folder and add following under “scripts” array:
"scripts": {
    "ng": "ng",
    "start": "ng serve",
    "build": "ng build",
    "build-test": "ng build --configuration test",
    "build-uat": "ng build --configuration uat",
     ...
 },
Summery
We discussed how to add or create new build environments in the Angular application. Keeping different environments makes the deployment of multiple instances very quick and error-free. This removes the extra efforts to replace certain properties and values required for a specific environment.