Angular app with Facebook social login example; We will discuss how to add Facebook login in Angular application using the OAuth protocol. For quick and easy implementation, we will be using a widely used social login plugin named angularx-social-login.
In the upcoming tutorial, you will learn how to add a Facebook social sign-in feature in the Angular app like a pro. An application will have a Facebook login button, on clicking it, the OAuth implicit flow will trigger to authenticate the user with Facebook credentials. Thereafter, authenticating the user you will be provided with user claims, including email address, name and profile image.
Firstly, we need an AppID from the Facebook developer console. That will be used to integrate the authentication in our Angular application. Secondly, we will install the angularx-social-login package and use its component to show a Facebook login button.
Let’s begin and start by getting the Facebook AppID by following the below quick steps.
How to Get Facebook App Id from Dev Console?
Let’s follow these quick steps to get the Client ID after creating an application on the Facebook developer console.
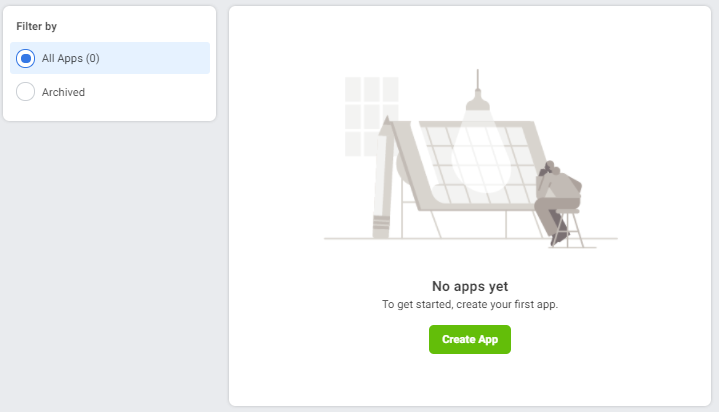
Step 1: Visit Facebook Developer Console and create an application by clicking the “Create App” button.
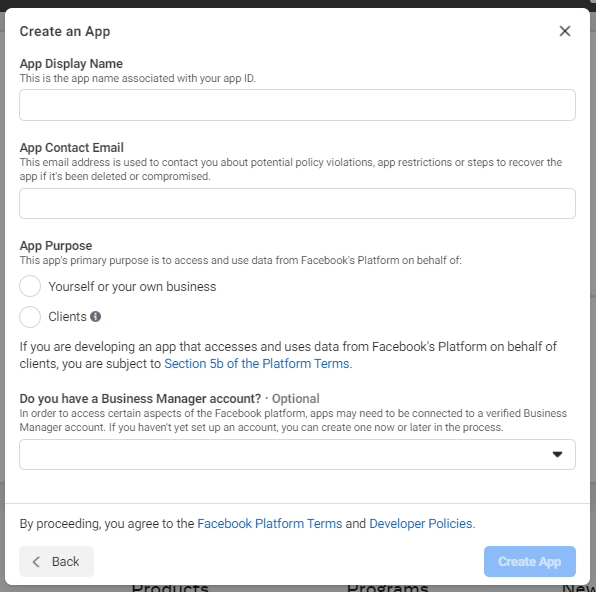
Step 2: Next, you will see a Create app popup, enter information including display name and contact email address.
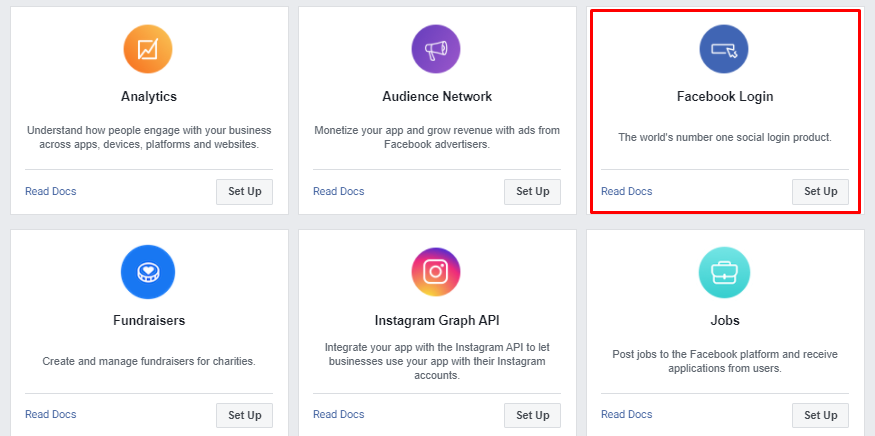
Step 3: On the next, screen you will see some cards to add to your application. Under the Facebook Login click on the Set Up button
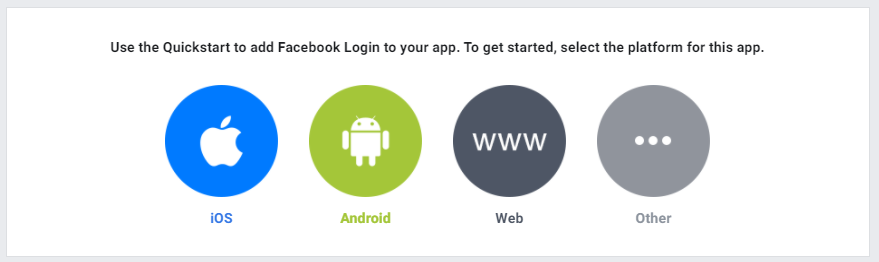
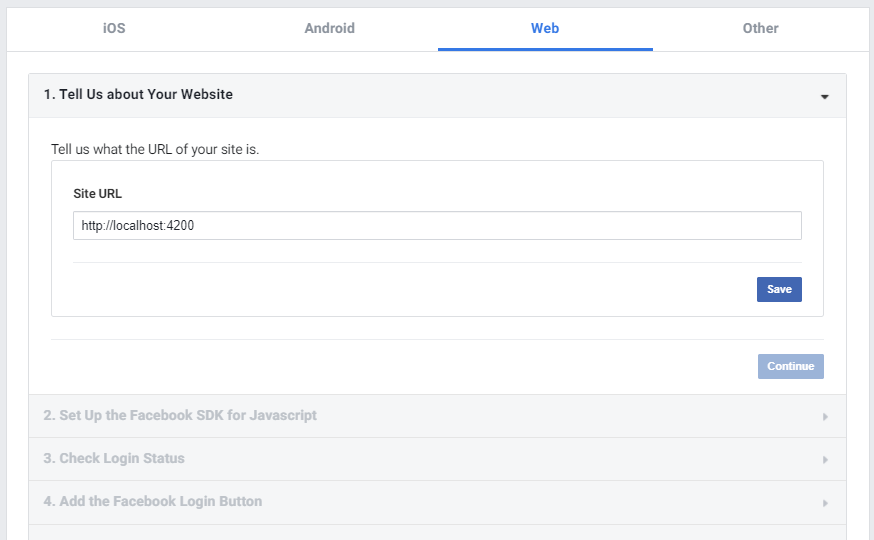
Step 3: Thereafter, you will see various platforms. Just click on the Web.
Step 4: The next screen will ask to enter the URL of your application. For now, it will be http://localhost:3000
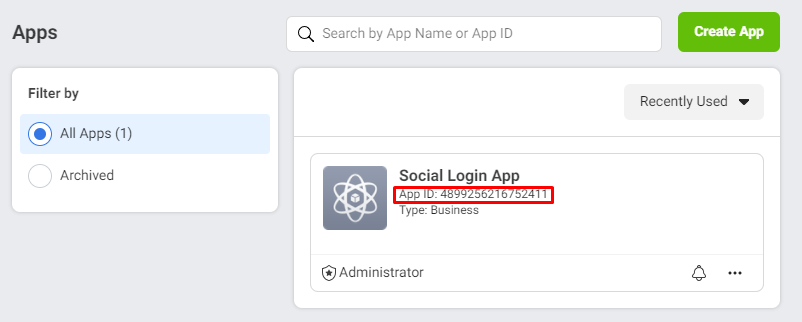
Step 5: Clicking on the Save button will create an application. You can see the application by clicking the My Apps link on top. Under the application name, you will find the App ID.
How to Add Facebook Social OAuth SignIn Button in Angular App?
After, getting the App ID, let’s proceed with the integration of Facebook Login in the Angular application. We will follow these steps to quickly integrate the Facebook authentication flow in your application:
- Step 1: Create Angular Application
- Step 2: Install Bootstrap For Styling
- Step 3: Install Angularx Social Login Package
- Step 4: Configure Social Login in Module
- Step 5: Add Facebook Sign In Button
- Step 6: Serve Application
Step 1) Create Angular Application
To start, let’s create a new Angular application. First, make sure you have Angular CLI installed on your system. Else you can execute the following command:
npm install -g @angular/cliAfter that, you can execute the following command to create a new app with a provided name:
ng new angular-facebook-login-appSoon after, move inside the directory:
cd angular-facebook-login-appStep 2) Install Bootstrap For Styling
For quick styling, an app, adding bootstrap is a nice solution but this is optional. Execute the below command to install the bootstrap package:
npm install bootstrapThereafter, open the angular.json file and update the "styles" array to include the bootstrap.min.css file:
"styles": [
  "src/styles.css",
  "node_modules/bootstrap/dist/css/bootstrap.min.css"
],
Step 3) Install Angularx Social Login Package
Now, install the angularx-social-login package in your application:
npm install angularx-social-loginStep 4) Configure Social Login in Module
After installing the package, you need to import the FacebookLoginProvider, SocialLoginModule and SocialAuthServiceConfig in the app.module.ts file:
import { BrowserModule } from '@angular/platform-browser';
import { NgModule } from '@angular/core';

import { AppComponent } from './app.component';

import { ReactiveFormsModule } from '@angular/forms';
import { FacebookLoginProvider, SocialLoginModule, SocialAuthServiceConfig } from 'angularx-social-login';

@NgModule({
  declarations: [
    AppComponent
  ],
  imports: [
    BrowserModule,
    ReactiveFormsModule,
    SocialLoginModule
  ],
  providers: [
    {
      provide: 'SocialAuthServiceConfig',
      useValue: {
        autoLogin: false,
        providers: [
          {
            id: FacebookLoginProvider.PROVIDER_ID,
            provider: new FacebookLoginProvider(
              'Your-Facebook-App-ID'
            )
          }
        ]
      } as SocialAuthServiceConfig,
    }
  ],
  bootstrap: [AppComponent]
})

export class AppModule { }
You need to provide your App Id in the class configuration above. Another important property is autoLogin, if we keep it as true, on application load it will fetch the user details if a user is already logged in else trigger the implicit flow.
Step 5) Add Facebook Sign In Button
Next, we will update the HTML template to show a Facebook login button. We are managing the UI state by using the boolean value in a variable named isLoggedin. After the user is logged in, the bootstrap card with user details including Fullname, Email, First name, Last name, Photo image url will be shown with a logout button.
Open the app.component.html file and update it as shown below:
<div class="container">

  <ng-container *ngIf="!isLoggedin; else elseTemplateLoggedIn">

    <h2 class="text-center mb-4">Login with Facebook in Angular</h2>
    <button type="button" (click)="loginWithFacebook()" class="btn btn-primary btn-block">Signin with Facebook</button>

  </ng-container>
  <ng-template #elseTemplateLoggedIn>

    <div class="card">
      <div class="card-body"> <img class="rounded" [src]="userResponse.photoUrl" alt="Profile" />
        <h5 class="card-title">Welcome, {{userResponse.name}}</h5>
        <p class="card-text">Email ID: {{userResponse.email}}</p>
        <p class="card-text">First Name: {{userResponse.email}}</p>
        <p class="card-text">Last Name: {{userResponse.email}}</p>
        <p class="card-text">ID: {{userResponse.id}}</p>
        <a href="#" class="btn btn-danger btn-sm" (click)="signOut()"> Logout </a>
      </div>
    </div>

  </ng-template>

</div>
Step 6) Serve Application
Now, we will serve the application in the secure HTTPS protocol. Otherwise, the Facebook popup will show an error saying:
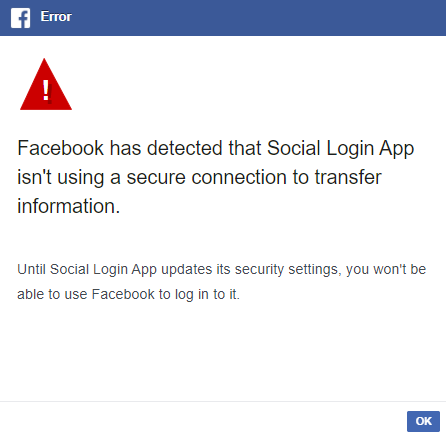
npm serve --ssl true --openAfter the application is opened, you need to click on Allow to open the application.
Conclusion
Finally, we have completed the Facebook integration with our Angular application. The implementation of Facebook Login authentication using the OAuth protocol becomes very easy using the angularx-social-login plugin. First, we discussed how to fetch the App ID after creating the application on the Facebook dev console. After that, we implemented the Facebook social login button in the Angular app.
We also discussed how to resolve a common security issue by running the application insecure network.
Hope you enjoyed this tutorial. thanks…