In this Angular tutorial, you will learn how to extract the ZIP file during npm script execution in the package.json or node commands. You will go through each step to be followed to use a third party plugin named extract-zip to achieve this functionality in your Angular application.
Angular applications may consist of a few assets resources that can be extracted from a ZIP file and can be moved into a specific location inside the application directory like the assets folder.
You will learn how to extract ZIP files into a specific location. Moreover, we will discuss how to move some folder or files content during the build process using the angular.json file’s glob feature.
In our example demo, we will create a ZIP file with a few images, that will be extracted into a folder. This folder containing the images will be moved to the assets folder. After moving and building the project, as a cleanup process, we will also delete the extracted folders which are now moved to the assets/images folder.
Let’s get started!
How to Extract ZIP file, Move its content to assets, then delete the extracted directory in Angular application?
- Step 1 – Create Angular App
- Step 2 – Install Extract-Zip Package Module
- Step 3 – Create a sample Image Zip File
- Step 4 – Update package.json Scripts
- Step 5 – Update angular.json Glob Property
- Step 6 – See in Action
Step 1 – Create Angular App
First, create a new Angular application. You can skip this step if already having an application up and running.
# Install NG CLI
npm install -g @angular/cli

#Update NG CLI
ng update
Afterwards, you can hit the following command to create a new angular project with the name provided:
ng new angular-extract-zip-appMove inside the application folder
cd angular-extract-zip-app
Step 2 – Install Extract-Zip Package Module
The extract-zip package will do the heavy load stuff to extract a zip file into a folder through node scripts. Execute following command to install the extract-zip package module in the application.
npm install extract-zipStep 3 – Create a sample Image Zip File
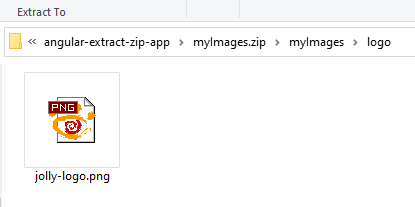
Afterwords, we will create a sample zip file named myImages.zip that will be placed in the root folder with following content:
~angular-extract-zip-app\myImages\logo\jolly-logo.png
You can have any zip file with whatever content in it as per requirements.
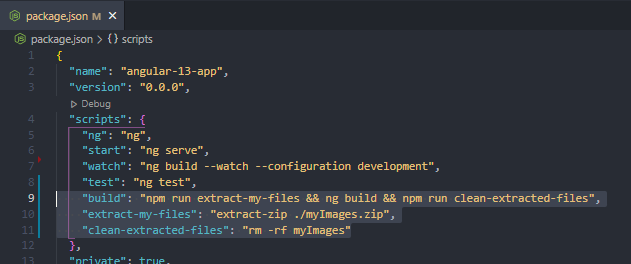
Step 4 – Update package.json Scripts
After placing the zip file at the root file, we need to modify the package.json scripts for following tasks to do while building the application:
- Extract the zip file
- Remove the extracted folder (After it is successfully placed into the dist folder) option step.
These three scripts, we will modify:
"scripts": {
    ...
    "build": "npm run extract-my-files && ng build && npm run clean-extracted-files",
    "extract-my-files": "extract-zip ./myImages.zip",
    "clean-extracted-files": "rm -rf myImages"
  },
Extract zip file: To extract the zip file(s). You can add multiple zip files as well as shown below:
"extract-my-files": "extract-zip ./myImages.zip ./anypath/otherfile.zip",Remove Extracted Folders: You can optionally remove/delete the extracted folders and its files by executing the below command for multiple if required:
"clean-extracted-files": "rm -rf myImages path/otherFolder"
In the “build” script, you will notice, that we are calling the “extract-my-files” to extract the zip file then, build the dist folder to move zip content into assets( will discuss in next step). After the dist folder or build process is complete the “clean-extracted-files” script will do clean-up stuff.
Step 5 – Update angular.json Glob Property
Now you will learn a very important and helpful process of moving the required folders/files into the dist folder itself using the glob. open the angular.json file at project root and head towards the “architect”>”build”>”options” property to modify the “assets” array as show below:
....
  "projects": {
    "angular-13-app": {
       .....
      },
      "root": "",
      "sourceRoot": "src",
      "prefix": "app",
      "architect": {
        "build": {
          "builder": "@angular-devkit/build-angular:browser",
          "options": {
             ....
            "assets": [
              "src/favicon.ico",
              "src/assets",
              {
                "glob": "**/*",
                "input": "./myImages",
                "output": "./src/assets"
              }
            ],
            "styles": ["src/styles.scss"],
            "scripts": []
          },
The object with “glob” having “input” and “output” to allow the movement of required files to the dist folder on build process:
{
"glob": "**/*",
"input": "./myImages",
"output": "./src/assets"
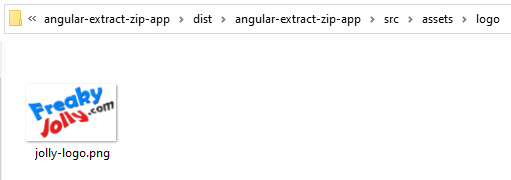
}Step 6 – See in Action
To see the action, execute the npm run build command at project root. You will see the dist folder’s asset will have the logo folder with files.
Conclusion
We are completed with a very simple tutorial on how to extract the zip file into a folder. In addition we also discussed how to move a folder content into the a specific location in the dist folder during build process. Moreover the deletion of the folder also we discussed to do the cleanup of extracted folder.
Hope this was helpful…. Thanks