In this tutorial, we will learn how to create an Angular Material table with editable fields by using dialogs. We will also perform CRUD (Create, Read, Update, Delete) operations on the data.
We will be using Angular Reactive Forms to handle form validation.
Prerequisites
- Basic knowledge of Angular
- Angular CLI installed
Step 1: Create a new Angular project
Open a terminal and run the following command to create a new Angular project:
ng new my-app
Step 2: Install Material and CDK
Run the following command to install Angular Material and the Component Development Kit (CDK) in your project:
ng add @angular/material
Step 3: Create a data model
Create a new file named data.ts in the src/app directory and define a data model as follows:
export class Data {
    id: number;
    name: string;
    email: string;
    phone: string;
}
Step 4: Create a table component
Run the following command to generate a new table component:
ng generate component tableThis will create a new folder named table in the src/app directory, containing the following files:
table.component.tstable.component.htmltable.component.css
Open the table.component.ts file and update with the following code in it:
import { Component, OnInit } from '@angular/core';
import { MatTableDataSource } from '@angular/material/table';
import { MatDialog } from '@angular/material/dialog';
import { DialogComponent } from '../dialog/dialog.component';
import { Data } from '../data';

@Component({
  selector: 'app-table',
  templateUrl: './table.component.html',
  styleUrls: ['./table.component.css'],
})
export class TableComponent implements OnInit {
  dataSource = new MatTableDataSource<Data>();
  displayedColumns: string[] = ['id', 'name', 'email', 'phone', 'action'];

  constructor(public dialog: MatDialog) {}

  ngOnInit(): void {
    this.dataSource.data = [
      {
        id: 1,
        name: 'John Doe',
        email: 'johndoe@example.com',
        phone: '123-456-7890',
      },
      {
        id: 2,
        name: 'Jane Smith',
        email: 'janesmith@example.com',
        phone: '098-765-4321',
      },
    ];
  }

  addData(): void {
    const dialogRef = this.dialog.open(DialogComponent, {
      width: '250px',
      data: { type: 'add', data: new Data() },
    });

    dialogRef.afterClosed().subscribe((result) => {
      if (result) {
        this.dataSource.data.push(result);
        this.dataSource._updateChangeSubscription();
      }
    });
  }

  updateData(data: Data): void {
    const dialogRef = this.dialog.open(DialogComponent, {
      width: '250px',
      data: { type: 'update', data: data },
    });

    dialogRef.afterClosed().subscribe((result) => {
      if (result) {
        const index = this.dataSource.data.findIndex((x) => x.id === result.id);
        this.dataSource.data[index] = result;
        this.dataSource._updateChangeSubscription();
      }
    });
  }

  viewData(data: Data): void {
    this.dialog.open(DialogComponent, {
      width: '250px',
      data: { type: 'view', data: data },
    });
  }

  deleteData(id: number): void {
    this.dataSource.data = this.dataSource.data.filter((x) => x.id !== id);
    this.dataSource._updateChangeSubscription();
  }
}
And here is the complete code for the table.component.html file:
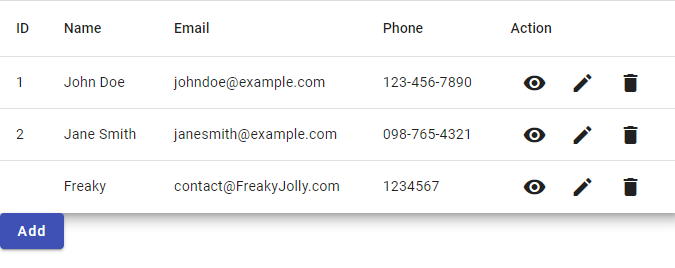
<table mat-table [dataSource]="dataSource" class="mat-elevation-z8">

    <ng-container matColumnDef="id">
        <th mat-header-cell *matHeaderCellDef> ID </th>
        <td mat-cell *matCellDef="let element"> {{element.id}} </td>
    </ng-container>
    <ng-container matColumnDef="name">
        <th mat-header-cell *matHeaderCellDef> Name </th>
        <td mat-cell *matCellDef="let element"> {{element.name}} </td>
    </ng-container>

    <ng-container matColumnDef="email">
        <th mat-header-cell *matHeaderCellDef> Email </th>
        <td mat-cell *matCellDef="let element"> {{element.email}} </td>
    </ng-container>

    <ng-container matColumnDef="phone">
        <th mat-header-cell *matHeaderCellDef> Phone </th>
        <td mat-cell *matCellDef="let element"> {{element.phone}} </td>
    </ng-container>

    <ng-container matColumnDef="action">
        <th mat-header-cell *matHeaderCellDef class="text-center"> Action </th>
        <td mat-cell *matCellDef="let element" class="text-center">
            <button mat-icon-button (click)="viewData(element)">
                <mat-icon>remove_red_eye</mat-icon>
            </button>
            <button mat-icon-button (click)="updateData(element)">
                <mat-icon>edit</mat-icon>
            </button>
            <button mat-icon-button (click)="deleteData(element.id)">
                <mat-icon>delete</mat-icon>
            </button>
        </td>
    </ng-container>

    <tr mat-header-row *matHeaderRowDef="displayedColumns"></tr>
    <tr mat-row *matRowDef="let row; columns: displayedColumns;"></tr>
</table>

<button mat-raised-button color="primary" (click)="addData()">Add</button>
Step 5: Create a dialog component
Run the following command to generate a new dialog component:
ng generate component dialogThis will create a new folder named dialog in the src/app directory, containing the following files:
dialog.component.tsdialog.component.htmldialog.component.css
Open the dialog.component.ts file and update with below code:
import { Component, Inject } from '@angular/core';
import { MatDialogRef, MAT_DIALOG_DATA } from '@angular/material/dialog';
import { FormGroup, FormBuilder, Validators } from '@angular/forms';
import { Data } from '../data';

@Component({
  selector: 'app-dialog',
  templateUrl: './dialog.component.html',
  styleUrls: ['./dialog.component.css'],
})
export class DialogComponent {
  form: FormGroup;
  type: string;
  data: Data;

  constructor(
    public dialogRef: MatDialogRef<DialogComponent>,
    @Inject(MAT_DIALOG_DATA) public inputData: any,
    private formBuilder: FormBuilder
  ) {
    this.type = inputData.type;
    this.data = inputData.data;

    this.form = this.formBuilder.group({
      name: [this.data.name, Validators.required],
      email: [this.data.email, [Validators.required, Validators.email]],
      phone: [
        this.data.phone,
        [Validators.required, Validators.pattern('^[0-9]*$')],
      ],
    });
  }

  onNoClick(): void {
    this.dialogRef.close();
  }

  onSaveClick(): void {
    if (this.form.valid) {
      this.dialogRef.close(this.form.value);
    }
  }
}
In this component, we are using MatDialogRef and MAT_DIALOG_DATA from Angular Material to create a dialog and receive data from the parent component. We are also using FormBuilder, FormGroup and Validators from Angular Forms to create the form and handle validation. We are injecting the data that is passed from the parent component to the dialog component via the inputData variable, and then using that data to create the form and set the values of the form controls.
The onNoClick() function is used to close the dialog when the user clicks the “Cancel” button, and the onSaveClick() function is used to save the form data and close the dialog when the user clicks the “Save” button.
Here is the complete code for the dialog.component.html file:
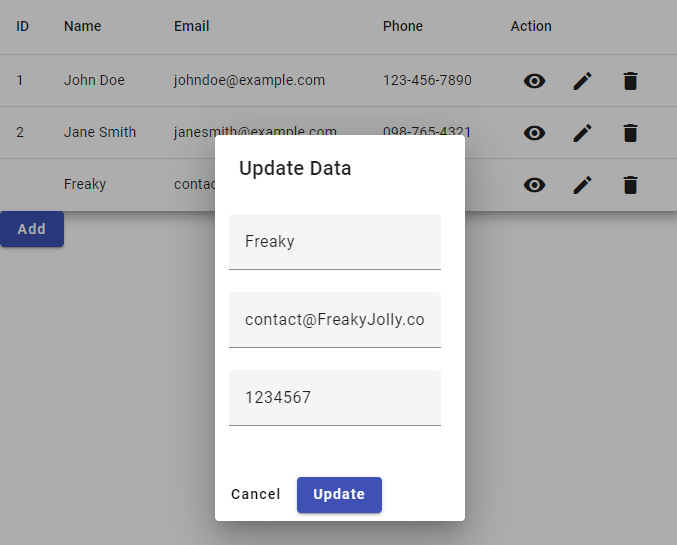
<h1 mat-dialog-title>{{ type == 'add' ? 'Add' : type == 'update' ? 'Update' : 'View' }} Data</h1>
<form [formGroup]="form" (ngSubmit)="onSaveClick()" *ngIf="type != 'view'">
<div mat-dialog-content>
<mat-form-field>
<input matInput formControlName="name" placeholder="Name">
<mat-error *ngIf="form.get('name')?.hasError('required')">
Name is <strong>required</strong>
</mat-error>
</mat-form-field>
<mat-form-field>
<input matInput formControlName="email" placeholder="Email">
<mat-error *ngIf="form.get('email')?.hasError('required')">
Email is <strong>required</strong>
</mat-error>
<mat-error *ngIf="form.get('email')?.hasError('email')">
Email is <strong>not valid</strong>
</mat-error>
</mat-form-field>
<mat-form-field>
<input matInput formControlName="phone" placeholder="Phone">
<mat-error *ngIf="form.get('phone')?.hasError('required')">
Phone is <strong>required</strong>
</mat-error>
</mat-form-field>
</div>
<div mat-dialog-actions>
<button mat-button (click)="onNoClick()">Cancel</button>
<button mat-raised-button color="primary" [disabled]="form.invalid" type="submit">{{ type == 'add' ? 'Add' :
'Update' }}</button>
</div>
</form>
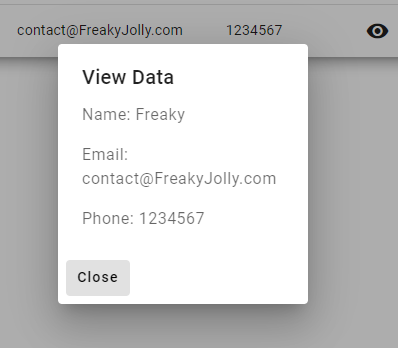
<div mat-dialog-content *ngIf="type == 'view'">
<p>Name: {{data.name}}</p>
<p>Email: {{data.email}}</p>
<p>Phone: {{data.phone}}</p>
</div>
<div mat-dialog-actions *ngIf="type == 'view'">
<button mat-button (click)="onNoClick()">Close</button>
</div>
You can now run the application by using the following command:
ng serve --open
It should display the table with data and a button to add data. You can add, update and delete the data.
Conclusion
we have learned how to create an Angular Material table with editable fields using dialogs, and how to perform CRUD operations on the data. We also learned how to handle form validation using Angular Reactive Forms.
This approach can be used for creating dynamic forms in Angular, and can also be applied to other types of data such as products, customers, or orders.