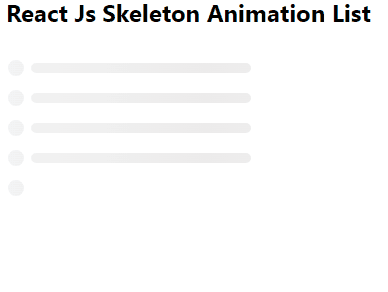
In this post, you will learn how to quickly create customized animated skeleton animated effects by the drag-drop tool in React JS application.
Various social media sites show skeleton animated sections to indicate that data is still loading, meanwhile, an animation is shown on the screen.
Similarly, you can create a customised animation effect in react js application in no time. We will use the react-content-loader library which will do the heavy lifting stuff for you.

How to Add Skeleton Animation in React JS application?
Step 1 – Create React App
Step 2 – Install React Content Loader Library
Step 3 – Create Skeleton Effect Component
Step 4 – Drag Drop to Create Effect
Step 5 – Use Skeleton Effect on List
Step 6 – See In Action
Step 1 – Create React App
First, make sure your system is having the create-react-app tool installed:
npm install create-react-app --globalnext, execute the following comamnd to create a react application with provided name:
npx create-react-app my-react-appMove inside the react application folder:
cd my-react-app
Step 2 – Install React Content Loader Library
To use the skeleton animation component, we need to install the React Content Loader library. Execute following command to install package module:
npm i react-content-loader
Step 4 – Drag Drop to Create Effect
Head towards this page to create your own style of loading component
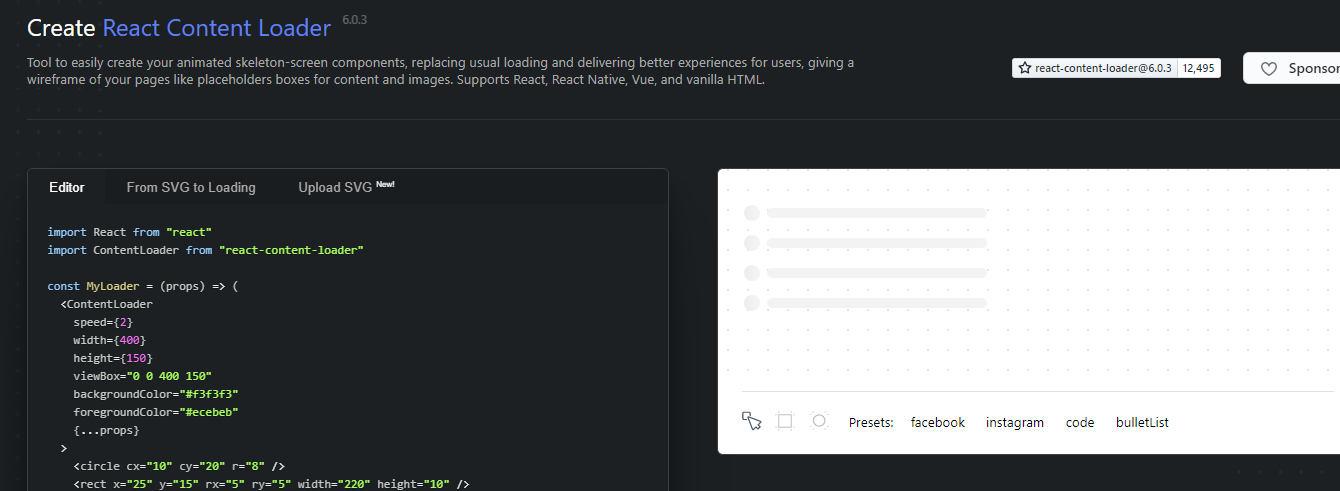
On the right section, you can create the loading structure, after you are done, just copy the left side component and past in the ListLoader.js file. In our case, we will use the bulletList preset style.
Step 3 – Create Skeleton Effect Component
Open the src directory and create the components folder with file named ListLoading.js:
Update the src/components/ListLoading.js file with the following content:
import React from "react";
function ListLoading() {
  return <div></div>;
}
export default ListLoading;
Now, import the ContentLoader from ‘react-content-loader’ then place the copied loader component in the return section as shown below:
import React from "react";
import ContentLoader from "react-content-loader";

function ListLoading(props) {
  return (
    <ContentLoader
      speed={2}
      width={400}
      height={150}
      viewBox="0 0 400 150"
      backgroundColor="#f3f3f3"
      foregroundColor="#ecebeb"
      {...props}
    >
      <circle cx="10" cy="20" r="8" />
      <rect x="25" y="15" rx="5" ry="5" width="220" height="10" />
      <circle cx="10" cy="50" r="8" />
      <rect x="25" y="45" rx="5" ry="5" width="220" height="10" />
      <circle cx="10" cy="80" r="8" />
      <rect x="25" y="75" rx="5" ry="5" width="220" height="10" />
      <circle cx="10" cy="110" r="8" />
      <rect x="25" y="105" rx="5" ry="5" width="220" height="10" />
      <circle cx="10" cy="110" r="8" />
      <rect x="25" y="105" rx="5" ry="5" width="220" height="10" />
      <circle cx="10" cy="110" r="8" />
      <rect x="25" y="105" rx="5" ry="5" width="220" height="10" />
    </ContentLoader>
  );
}
export default ListLoading;
Step 5 – Use Skeleton Effect on List
We have a components/SelectList.js component, that will load the remote List items using the fetch function. Here we have imported the ListLoader.js component to show loading skeleton animation till the data is loaded and populated into the list variable.
import React, { useState, useEffect } from "react";
import "../App.css";
import ListLoading from "./ListLoading";
function SelectList() {
  const [list, setList] = useState([]);
  const [active, setActive] = useState(null);
  const fetchData = () => {
    fetch("https://jsonplaceholder.typicode.com/users")
      .then((res) => res.json())
      .then((json) => setList(json))
      .catch((e) => console.log(e));
  };
  useEffect(() => {
    fetchData();
  }, []);
  return (
    <div>
      <h2>React Js Skeleton Animation List Item Example</h2>
      {(() => {
        if (list.length) {
          return (
            <ul className="list-group">
              {list.map((item) => {
                return (
                  <li
                    key={item.id}
                    onClick={() => setActive(item)}
                    className={`list-item ${active == item && "active"}`}
                  >
                    {item.name}
                  </li>
                );
              })}
            </ul>
          );
        } else {
          return <ListLoading />;
        }
      })()}
    </div>
  );
}
export default SelectList;
The if-else expression inside the template will handle the show of animation and list items using the value in the list variable.
Next, you can import the SelectList component into the App.js file as shown below:
import React from "react";
import "./App.css";
import SelectList from "./components/SelectList";
function App() {
  return (
    <div className="wrap">
      <SelectList />
    </div>
  );
}
export default App;
Step 6 – See In Action
Run your react application in the development web server by hitting the below command:
npm startIt will open the application at the following URL: