Friends, as we know that login system allows the user to gain access to any software system securely. Sign Up is the process that enables the user to register in any web and mobile app.
So, in this tutorial, we will get to know how can we create an attractive login and user registration template for a React app. We will do this by using the Bootstrap 4 front-end framework to build this react login system.
If you are a novice in creating React apps, then just don’t worry. This guide will make you learn the same while starting from scratch.
How to Create Login and Register Screen using Bootstrap in React Js?
Follow these quick steps to easily create Bootstrap templates for Login and Signup with validation
Step 1 – Create React App
Step 2 – Install and Setup Bootstrap
Step 3 – Create Login and Signup Components with Forms
Step 4 – Enable Routing In React
Step 1 – Create React App
This is the basic step in which we have to install a new React project so that we can move forward towards building React login and sign-up UI template by using Bootstrap 4. We simply have to use the given command using create-react-app:
npx create-react-app react-login-signup-ui-template
Next is to enter inside the react-login-signup-ui-template project.
cd react-login-signup-ui-template
Step 2 – Install and Setup Bootstrap
Further, we need to install and set up the Bootstrap UI framework and it provides beautiful UI components:
npm install bootstrap --save
After installing Bootstrap, we have now to import bootstrap.min.css inside the index.js file:
import React from 'react';
import ReactDOM from 'react-dom/client';
import './index.css';
import "bootstrap/dist/css/bootstrap.min.css"; //<- Add Here
import App from './App';
import reportWebVitals from './reportWebVitals';

const root = ReactDOM.createRoot(document.getElementById('root'));
root.render(
  <React.StrictMode>
    <App />
  </React.StrictMode>
);
reportWebVitals();
Let’s start the React app:
npm start
Step 3 – Create Login and Signup Components with Forms
After creating a new React app with Bootstrap configured, next, we will create the Login.js and Signup.js files under the src folder.
Thereafter update the respective file code as shown below:
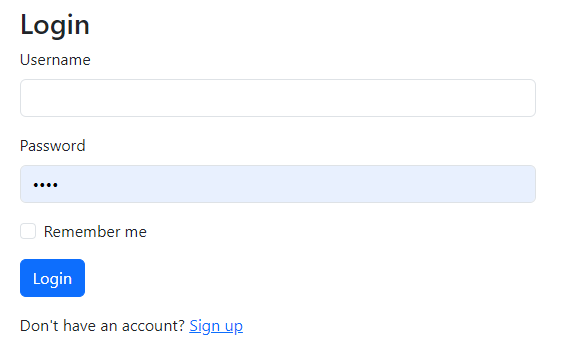
Login.js:
import React from "react";
import LoginForm from "./LoginForm";

const Login = () => {
  return (
    <div className="container">
      <LoginForm />
      <p className="mt-3">
        Don't have an account? <a href="/signup">Sign up</a>
      </p>
    </div>
  );
};

export default Login;
Signup.js:
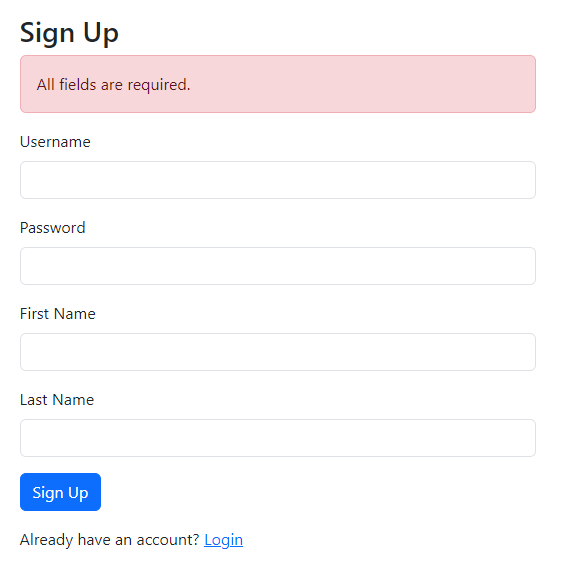
import React from "react";
import SignupForm from "./SignupForm";

const Signup = () => {
  return (
    <div className="container">
      <SignupForm />
      <p className="mt-3">
        Already have an account? <a href="/">Login</a>
      </p>
    </div>
  );
};

export default Signup;
If you notice, these components, in turn, are having other components named LoginForm and SignupForm which will contain the Form fields and validation stuff.
Create Form components under the src directory with the names LoginForm.js and SignupForm.js then update their respective code as shown below:
LoginForm.js:
import React, { useState } from "react";

const LoginForm = () => {
  const [username, setUsername] = useState("");
  const [password, setPassword] = useState("");
  const [remember, setRemember] = useState(false);
  const [errorMessage, setErrorMessage] = useState("");

  const handleLogin = (e) => {
    e.preventDefault();
    if (!username || !password) {
      setErrorMessage("Username and password are required.");
    } else {
      // Handle login logic here
    }
  };

  return (
    <form>
      <h2>Login</h2>
      {errorMessage && <div className="alert alert-danger">{errorMessage}</div>}
      <div className="mb-3">
        <label htmlFor="username" className="form-label">
          Username
        </label>
        <input
          type="text"
          className="form-control"
          id="username"
          value={username}
          onChange={(e) => setUsername(e.target.value)}
        />
      </div>
      <div className="mb-3">
        <label htmlFor="password" className="form-label">
          Password
        </label>
        <input
          type="password"
          className="form-control"
          id="password"
          value={password}
          onChange={(e) => setPassword(e.target.value)}
        />
      </div>
      <div className="mb-3 form-check">
        <input
          type="checkbox"
          className="form-check-input"
          id="remember"
          checked={remember}
          onChange={() => setRemember(!remember)}
        />
        <label className="form-check-label" htmlFor="remember">
          Remember me
        </label>
      </div>
      <button type="submit" className="btn btn-primary" onClick={handleLogin}>
        Login
      </button>
    </form>
  );
};

export default LoginForm;
SignupForm.js:
import React, { useState } from "react";

const SignupForm = () => {
  const [username, setUsername] = useState("");
  const [password, setPassword] = useState("");
  const [firstName, setFirstName] = useState("");
  const [lastName, setLastName] = useState("");
  const [errorMessage, setErrorMessage] = useState("");

  const handleSignup = (e) => {
    e.preventDefault();
    if (!username || !password || !firstName || !lastName) {
      setErrorMessage("All fields are required.");
    } else {
      // Handle signup logic here
    }
  };

  return (
    <form>
      <h2>Sign Up</h2>
      {errorMessage && <div className="alert alert-danger">{errorMessage}</div>}
      <div className="mb-3">
        <label htmlFor="username" className="form-label">
          Username
        </label>
        <input
          type="text"
          className="form-control"
          id="username"
          value={username}
          onChange={(e) => setUsername(e.target.value)}
        />
      </div>
      <div className="mb-3">
        <label htmlFor="password" className="form-label">
          Password
        </label>
        <input
          type="password"
          className="form-control"
          id="password"
          value={password}
          onChange={(e) => setPassword(e.target.value)}
        />
      </div>
      <div className="mb-3">
        <label htmlFor="firstName" className="form-label">
          First Name
        </label>
        <input
          type="text"
          className="form-control"
          id="firstName"
          value={firstName}
          onChange={(e) => setFirstName(e.target.value)}
        />
      </div>
      <div className="mb-3">
        <label htmlFor="lastName" className="form-label">
          Last Name
        </label>
        <input
          type="text"
          className="form-control"
          id="lastName"
          value={lastName}
          onChange={(e) => setLastName(e.target.value)}
        />
      </div>
      <button type="submit" className="btn btn-primary" onClick={handleSignup}>
        Sign Up
      </button>
    </form>
  );
};

export default SignupForm;
Step 4 – Enable Routing In React
In this step, we run the command in the terminal to install the react-router-dom module to enable Router service in React:
npm install --save react-router-dom
Then, we will go to the src/App.js file and update to define routes for Login and Signup pages:
import React from "react";
import { BrowserRouter as Router, Route, Routes } from "react-router-dom"; // Note the removal of 'Switch'
import Login from "./Login";
import Signup from "./Signup";

const App = () => {
  return (
    <Router>
      <Routes>
        <Route path="/" element={<Login />} />
        <Route path="/signup" element={<Signup />} />
      </Routes>
    </Router>
  );
};

export default App;
That’s it now you have Login and Signup template styled with Bootstrap as shown below:
Conclusion
So, friends, here we reach the end of this tutorial in which we have learned to build React Login and Sign Up UI templates using the Bootstrap 4 UI framework. Hope you have found it quite simple to make beautiful components in React by using Bootstrap 4 UI Components.