In this comprehensive guide, you will learn about Auth Guards in Angular 15 with practical examples of Students applications.
In this tutorial series, we will cover all 4 important types of Auth Guards we generally find useful in our application including CanActivate, CanActivateChild, CanDeactivate and CanLoad with examples and detailed implementation steps.
Note: In latest Angular 15, you will see this warning message ”
‘CanActivate’ is deprecated.ts(6385)
index.d.ts: The declaration was marked as deprecated here.(alias) interface CanActivate
import CanActivate“
After upgrading to the latest Angular 15 version, you have noticed that the warning saying canActivate interface is deprecated. You can find our Auth Guard implementation tutorial for previous versions here.
What are Auth Guards and Why they are used?
Auth Guards provided by Angular that are used to control behaviour during navigation to and from various routes in the application.
Routes are used to define public and private paths in the application that help a user to navigate from one component/ module to another.
Auth Guards as the name sounds act as a gatekeeper, determining whether a user can access a specific route based on conditions such as authentication status or user permissions.
How Auth Guard Implementation has Changed in Anguar 15?
Angular version 15 introduced a new syntax for creating route guards that do not require the use of interfaces.
According to official Angular docs, we can create a custom functional class that will inject the and Auth Service and Router service to control the navigational behaviour behind our Guards.
Let’s jump into the practical implementation of our canActivate class in a sample Students application. In this Students app, a user can only be allowed to view Students details, if it is logged in. Else the navigation will redirect to the Login page.
How to Implement canActivate Auth Guards in Angular App?
Follow these quick steps to start implementing Auth guards in your Angular project:
Setting up the Angular Project
First, let’s create a new Angular project using the Angular CLI:
ng new angular-auth-guards-example
cd angular-auth-guards-example
Creating Required Component
For our student’s app, we will create a few of the required components, that will help us to easy demonstrate the required scenario.
Execute the following generate commands one by one to create the required components:
ng generate component student-list
ng generate component student-details
ng generate component login
Create Auth Guard Function and Service Class
Next, we will create a guard and a service that will help to authenticate route navigation for our application.
Execute the following command to create them quickly:
ng generate service auth/auth
ng generate guard auth/auth
This is how the project directory will look after creating all the files including components, guard and service for our Student’s application:
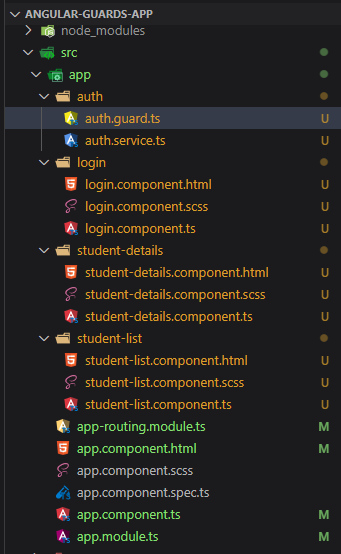
Update Auth Guard and Service
Thereafter, we will update the authGuard and <span >AuthService</span>code. Open the auth.guard.ts and auth.service.ts files and update then as below:
~angular-guards-app\src\app\auth\auth.guard.ts
import { inject } from '@angular/core';
import { Router } from '@angular/router';

import { AuthService } from './auth.service';

export const authGuard = () => {
  const authService = inject(AuthService);
  const router = inject(Router);

  if (authService.isLoggedIn) {
    return true;
  }

  // Redirect to the login page
  return router.parseUrl('/login');
};
Above code defines a custom authGuard function that checks whether the user is logged in and returns a boolean value or a URL tree.
The inject function is used to inject an instance of AuthService and Router into the authGuard function.
If the AuthService indicates that the user is logged in, the function returns true, allowing the navigation to continue. Otherwise, it returns a URL tree that redirects the user to the login page.
This custom authGuard function can be used in the Angular router configuration to protect routes that require authentication.
~angular-guards-app\src\app\auth\auth.service.ts
import { Injectable } from '@angular/core';

import { Observable, of } from 'rxjs';
import { tap, delay } from 'rxjs/operators';

@Injectable({
  providedIn: 'root',
})
export class AuthService {
  isLoggedIn = false;

  // store the URL so we can redirect after logging in
  redirectUrl: string | null = null;

  login(): Observable<boolean> {
    return of(true).pipe(
      delay(1000),
      tap(() => (this.isLoggedIn = true))
    );
  }

  logout(): void {
    this.isLoggedIn = false;
  }
}
This is the service called AuthService that provides methods for simulating user authentication in an Angular application.
The service has the following properties and methods:
isLoggedIn: a boolean flag that indicates whether the user is currently authenticated or not.redirectUrl: a string that stores the URL that the user was trying to access before being redirected to the login page.login(): Returns an Observable that simulates the login process. The method sets theisLoggedInflag to true after a delay of 1 second using thedelay()operator from RxJS, and logs the user in using thetap()operator from RxJS.logout(): a method that sets theisLoggedInflag to false, effectively logging the user out of the application.
This service provides a simple way to handle user authentication in an Angular application, without the need for an actual authentication server or database. It can be used as a starting point for building more advanced authentication systems.
Update App Routing Module
Next, we will set up the Application routing module that will take in out authGuard to handle the navigation logic. Open the app-routing.module.ts file and update it with the following code:
// src/app/app-routing.module.ts
import { NgModule } from '@angular/core';
import { RouterModule, Routes } from '@angular/router';
import { StudentListComponent } from './student-list/student-list.component';
import { StudentDetailsComponent } from './student-details/student-details.component';
import { LoginComponent } from './login/login.component';
import { authGuard } from './auth/auth.guard';

const routes: Routes = [
  { path: '', redirectTo: '/students', pathMatch: 'full' },
  { path: 'students', component: StudentListComponent },
  {
    path: 'student/:id',
    component: StudentDetailsComponent,
    canActivate: [authGuard],
  },
  { path: 'login', component: LoginComponent },
  { path: '**', redirectTo: '/students' },
];

@NgModule({
  imports: [RouterModule.forRoot(routes)],
  exports: [RouterModule],
})
export class AppRoutingModule {}
Update Components Class and Templates
After completing the heavy load, now we will update the classes and HTML templates of the components we created.
Login Component:
<!-- src/app/login/login.component.html -->
<h2>Login</h2>
<button (click)="login()">Log in</button>
// src/app/login/login.component.ts
import { Component } from '@angular/core';
import { Router } from '@angular/router';
import { AuthService } from '../auth/auth.service';
@Component({
selector: 'app-login',
templateUrl: './login.component.html',
styleUrls: ['./login.component.scss'],
})
export class LoginComponent {
constructor(private authService: AuthService, private router: Router) {}
login(): void {
this.authService.login().subscribe(() => {
if (this.authService.isLoggedIn) {
const redirectUrl = this.authService.redirectUrl
? this.authService.redirectUrl
: '/students';
this.router.navigate([redirectUrl]);
}
});
}
}
Student List Component:
<!-- src/app/student-list/student-list.component.html -->
<h2>Student List</h2>
<ul>
    <li *ngFor="let student of students">
        <a [routerLink]="['/student', student.id]">{{ student.name }}</a>
    </li>
</ul>
// src/app/student-list/student-list.component.ts
import { Component } from '@angular/core';
@Component({
selector: 'app-student-list',
templateUrl: './student-list.component.html',
styleUrls: ['./student-list.component.scss'],
})
export class StudentListComponent {
students = [
{ id: 1, name: 'Student 1' },
{ id: 2, name: 'Student 2' },
{ id: 3, name: 'Student 3' },
];
}
Student Details Component:
<!-- src/app/student-details/student-details.component.html -->
<h2>Student Details</h2>
<div *ngIf="student">
    <p>ID: {{ student.id }}</p>
    <p>Name: {{ student.name }}</p>
</div>
// src/app/student-details/student-details.component.ts
import { Component, OnInit } from '@angular/core';
import { ActivatedRoute } from '@angular/router';
@Component({
selector: 'app-student-details',
templateUrl: './student-details.component.html',
styleUrls: ['./student-details.component.scss'],
})
export class StudentDetailsComponent implements OnInit {
student: any;
constructor(private route: ActivatedRoute) {}
ngOnInit(): void {
const id = Number(this.route.snapshot.paramMap.get('id'));
this.student = { id, name: `Student ${id}` };
}
}
Update App Component
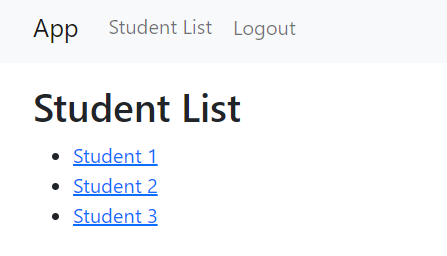
Finally, we will add the links with Login/ Logout button with router-outlet to show the required components using routing.
App Component:
<!-- src/app/app.component.html -->
<header>
  <nav class="navbar navbar-expand-lg navbar-light bg-light">
    <div class="container">
      <a class="navbar-brand" routerLink="/">App</a>
      <button class="navbar-toggler" type="button" data-bs-toggle="collapse" data-bs-target="#navbarNav"
        aria-controls="navbarNav" aria-expanded="false" aria-label="Toggle navigation">
        <span class="navbar-toggler-icon"></span>
      </button>
      <div class="collapse navbar-collapse" id="navbarNav">
        <ul class="navbar-nav">
          <li class="nav-item">
            <a class="nav-link" routerLink="/students">Student List</a>
          </li>
          <li class="nav-item" *ngIf="!authService.isLoggedIn">
            <a class="nav-link" routerLink="/login">Login</a>
          </li>
          <li class="nav-item" *ngIf="authService.isLoggedIn">
            <button class="btn btn-link nav-link" (click)="logout()">Logout</button>
          </li>
        </ul>
      </div>
    </div>
  </nav>
</header>
<main class="container mt-3">
  <router-outlet></router-outlet>
</main>
// src/app/app.component.ts
import { Component } from '@angular/core';
import { Router } from '@angular/router';
import { AuthService } from './auth/auth.service';
@Component({
selector: 'app-root',
templateUrl: './app.component.html',
styleUrls: ['./app.component.scss'],
})
export class AppComponent {
constructor(public authService: AuthService, private router: Router) {}
logout(): void {
this.authService.logout();
this.router.navigate(['/']);
}
}
Make sure you have the following in your app.module.ts file:
import { NgModule } from '@angular/core';
import { BrowserModule } from '@angular/platform-browser';

import { AppRoutingModule } from './app-routing.module';
import { AppComponent } from './app.component';
import { StudentListComponent } from './student-list/student-list.component';
import { StudentDetailsComponent } from './student-details/student-details.component';
import { LoginComponent } from './login/login.component';

@NgModule({
  declarations: [
    AppComponent,
    StudentListComponent,
    StudentDetailsComponent,
    LoginComponent
  ],
  imports: [
    BrowserModule,
    AppRoutingModule
  ],
  providers: [],
  bootstrap: [AppComponent]
})
export class AppModule { }
Run Application
Now we are ready to run and test our application. Execute the npm start or ng serve command in the terminal to start the webserver open the application on http://localhost:4200/

Conclusion
We have successfully created an Angular application that demonstrates the use of the canActivate Auth Guard to protect certain routes. By implementing an AuthService to manage user authentication status and redirecting unauthenticated users to the Login page, we’ve ensured that only authenticated users can access protected routes which is the Student Details page here.
You can further extend this project by integrating real-world authentication providers, adding role-based access control, or implementing other guards, such as canLoad or canActivateChild, to enhance the security of your application.