In this Angular tutorial, you will learn how to add Toast Notification messages in the Angular application by adding the ngx-toastr package module.
A toast notification message is a very useful UI element that helps in displaying the messages to the user. A message could be an error, warning, success or just information. These message pieces of text may be triggered from HTTP rest calls which can intimate if there is some error or process is completed like the form is submitted successfully.
Using ngx-toastr you can quickly and easily add Toasts by following a few quick steps. You can easily customise the default appearances globally in your application.
In this tutorial, you will learn how to create a common service method that can be easily used to display toast messages from any component of your modules by calling a single service method. This type of architectural implementation helps in organizing and maintaining complex applications very well.
How to Add/ Show Toast Messages in Angular 13 Application?
Following are the quick steps to show toast notification messages using a common service in the Angular application:
Step 1 – Create Angular Application
Step 2 – Install the NGX-Toastr Package Module
Step 3 – Import CSS/SCSS Toastr Styles
Step 4 – Import Toastr in AppModule
Step 5 – Create a Toaster Service
Step 6 – Global Configuration for Toast Messages
Step 7 – Start Showing Toast Messages
Step 8 – See In Action
Step 1 – Create Angular Application
First, we will create a new Angular application using the NG command on the terminal. Make sure you have installed the latest version of Angular CLI to use ng commands. Execute the following to upgrade or install the NG CLI:
npm install -g @angular/cliCreate a new Angular application by executing the below command:
ng new angular-toaster-appEnter into the application directory
cd angular-toaster-appNow open your application in the Visual Studio Code IDE
code .
Step 2 – Install the NGX-Toastr Package Module
Next, install the NGX-Toastr plugin in your application. Execute the following commands to install the ngx-toastr module:
npm install ngx-toastr --saveOptionally you can install Angular’s animation package to support transitions. It’s better to have it, if don’t then we need to include toastr module in another way we will show you.
npm install @angular/animations --saveStep 3 – Import CSS/SCSS Toastr Styles
Toastr CSS style needs to be imported into the application. There are two ways to do it for CSS and SCSS approaches, we have discussed them both:
CSS Style Import:
You can easily add the toastr.css file in the "styles" property array inside the angular.json file in application root:
...
"styles": [
  ...
  "node_modules/ngx-toastr/toastr.css"
],
...
SCSS Style Import:
Open the styles.scss file and import the toastr.scss files:
// regular style toast
@import '~ngx-toastr/toastr';
Step 4 – Import Toastr in AppModule
Afterwards, we need to add the toastr module in the AppModule to use it in our application. Open the app.module.ts file to update the imports array with Toastr Module.
We will go ahead to use the animations module in this tutorial.
With Animation( Most common, when @angular/animations module is installed )
import { NgModule } from '@angular/core';
import { BrowserModule } from '@angular/platform-browser';

import { AppComponent } from './app.component';

import { BrowserAnimationsModule } from '@angular/platform-browser/animations';
import { ToastrModule } from 'ngx-toastr';

@NgModule({
  declarations: [AppComponent],
  imports: [
    BrowserModule,
    BrowserAnimationsModule, // required animations module
    ToastrModule.forRoot(), // ToastrModule added
  ],
  providers: [],
  bootstrap: [AppComponent],
})
export class AppModule {}
Without Animations Module Installed
import { NgModule } from '@angular/core';
import { BrowserModule } from '@angular/platform-browser';

import { AppComponent } from './app.component';

import { BrowserAnimationsModule } from '@angular/platform-browser/animations';
import { ToastrModule } from 'ngx-toastr';

@NgModule({
  declarations: [AppComponent],
  imports: [
    BrowserModule,
    BrowserAnimationsModule, // required animations module
    ToastrModule.forRoot(), // ToastrModule added
  ],
  providers: [],
  bootstrap: [AppComponent],
})
export class AppModule {}
Step 5 – Create a Toaster Service
To reuse the toast methods, we will create a common service. This service will limit the ToastrService import to one place only. Moreover, it makes the maintenance and changes eazy.
Execute the following command to create a new service in the services folder:
ng generate service services/commonIt will create the CommonService at the following path:
~src/app/services/common.service.ts
Update it with the following code:
import { Injectable } from '@angular/core';
import { IndividualConfig, ToastrService } from 'ngx-toastr';

export interface toastPayload {
  message: string;
  title: string;
  ic: IndividualConfig;
  type: string;
}

@Injectable({
  providedIn: 'root',
})
export class CommonService {
  constructor(private toastr: ToastrService) {}

  showToast(toast: toastPayload) {
    this.toastr.show(
      toast.message,
      toast.title,
      toast.ic,
      'toast-' + toast.type
    );
  }
}
Above, we have the showToast() function which in turn is calling the show() method. On top we have defined a toastPayload interface to ease property assignment.
Step 6 – Start Showing Toast Messages
To show toast messages, we only need to call out the CommonService function. In the app.component.html file, update with the following template HTML to add a few buttons. These buttons will call various types of toast messages.
<button (click)="buttonClick('success')">Success Toast</button>
<button (click)="buttonClick('error')">Error Toast</button>
<button (click)="buttonClick('warning')">Warning Toast</button>
<button (click)="buttonClick('info')">Info Toast</button>
Next, open the app.component.ts file and update it with the following code:
import { Component } from '@angular/core';
import { IndividualConfig } from 'ngx-toastr';
import { CommonService, toastPayload } from './services/common.service';

@Component({
  selector: 'app-root',
  templateUrl: './app.component.html',
  styleUrls: ['./app.component.css'],
})
export class AppComponent {
  title = 'angular-toastr-app';
  toast!: toastPayload;

  constructor(private cs: CommonService) {}

  buttonClick(type: string) {
    this.toast = {
      message: 'Some Message to Show',
      title: 'Title Text',
      type: type,
      ic: {
        timeOut: 2500,
        closeButton: true,
      } as IndividualConfig,
    };
    this.cs.showToast(this.toast);
  }
}
Under the ic (IndividualConfiguration) you can pass toast level options or callbacks.
Step 7 – Global Configuration for Toast Messages
Instead of providing configuration for each toast, you can provide GlobalConfiguration to the ToastrService instance. In the CommonService we have defined GlobalConfigurations at constructor as shown below:
import { Injectable } from '@angular/core';
import { GlobalConfig, IndividualConfig, ToastrService } from 'ngx-toastr';
export interface toastPayload {
message: string;
title: string;
ic: IndividualConfig;
type: string;
}
@Injectable({
providedIn: 'root',
})
export class CommonService {
constructor(private toastr: ToastrService) {
// Define toastr GlobalConfig
this.toastr.toastrConfig.enableHtml = true;
}
showToast(toast: toastPayload) {
this.toastr.show(
toast.message,
toast.title,
toast.ic,
'toast-' + toast.type
);
}
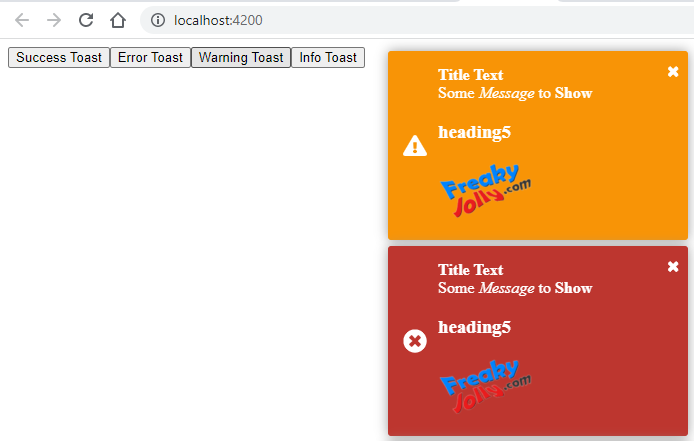
}The enableHTML property allows using HTML tags in the toast message. Update the app.component.ts function message to display tags and images:
buttonClick(type: string) {
    this.toast = {
      message: `Some <i>Message</i> to <b>Show</b>
                <h3>heading5</h3>
                <img src="https://www.freakyjolly.com/wp-content/uploads/2021/07/cropped-cropped-fj-logo-192-removebg-preview-e1625997712615-1.png"/>`,
      title: 'Title Text',
      type: type,
      ic: {
        timeOut: 5000,
        closeButton: true,
      } as IndividualConfig,
    };
    this.cs.showToast(this.toast);
  }
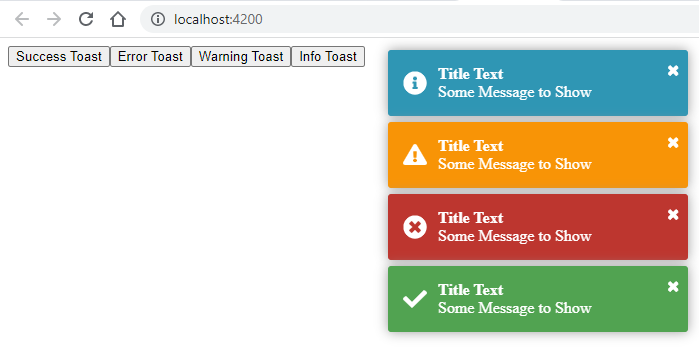
Step 8 – See In Action
Run the application to see the toast messages in action. Execute the ng serve command to run the application on a localhost webserver.
Conclusion
In this guide, we discussed how to easily add the ngx-toastr package in the Angular application using a common service. The service function is structured to take any individual toast level configuration. You can easily customize the CSS style of the toast message notifications as well. Using the global configuration you can define toast options at application level.