In this tutorial, we will learn how to implement a Material table with server-side pagination, sorting, filtering, and checkbox selection in Angular. We will use json-server as a mock server to perform server-side operations and Angular Material to create the table. By the end of this tutorial, you will have a fully functional Material table that can perform various operations on the client using the server we set up.
Pagination is the process of dividing a large set of data into smaller pages for more manageable and efficient viewing. In this tutorial, we implemented server-side pagination, which means that the pagination process is handled by the server, rather than on the client-side. This makes the process more efficient as it reduces the amount of data that needs to be loaded and processed on the client-side.
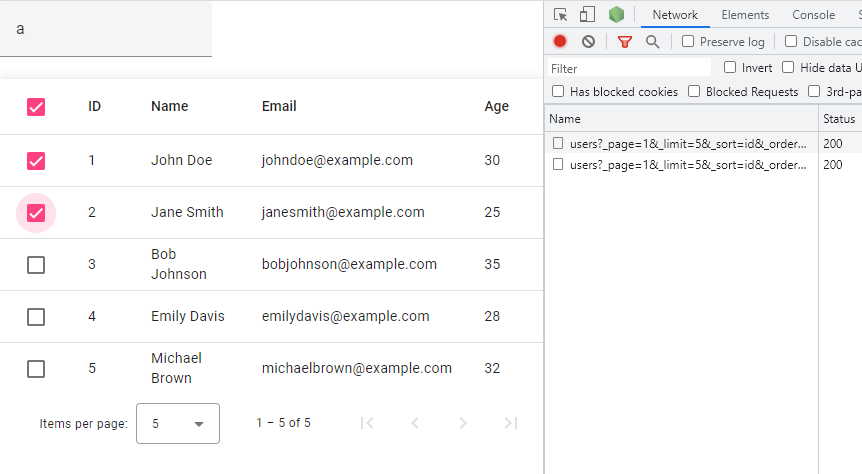
In this tutorial we will create a Material table with server-side pagination, filtering, sorting, and row selection using json-server as a dummy server and various modules from the @angular/material library. Following is the quick overview of what we are going to do.
- Setting up the Angular project
- Installing required packages
- Creating a mock server using json-server
- Creating the Material table component
- Implementing server-side pagination
- Implementing server-side sorting
- Implementing server-side filtering
- Implementing checkbox selection
Step 1: Setting up the Angular project
- Create a new Angular project by running the following command:
ng new my-app - Navigate to the project directory by running the command
cd my-app
Step 2: Installing required packages
- Install json-server by running the command
npm install json-server - Install Angular Material by running the command
ng add @angular/material
Then update the app.module.ts file with the required modules:
import { NgModule } from '@angular/core';
import { BrowserModule } from '@angular/platform-browser';

import { AppComponent } from './app.component';
import { BrowserAnimationsModule } from '@angular/platform-browser/animations';

import { FormsModule, ReactiveFormsModule } from '@angular/forms';

import { HttpClientModule } from '@angular/common/http';

import { MatTableModule } from '@angular/material/table';
import { MatFormFieldModule } from '@angular/material/form-field';
import { MatInputModule } from '@angular/material/input';
import { MatSortModule } from '@angular/material/sort';
import { MatPaginatorModule } from '@angular/material/paginator';
import { MatCheckboxModule } from '@angular/material/checkbox';

@NgModule({
  declarations: [AppComponent],
  imports: [
    BrowserModule,
    BrowserAnimationsModule,
    FormsModule,
    ReactiveFormsModule,
    HttpClientModule,
    MatFormFieldModule,
    MatTableModule,
    MatPaginatorModule,
    MatSortModule,
    MatInputModule,
    MatCheckboxModule,
  ],
  providers: [],
  bootstrap: [AppComponent],
})
export class AppModule {}
Step 3: Creating a mock server using json-server
Create a new file called db.json in the root of your project and add the following data:
{
  "users": [
    {
      "id": 1,
      "name": "John Doe",
      "email": "johndoe@example.com",
      "age": 30
    },
    ...
  ]
}
Run the command json-server db.json in the terminal to start the json-server
Step 4: Creating the Material table component
Generate a new component by running the command ng g c table and update the table.component.ts file with the following code:
import { Component, OnInit, ViewChild } from '@angular/core';
import { MatTableDataSource } from '@angular/material/table';
import { MatPaginator } from '@angular/material/paginator';
import { MatSort } from '@angular/material/sort';
import { HttpClient } from '@angular/common/http';
import { SelectionModel } from '@angular/cdk/collections';
import { mergeMap } from 'rxjs';

@Component({
  selector: 'app-root',
  templateUrl: './app.component.html',
  styleUrls: ['./app.component.css'],
})
export class AppComponent implements OnInit {
  displayedColumns: string[] = ['select', 'id', 'name', 'email', 'age'];
  dataSource!: MatTableDataSource<any>;
  selection = new SelectionModel<any>(true, []);
  filterValue: string = '';
  page: number = 0;
  size: number = 5;
  sortBy: string = 'id';
  sortOrder: string = 'asc';

  @ViewChild(MatPaginator, { static: true })
  paginator!: MatPaginator;
  @ViewChild(MatSort, { static: true })
  sort!: MatSort;

  constructor(private http: HttpClient) {}

  ngOnInit() {
    this.loadData();
  }

  loadData() {
    this.http
      .get(
        `http://localhost:3000/users?_page=${this.page + 1}&_limit=${
          this.size
        }&_sort=${this.sortBy}&_order=${this.sortOrder}&q=${this.filterValue}`
      )
      .subscribe((data: any) => {
        this.dataSource = new MatTableDataSource(data);
        this.dataSource.paginator = this.paginator;
        this.dataSource.sort = this.sort;
      });
  }

  applyFilter(filterValue: any) {
    this.filterValue = filterValue.value;
    this.loadData();
  }

  pageChanged(event: { pageIndex: number; pageSize: number }) {
    this.page = event.pageIndex;
    this.size = event.pageSize;
    this.loadData();
  }

  sortData(event: { active: string; direction: string }) {
    this.sortBy = event.active;
    this.sortOrder = event.direction;
    this.loadData();
  }

  /** Whether the number of selected elements matches the total number of rows. */
  isAllSelected() {
    const numSelected = this.selection.selected.length;
    const numRows = this.dataSource.data.length;
    return numSelected === numRows;
  }

  /** Selects all rows if they are not all selected; otherwise clear selection. */
  masterToggle() {
    this.isAllSelected()
      ? this.selection.clear()
      : this.dataSource.data.forEach((row) => this.selection.select(row));
  }

  /** The label for the checkbox on the passed row */
  checkboxLabel(row?: any): string {
    if (!row) {
      return `${this.isAllSelected() ? 'select' : 'deselect'} all`;
    }
    return `${this.selection.isSelected(row) ? 'deselect' : 'select'} row ${
      row.id + 1
    }`;
  }
}
Following is the feature explanation of functional we have in the above template class:
loadData() method makes a GET request to the json-server to fetch the data and assigns it to the dataSource. This method is called in the ngOnInit() method to load the data when the component is initialized.
applyFilter(filterValue: string) filters the data based on the value entered in the search field. It takes the value entered in the search field as a parameter, trims any leading or trailing spaces, and converts the value to lowercase. The filtered data is then assigned to the dataSource.
isAllSelected() checks if all the rows in the table have been selected. It does this by comparing the number of selected rows to the total number of rows in the dataSource.
masterToggle() is used to toggle the selection of all rows in the table. If all rows are already selected, it deselects all rows. If not all rows are selected, it selects all rows.
The above functions used in the class and their features allows to perform the following operations:
- Loading data from the server
- Filtering data based on the value entered in the search field
- Checking if all rows are selected
- Toggling the selection of all rows
- Managing the row selection state
- Representing data in a tabular format with sorting and pagination features.
Update the template HTML :
<div class="container">
    <mat-form-field>
        <input matInput (keyup)="applyFilter($event.target)" placeholder="Filter">
    </mat-form-field>
    <table mat-table [dataSource]="dataSource" matSort class="mat-elevation-z8">
        <ng-container matColumnDef="select">
            <th mat-header-cell *matHeaderCellDef>
                <mat-checkbox (change)="$event ? masterToggle() : null"
                    [checked]="selection.hasValue() && isAllSelected()"
                    [indeterminate]="selection.hasValue() && !isAllSelected()">
                </mat-checkbox>
            </th>
            <td mat-cell *matCellDef="let row">
                <mat-checkbox (click)="$event.stopPropagation()" (change)="$event ? selection.toggle(row) : null"
                    [checked]="selection.isSelected(row)">
                </mat-checkbox>
            </td>
        </ng-container>
        <ng-container matColumnDef="id">
            <th mat-header-cell *matHeaderCellDef mat-sort-header> ID </th>
            <td mat-cell *matCellDef="let element"> {{element.id}} </td>
        </ng-container>
        <ng-container matColumnDef="name">
            <th mat-header-cell *matHeaderCellDef mat-sort-header> Name </th>
            <td mat-cell *matCellDef="let element"> {{element.name}} </td>
        </ng-container>
        <ng-container matColumnDef="email">
            <th mat-header-cell *matHeaderCellDef mat-sort-header> Email </th>
            <td mat-cell *matCellDef="let element"> {{element.email}} </td>
        </ng-container>
        <ng-container matColumnDef="age">
            <th mat-header-cell *matHeaderCellDef mat-sort-header> Age </th>
            <td mat-cell *matCellDef="let element"> {{element.age}} </td>
        </ng-container>
        <tr mat-header-row *matHeaderRowDef="displayedColumns"></tr>
        <tr mat-row *matRowDef="let row; columns: displayedColumns;" (click)="selection.toggle(row)"
            [class.selected]="selection.isSelected(row)"></tr>
    </table>
    <mat-paginator [pageSizeOptions]="[5, 10, 20]" showFirstLastButtons (page)="pageChanged($event)"></mat-paginator>

</div>
The template file contains the structure of the Material table component. It defines the table structure using the mat-table directive, and creates columns using ng-container matColumnDef with different column name.
It also creates the checkboxes for row selection using the mat-checkbox element and the change and click events. It creates header cells for each column and data cells for each row using mat-header-cell, mat-sort-header, mat-cell and matCellDef directives. The matHeaderRowDef and matRowDef are used to define the template for the header row and data rows respectively. It also uses mat-sort directive to enable sorting feature and uses dataSource as data source for the table.
We added the mat-paginator element to the template, which is used to display the paginator controls. The [length], [pageSize], and [pageSizeOptions] input properties are used to configure the paginator. The (page) event is used to handle the pagination events.
Step 5: Run JSON-Server and Application
Here are the steps to run the json-server and the application:
- Install json-server globally: Open a terminal and run the command
npm install -g json-server. This will install the json-server package globally, allowing you to run it from any directory on your system. - Start the json-server: In the terminal, navigate to the directory where your db.json file is located. Run the command
json-server --watch db.jsonto start the json-server. This command starts a server on port 3000 and uses the db.json file as the data source. - Run the application: Open a new terminal and navigate to the root directory of your Angular application. Run the command
ng serveto start the application. The application will be available athttp://localhost:4200/
Conclusion
In this tutorial demonstrated how to create a Material table with various features like server-side pagination, filtering, sorting, and row selection. We have used json-server as a dummy server to perform server-side operations and also used MatTableDataSource, MatPaginator, MatSort, SelectionModel modules from the @angular/material library to implement these features. The application uses HttpClient module to make GET requests to the json-server to fetch the data and performs the different operations on the client-side. The checkbox feature is also implemented which allows to select/deselect all rows at once.
This tutorial also explained how to run the json-server and the application and how to test the application’s functionality. With this tutorial, you should now have a good understanding of how to create a Material table with server-side pagination, filtering, sorting, and row selection, as well as how to set up and run a json-server to serve as a data source for the table. This can be a useful starting point for building more complex and feature-rich table-based applications.