Quill is a popular rick text editor for web applications. It provides a marvellous feature set with minimal implementation mania. If you want to learn how to add a rich text editor in the quickest and error-free steps, then you are in the right place!
Rich text editors or What You See Is What You Get editors to provide a full-featured textarea where users can do text formating, add multi-media content, use emojis use text heading change text size or color, etc.
In this tutorial, we will learn How to add a Rich Text editor in the Angular application by using a very popular and expert plugin named Quill. The Quill Rich text editor provides many extended features as well like AutoSave, Mentions, Image Resizer, Multiple themes options and many more.
Implementation of the Quill edition is very easy and quick, it also supports many extension plugins to integrate with the basic setup. We will discuss all of them with examples here.
Warning: We have gone through most of the issues developers face while the integration of Quill to Angular projects, keep watch on those possible glitches with simple solutions.
How to Add Quill in Angular 12 App?
- Step 1 – Create Angular App
- Step 2 – Install Quill Packages
- Step 3 – Configure CSS and JS Files
- Step 4 – Update App Module
- Step 5 – Adding Quill Editor
- Step 6 – Event and Input Properties
- Step 7.1 – How to Use Emojis in Quill Editor
- Step 7.2 – How to Resize Image in Quill Editor
Step 1 – Create Angular App
To create an Angular application, you need to install the Angular CLI tool. you can execute the following command to install the latest version:
npm install -g @angular/cliAfter that, you just need to execute the following command to quickly create a new Angular project with name provided:
ng new angular-quill-example-app
? Would you like to add Angular routing? No
? Which stylesheet format would you like to use? CSS
Now, move inside the application created by hitting the change directory command:
cd angular-quill-example-appYou can now simply open the application project in the Visual Studio Code by hitting code . command
angular-quill-example-app>code .Step 2 – Install Quill Packages
After creating the Angular project, we need to install Quill packages including the core and feature libraries.
# Angular Adapter Package
npm install ngx-quill

# Quill Core Library
npm install quill
Error Alert:
Sometimes you may notice an error saying:
Error: node_modules/ngx-quill/lib/quill-editor.component.d.ts:3:34 – error TS7016: Could not find a declaration file for module ‘quill’. ‘…angular-quill-example-app/node_modules/quill/dist/quill.js’ implicitly has an ‘any’ type.
Try `npm i –save-dev @types/quill` if it exists or add a new declaration (.d.ts) file containing `declare module ‘quill’;`
3 import QuillType, { Delta } from ‘quill’;
~~~~~~~
Error: node_modules/ngx-quill/lib/quill-view.component.d.ts:1:23 – error TS7016: Could not find a declaration file for module ‘quill’. ‘..angular-quill-example-app/node_modules/quill/dist/quill.js’ implicitly has an ‘any’ type.
Try `npm i –save-dev @types/quill` if it exists or add a new declaration (.d.ts) file containing `declare module ‘quill’;`
1 import QuillType from ‘quill’;
Solution:
To resolve this issue, for following set of versions:
"dependencies": {
    "@angular/core": "~12.0.0",
    "ngx-quill": "^14.3.0",
    "quill": "^1.3.7"
  },
You need to install the @types/quill package with version 1 latest by hitting the following command:
npm install --save @types/quill@1Now restart the development server to resolve the issue.
Step 3 – Configure CSS and JS Files
Quill provides its own set of CSS and Javascript files, that need to be added to style the rich content editor in a snap. For that, head towards the angular.json file to update the "styles" and "scripts" array as shown below:
...
    "options": {
        ...
        "styles": [
            "src/styles.css",
            "./node_modules/quill/dist/quill.core.css",
            "./node_modules/quill/dist/quill.bubble.css",
            "./node_modules/quill/dist/quill.snow.css"
        ],
        "scripts": [
            "./node_modules/quill/dist/quill.min.js"
        ]
    },
...
Step 4 – Update App Module
To use Quill rich editor we need to provide its module in the App Module, which is the main module of our Angular application project.
Open the app.module.ts file and updated its imports array with QuillModule.forRoot() as shown below:
import { NgModule } from '@angular/core';
import { BrowserModule } from '@angular/platform-browser';

import { AppComponent } from './app.component';

import { QuillModule } from 'ngx-quill'

@NgModule({
  declarations: [
    AppComponent
  ],
  imports: [
    BrowserModule,
    QuillModule.forRoot() //<-- Updated Quill Module
  ],
  providers: [],
  bootstrap: [AppComponent]
})
export class AppModule { }
Step 5 – Adding Quill Editor
Adding and creating the Quill rich editor is the easiest step, we just need to add the <quill-editor/> directive in the template with optional configuration.
Open the app.component.html file update it as shown below:
<h1>Simple Quill Editor</h1>
<quill-editor [styles]="{height: '200px'}"></quill-editor>
Step 6 – Event and Input Properties
Let’s have a look at some important properties and event handlers available for the quill-editor directive component.
Following are the output event handlers:
<quill-editor [styles]="{height: '400px'}"
    (onFocus)="focus($event)"
    (onEditorChanged)="changedEditor($event)"
    (onBlur)="blur($event)"
    (onEditorCreated)="created($event)" >
</quill-editor>
Now, in the component class, you need to add these events which can be used as hooks for getting input data available inside the rich editor at any time.
import { Component } from '@angular/core';
import { EditorChangeContent, EditorChangeSelection } from 'ngx-quill'
@Component({
selector: 'app-root',
templateUrl: './app.component.html',
styleUrls: ['./app.component.css']
})
export class AppComponent {
title = 'angular-quill-example-app';
blured = false
focused = false
created(event: any) {
// tslint:disable-next-line:no-console
console.log('editor-created', event)
}
changedEditor(event: EditorChangeContent | EditorChangeSelection) {
// tslint:disable-next-line:no-console
console.log('editor-change', event)
}
focus($event: any) {
// tslint:disable-next-line:no-console
console.log('focus', $event)
this.focused = true
this.blured = false
}
blur($event: any) {
// tslint:disable-next-line:no-console
console.log('blur', $event)
this.focused = false
this.blured = true
}
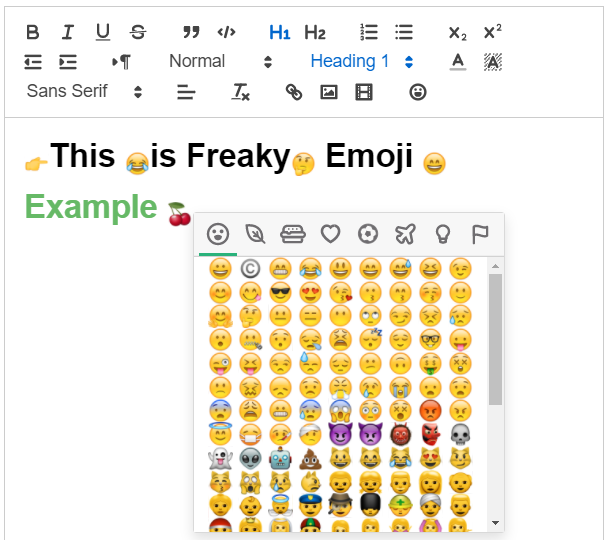
}Step 7.1 – How to Use Emojis in NGX Quill Editor
In Quill rich editor you can easily incorporate the emoji’s that allows users to add smilies by opening a popup as shown below:
1) First, install the following emoji plugin for quill:
npm install quill-emoji
2) Next, open the angular.json file to update the “styles” array and append quill-emoji.css as shown below:
"styles": [
  ...
  "./node_modules/quill-emoji/dist/quill-emoji.css"
],
3) Then you need to define the [modules] property in the directive template component:
<quill-editor [styles]="{height: '400px'}"
     [modules]="modules">
</quill-editor>
4) Afterwards, define the modules with all toolbar or required toolset you want to display along with the Emoji toolbar.
import { Component } from '@angular/core';
import { EditorChangeContent, EditorChangeSelection } from 'ngx-quill'
import 'quill-emoji/dist/quill-emoji.js'
@Component({
selector: 'app-root',
templateUrl: './app.component.html',
styleUrls: ['./app.component.css']
})
export class AppComponent {
....
modules = {}
constructor() {
this.modules = {
'emoji-shortname': true,
'emoji-textarea': false,
'emoji-toolbar': true,
'toolbar': {
container: [
['bold', 'italic', 'underline', 'strike'], // toggled buttons
['blockquote', 'code-block'],
[{ 'header': 1 }, { 'header': 2 }], // custom button values
[{ 'list': 'ordered' }, { 'list': 'bullet' }],
[{ 'script': 'sub' }, { 'script': 'super' }], // superscript/subscript
[{ 'indent': '-1' }, { 'indent': '+1' }], // outdent/indent
[{ 'direction': 'rtl' }], // text direction
[{ 'size': ['small', false, 'large', 'huge'] }], // custom dropdown
[{ 'header': [1, 2, 3, 4, 5, 6, false] }],
[{ 'color': [] }, { 'background': [] }], // dropdown with defaults from theme
[{ 'font': [] }],
[{ 'align': [] }],
['clean'], // remove formatting button
['link', 'image', 'video'], // link and image, video
['emoji'],
],
handlers: { 'emoji': function () { } }
}
}
}
....
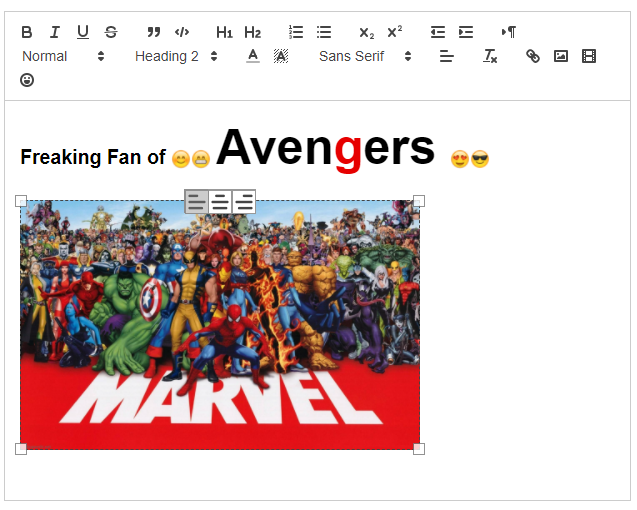
}Step 7.2 – How to Resize Image in Quill Editor
In a rick editor like a quill, users can easily copy and paste images with the help of a mouse or keyboard only. But users will not be able to resize the pasted images without using the quill image resizer plugin.
Let’s have a look at how to integrate and use the Image resize feature in NGX Quill content editor in Angular.
1) First, install the following Quill Bloat Formatter plugin for quill. This allows image resizing in Quill editor with Angular 6+ versions.
npm install --save quill-blot-formatter2) Now, open the component class and import the Quill and BlotFormatter and register to enable resizing. The modules object will be updated with blotFormatter property object as shown below:
import { Component } from '@angular/core';
import { EditorChangeContent, EditorChangeSelection } from 'ngx-quill';

import 'quill-emoji/dist/quill-emoji.js';

import Quill from 'quill'
import BlotFormatter from 'quill-blot-formatter/dist/BlotFormatter';

Quill.register('modules/blotFormatter', BlotFormatter);

@Component({
  selector: 'app-root',
  templateUrl: './app.component.html',
  styleUrls: ['./app.component.css']
})
export class AppComponent {

  title = 'angular-quill-example-app';

  blured = false
  focused = false
  modules = {}
  constructor() {
    this.modules = {
      'emoji-shortname': true,
      'emoji-textarea': false,
      'emoji-toolbar': true,
      blotFormatter: {
        // empty object for default behaviour.
      },
      'toolbar': {
        container: [
          ['bold', 'italic', 'underline', 'strike'],        // toggled buttons
          ['blockquote', 'code-block'],

          [{ 'header': 1 }, { 'header': 2 }],               // custom button values
          [{ 'list': 'ordered' }, { 'list': 'bullet' }],
          [{ 'script': 'sub' }, { 'script': 'super' }],      // superscript/subscript
          [{ 'indent': '-1' }, { 'indent': '+1' }],          // outdent/indent
          [{ 'direction': 'rtl' }],                         // text direction

          [{ 'size': ['small', false, 'large', 'huge'] }],  // custom dropdown
          [{ 'header': [1, 2, 3, 4, 5, 6, false] }],

          [{ 'color': [] }, { 'background': [] }],          // dropdown with defaults from theme
          [{ 'font': [] }],
          [{ 'align': [] }],

          ['clean'],                                         // remove formatting button

          ['link', 'image', 'video'],                         // link and image, video
          ['emoji'],
        ],
        handlers: { 'emoji': function () { } },

      }
    }
  }

...
}

Conclusion
Adding rich text editors provides much flexibility to the user to easily format informal in required layouts. Quill editor is an awesome option for such requirements with support for free extensions like emojis, mentions, themes, Image resize, etc.
We discussed how to easily implement Quill editor and add Emoji plugin and Image resize feature in it with ease. You can check more details on examples here for Quill Editor.