In this tutorial, we will learn how to validate radio form control in Angular using the Reactive form approach. To validate the form we will be Reactive form approach provided by the ReactiveFormModule service.
Radio UI form control enables a user to select a single value out of a list of options available. The radio control is mainly used in areas where we want a user to select only a single value, for example, choosing gender, address type, payment options etc.
At the same time, there is a situation to enforce a user to select a value. In those scenarios, we need to validate a form so that we can show a sweet message to the user that that option selection is required to be filled!
Angular provides two important validation approaches Template-driven and Reactive Form validation. Here we will create a form with a Radio list to validate using the Reactive approach if any of the values is selected.
How to Validate Radio Control in Angular Reactive Form?
Step 1) Import ReactiveFormModule
Step 2) Add Form in HTML Template
Step 3) Update Component Class
Step 1) Import ReactiveFormModule
To implement Angular form validation, we need to import ReactiveFormModule and FormModule in the application module to use its services.
Open the app.module.ts file then import these modules as shown below:
// app.module.ts
import { BrowserModule } from '@angular/platform-browser';
import { NgModule } from '@angular/core';

import { AppRoutingModule } from './app-routing.module';
import { AppComponent } from './app.component';
import { ReactiveFormsModule, FormsModule } from '@angular/forms';

@NgModule({
  declarations: [
    AppComponent
  ],
  imports: [
    BrowserModule,
    AppRoutingModule,
    ReactiveFormsModule,
    FormsModule
  ],
  providers: [],
  bootstrap: [AppComponent]
})
export class AppModule { }
Step 2) Add Form in HTML Template
Add Form in Template
In the template add <form> tag with [formGroup] and (ngSubmit) event handler which is triggered when the form is submitted.
The [formGroup] takes a name which is used by Angular to connect HTML form in the component class.
Also, add the novalidate attribute which disables the validation on form submit. This is HTML5 attribute, we are adding it here as we will validate form using Angular FormControl:
<form [formGroup]="myForm" (ngSubmit)="submitForm()">
...
</form>
In the form, we will create a radio control list dynamically by using RADIO_LIST array of item. This object is showing different payment methods a user can choose.
  RADIO_LIST = [
    { name: 'Cash Payment', value: '100CP', checked: false },
    { name: 'Telegraphic Transfer', value: '101TR', checked: false },
    { name: 'Money Order or Postal Order', value: '102MO', checked: false },
    { name: 'Bill of Exchange', value: '103BE', checked: false },
    { name: 'Promissory Note', value: '104PN', checked: false },
    { name: 'Cheque', value: '105CQ', checked: false },
    { name: 'Bank Draft', value: '106BD', checked: false }
  ];
There are three properties name, value and checked.
Adding Radio List in Form
Next, we will add a list of radio controls which is created by iterating over the object using Angular’s *ngFor directive. Each radio input will have the following properties:
[value]: defining the value of each radio control.
formControlName: In Reactive approach, we are required to give each control a name in formControlName property to group a set of radio controls. These should remain the same for a specific radio group.
[checked]: the property takes a boolean value and set the checked state of Radio on component load.
<form [formGroup]="myForm" (ngSubmit)="submitForm()">
<div *ngFor="let item of RADIO_LIST; let i=index">
<input type="radio" [value]="item.value" [checked]="item.checked" formControlName="paymentOptions" />
<label>{{item.name}}</label>
</div>
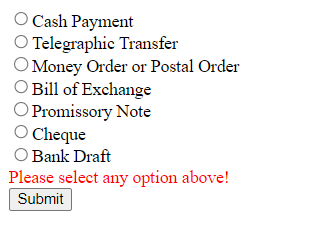
<div class="error-msg" *ngIf="isFormSubmitted && myForm.controls['paymentOptions'].errors?.['required']">
Please select any option above!
</div>
<button type="submit" color="danger" expand="block">Submit</button>
<h4>{{submittedValue | json}}</h4>
<code>
</code>
</form>There is a span element with expression to show a message only when the form is submitted and there is an error in the controls property
Step 3) Update Component Class
In the class, we will initialize the Reactive form using FormGroup class
myForm: FormGroup;In the ngOnInit class hook, we will create a FormGroup with all control elements in form using FormControl. Each form of control takes default value and Validators array to validate that control.
As here we only have Radio control, it will look like this:
    this.myForm = new FormGroup({
      'paymentOptions': new FormControl(null, [Validators.required])
    })
We are setting the validators array with Validators.required as we want this option to be required.
We will also loop over the object to get if any value is checked.
  ngOnInit() {

    // Setting default selection in FormControl
    let getCheckedRadio = null
    this.RADIO_LIST.forEach(o => {
      if (o.checked)
        getCheckedRadio = o.value;
    })

    this.myForm = new FormGroup({
      'paymentOptions': new FormControl(getCheckedRadio, [Validators.required])
    })
  }
The getCheckedRadio is set to null by default, but if any item’s checked property set to true it will be set by default.
After adding the submitForm method our app.component.ts file will look like this:
import { Component } from '@angular/core';
import { FormGroup, FormControl, Validators } from '@angular/forms';
@Component({
selector: 'app-root',
templateUrl: './app.component.html',
styleUrls: ['./app.component.css'],
})
export class AppComponent {
title = 'angular-checkbox-validation';
myForm!: FormGroup;
isFormSubmitted = false;
submittedValue: any;
RADIO_LIST = [
{ name: 'Cash Payment', value: '100CP', checked: false },
{ name: 'Telegraphic Transfer', value: '101TR', checked: false },
{ name: 'Money Order or Postal Order', value: '102MO', checked: false },
{ name: 'Bill of Exchange', value: '103BE', checked: false },
{ name: 'Promissory Note', value: '104PN', checked: false },
{ name: 'Cheque', value: '105CQ', checked: false },
{ name: 'Bank Draft', value: '106BD', checked: false },
];
ngOnInit() {
// Setting default selection in FormControl
let getCheckedRadio = null;
this.RADIO_LIST.forEach((o) => {
if (o.checked) getCheckedRadio = o.value;
});
this.myForm = new FormGroup({
paymentOptions: new FormControl(getCheckedRadio, [Validators.required]),
});
}
submitForm() {
this.isFormSubmitted = true;
console.log('valid', this.myForm.valid);
if (!this.myForm.valid) {
console.log('Please provide all the required values!');
this.submittedValue = undefined;
return false;
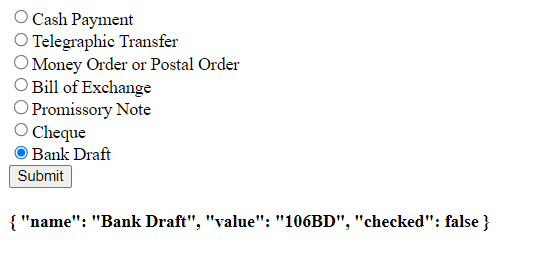
} else {
console.log(this.myForm.value);
this.submittedValue = this.RADIO_LIST.find(
(rv) => rv.value === this.myForm.value['paymentOptions']
);
return true;
}
}
}To style the .error-msg class update app.component.css file with below style:
.error-msg{
  color: red;
}
Angular form validation using the Reactive approach enables to control of validation condition in the component class it self. In this tutorial, we discussed how to validate the Radio items list and displayed a message when no value is selected.