In this tutorial, you will learn how to add the radio button group in reactive form with example. The implementation of radio list control inside the angular reactive forms, which will emit the change event when selected.
Radio form controls are used to allow a user only to select a single value out of a list in the radio group. In angular, we can use either the template-driven forms or reactive forms approach. The reactive forms are ideally used in case, we are trying to build a dynamic form from a provided form control meta-data.
In our tutorial, we will discuss two use-cases to fetch the value of selected radio button values. When a user clicks on the submit button the value of the selected radion button will be displayed. In another case, the value of the selected radio will be displayed on the selection/ change is triggered on the radio button.
Let’s start our first use-case in the upcoming section:
How to Get Checked Radio Button Value on Reactive Form Submit in Angular?
You will be following these quick steps:
Step 1 – Import FormsModule in App Module
To use forms in the Angular application, you need to import the FormsModule provided by the forms API. Also, for using the Reactive forms, import the ReactiveFormsModule class.
Open the app.module.ts file, them update the imports array:
import { BrowserModule } from '@angular/platform-browser';
import { NgModule } from '@angular/core';

import { AppComponent } from './app.component';
import { FormsModule, ReactiveFormsModule } from '@angular/forms';

@NgModule({
  declarations: [
    AppComponent
  ],
  imports: [
    BrowserModule,
    FormsModule,
    ReactiveFormsModule
  ],
  providers: [],
  bootstrap: [AppComponent]
})
export class AppModule { }
Step 2 – Add Bootstrap Styling
This is an optional step, to use bootstrap style install the bootstrap package:
$ npm install bootstrapThen update the "styles" array inside the angular.json file at project root:
...
"styles": [
   ...
  "./node_modules/bootstrap/dist/css/bootstrap.min.css"
],
Step 3 – Update Component HTML Template
Next, add the form with the Radio form group, the list to select from a sport to choose from. The <form> will have the [formGroup] and (ngSubmit) handler.
Open the app.component.html file and update it will the following template HTML:
<div class="container">
  <h1>Angular Radio Button Example - FreakyJolly.com</h1>

  <form [formGroup]="myform" (ngSubmit)="submit()">

    <div class="form-group">
      <label for="sport">Select a Sport:</label>
      <div *ngFor="let sport of sportsList">
        <input id="sport-{{sport.id}}" type="radio" value="{{sport.value}}" name="{{sport.name}}"
          formControlName="{{sport.name}}">
        <label for="sport-{{sport.id}}">{{sport.label}}</label>
      </div>

      <div *ngIf="f.sport.touched && f.sport.invalid" class="alert alert-danger">
        <div *ngIf="f.sport.errors?.required">Name is required.</div>
      </div>
    </div>

    <button class="btn btn-primary" type="submit" [disabled]="!myform.valid">Submit</button>

    <h5>Selected Value: {{myform.value | json}}</h5>
  </form>
</div>
We are dynamically listing the sports radio controls in the radio group using the *ngFor directive. In next section, have a look at class ts file with submit event handler and formControl definition.
Step 4 – Update Component ts Class File
Next, we will define the myForm with formGroup and formControl added with Validators as required.
The sportsList containing the dynamic list of form radio items to show in the template.
Each radio item is having id, value, name, label key-value pairs. The name property will remain the same for a particular radio group in the form.
Open the app.component.ts file and update with following code in it:
import { Component } from '@angular/core';
import { FormControl, FormGroup, Validators } from '@angular/forms';


@Component({
  selector: 'app-root',
  templateUrl: './app.component.html',
  styleUrls: ['./app.component.scss']
})
export class AppComponent {

  sportsList = [
    {
      id:1,
      name:'sport',
      value:'cricket',
      label:'Cricket'
    },{
      id:2,
      name:'sport',
      value:'football',
      label:'Football'
    },{
      id:3,
      name:'sport',
      value:'swimming',
      label:'Swimming'
    },{
      id:4,
      name:'sport',
      value:'hockey',
      label:'Hockey'
    }
  ]

  myform = new FormGroup({
    sport: new FormControl('', Validators.required)
  });

  constructor(){}

  get f(){
    return this.myform.controls;
  }

  submit(){
    console.log(this.myform.value);
  }
}
You can now run the application by executing the following command:
$ ng serve –open
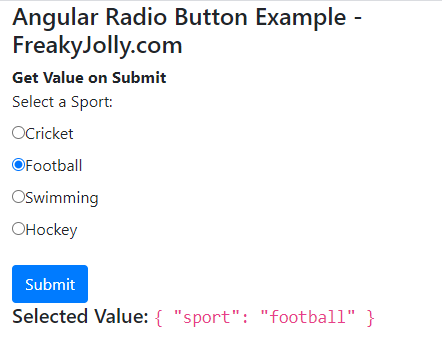
It will look like this:
How to Get Radio Button Value on Change in Angular?
To get value on radio change, add the (change) event handler on radio form controls a shown below:
<div *ngFor="let sport of sportsList">
   <input id="sport-{{sport.id}}" type="radio" value="{{sport.value}}" name="{{sport.name}}"
          formControlName="{{sport.name}}" (change)="onRadioChange(sport)">
   <label for="sport-{{sport.id}}">{{sport.label}}</label>
</div>
Then add the method in the template class file:
onRadioChange(sport: any) {
    console.log(sport);
 }
Conclusion
We discussed how to create a dynamic radio list in reactive angular form. Also, added the required validation using formControl. The value of the selected item in the radio list can be fetched using the submit control and on the change event trigger.