In this Angular tutorial, you will learn how to pass data from one parent component to its child and child adjacent child using the Input/ Output decorators.
This is the most efficient way in case you need to communicate data transfer at one place only. If you have to implement data communication of similar types at multiple places in the application you can consider services for that.
The application, that we are goin to develop will have a parent Dashboard which will have two Child components. The first child will have a form to submit values. The submitted values will pass to the other Child to list values in a table.
Let’s implement the use-case
How to pass data from parent to child or child to child in Angular?
Step 1 – Create an Angular App
Step 2 – Create Required Components
Step 3 – Configure Parent-Child Components
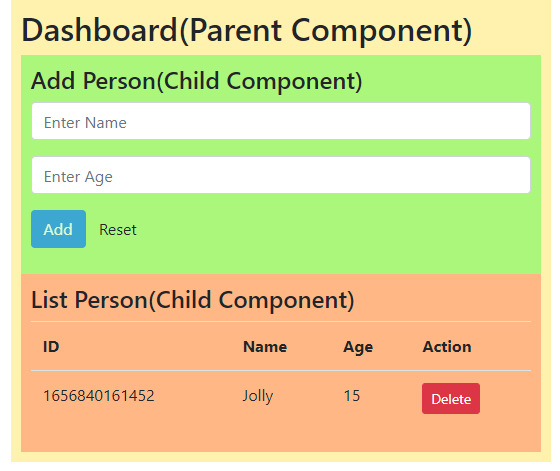
Step 4 – See In Action
Step 1 – Create Angular App
First, create a new Angular app or use your existing project.
ng new angular-pass-data-appEnter into the project directory
cd angular-pass-data-appNow open a new application your favourite IDE
Step 2 – Create Required Components
For a demonstration of discussed scenario, we will create three Components in our Angular application.
DashboardComponent: Dashboard component will contain both following Child componentsAddEditPersonComponent: It will carry a Form to submit data.PersonlistComponent: It will display the submitted data in the table list with the delete action
Execute the following ng generate commands to create these components in the ~src/app folder:
ng generate component dashboard
ng generate component add-edit-person
ng generate component personlist
Step 3 – Configure Parent-Child Components
we are now ready with our components, let’s configure these ones to set up data communication between them.
Dashboard Component
Update Dashboard HTML Template. Open the dashboard.component.html file and update it.
<div class="container parent">
  <h2>Dashboard(Parent Component)</h2>

  <app-add-edit-person (getAddedRow)="addRow($event)"></app-add-edit-person>

  <app-personlist
    [listData]="personData"
    (getDeletedRow)="deleteRow($event)"
  ></app-personlist>
</div>
We have added both child components to the Dashboard.
Next, update the dashboard.component.ts file:
import { Component, OnInit } from '@angular/core';
import { USER } from '../add-edit-person/add-edit-person.component';

@Component({
  selector: 'app-dashboard',
  templateUrl: './dashboard.component.html',
  styleUrls: ['./dashboard.component.css'],
})
export class DashboardComponent implements OnInit {
  personData: USER[] = [];
  constructor() {}

  ngOnInit() {}

  addRow(row) {
    this.personData.push(row);
  }

  deleteRow(row) {
    for (let i in this.personData) {
      if (this.personData[i]['id'] == row.id) {
        this.personData.splice(parseInt(i), 1);
      }
    }
  }
}
In the dashboard, we have add and delete row methods to update the personData object.
AddEditPerson Component
Now open the add-edit-person.component.html and update with the following:
<div class="child1">
  <h4>Add Person(Child Component)</h4>

  <form (ngSubmit)="submitValues()" #myForm="ngForm">
    <div class="form-group">
      <input
        class="form-control"
        type="text"
        name="enter_name"
        placeholder="Enter Name"
        [(ngModel)]="name"
        required
      />
    </div>
    <div class="form-group">
      <input
        class="form-control"
        type="text"
        name="enter_age"
        placeholder="Enter Age"
        [(ngModel)]="age"
        required
      />
    </div>
    <div class="form-group">
      <button
        class="btn btn-primary"
        type="submit"
        [disabled]="!myForm.form.valid"
      >
        Add
      </button>
      <button class="btn" type="button" (click)="myForm.reset()">Reset</button>
    </div>
  </form>
</div>
We have the person form to submit data.
Now open the add-edit-person.component.ts file and update with following:
import { Component, EventEmitter, Output, ViewChild } from '@angular/core';
import { NgForm } from '@angular/forms';

export interface USER {
  id: number;
  name: string;
  age: number;
}

@Component({
  selector: 'app-add-edit-person',
  templateUrl: './add-edit-person.component.html',
  styleUrls: ['./add-edit-person.component.css'],
})
export class AddEditPersonComponent {
  name: string;
  age: number;

  @ViewChild('myForm', { static: false }) MyForm: NgForm;

  @Output() getAddedRow: EventEmitter<any>;

  constructor() {
    this.getAddedRow = new EventEmitter();
  }

  submitValues() {
    let sendObj = {
      id: Date.now(),
      name: this.name,
      age: this.age,
    };
    this.getAddedRow.emit(sendObj);
    this.MyForm.reset();
  }
}
The submitValues() function will emit the submitted values.
Personlist Component
Open the personlist.component.html file to display the data list in a table:
<div class="child2">
  <h4>List Person(Child Component)</h4>

  <table class="table">
    <tr>
      <th>ID</th>
      <th>Name</th>
      <th>Age</th>
      <th>Action</th>
    </tr>
    <tr *ngFor="let p of listData">
      <td>{{ p.id }}</td>
      <td>{{ p.name }}</td>
      <td>{{ p.age }}</td>
      <td>
        <button class="btn btn-danger btn-sm" (click)="deleteRow(p)">
          Delete
        </button>
      </td>
    </tr>
  </table>
</div>
Now open the personlist.component.ts file and update its content with the following:
import { Component, EventEmitter, Input, OnInit, Output } from '@angular/core';
import { USER } from '../add-edit-person/add-edit-person.component';

@Component({
  selector: 'app-personlist',
  templateUrl: './personlist.component.html',
  styleUrls: ['./personlist.component.css'],
})
export class PersonlistComponent {
  @Input() listData: USER[];
  @Output() getDeletedRow: EventEmitter<any>;

  constructor() {
    this.getDeletedRow = new EventEmitter();
  }

  deleteRow(row) {
    this.getDeletedRow.emit(row);
  }
}
The deleteRow() function will emit the row to be deleted
Step 4 – See In Action
That’s it now you can run your application by hitting npm start to open the application on default 4200 port on following URL:
Find working app on StackBlitz