In this comprehensive Angular guide, you will learn how to set up the TreeView structure in Angular using the NGX TreeView npm library. The ngx-treeview library provides a number of features like filter search, checkbox selection, lazy-loading of child items, custom template support and much more.
We will walk through each and every step to implement each discussed feature in detail.
So let’s get into it…
How to Create an NGX Treeview in Angular App
Follow these quick step to create a NGX Treeview in latest Angular 15 with various features:
1. Setting up Angular Project
First, let’s create a new Angular project using the Angular CLI:
ng new angular-ngx-treeview-example
cd angular-ngx-treeview-example
2. Installing ngx-treeview
To install the ngx-treeview library, run the following command:
npm install ngx-treeview
Next, import the TreeviewModule in your app.module.ts file:
import { BrowserModule } from '@angular/platform-browser';
import { NgModule } from '@angular/core';
import { AppComponent } from './app.component';
import { TreeviewModule } from 'ngx-treeview';

@NgModule({
  declarations: [
    AppComponent
  ],
  imports: [
    BrowserModule,
    TreeviewModule.forRoot()
  ],
  providers: [],
  bootstrap: [AppComponent]
})
export class AppModule { }
3. Adding Hierarchical Tree Structure
To add a hierarchical tree structure, first, define the data in the app.component.ts file:
import { Component } from '@angular/core';
import { TreeviewItem } from 'ngx-treeview';

@Component({
  selector: 'app-root',
  templateUrl: './app.component.html',
  styleUrls: ['./app.component.scss']
})
export class AppComponent {
  public treeItems: TreeviewItem[];

  constructor() {
    this.treeItems = [
      new TreeviewItem({ text: 'Parent 1', value: 1, children: [
        { text: 'Child 1.1', value: 11 },
        { text: 'Child 1.2', value: 12 }
      ]}),
      new TreeviewItem({ text: 'Parent 2', value: 2, children: [
        { text: 'Child 2.1', value: 21 },
        { text: 'Child 2.2', value: 22 }
      ]})
    ];
  }
}
Then, add the following code to your app.component.html file:
<ngx-treeview [items]="treeItems"></ngx-treeview>
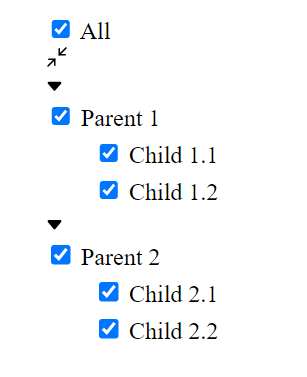
4. Adding Checkboxes
To add checkboxes to tree nodes, modify the app.component.html file with the hasAllCheckBox and hasFilter attributes:
<ngx-treeview [items]="treeItems" [config]="config"></ngx-treeview>
Update the class file as shown below with changes in the config object:
import { Component } from '@angular/core';
import { TreeviewConfig, TreeviewItem } from 'ngx-treeview';

@Component({
  selector: 'app-root',
  templateUrl: './app.component.html',
  styleUrls: ['./app.component.scss'],
})
export class AppComponent {
  public treeItems: TreeviewItem[];
  public config: TreeviewConfig;

  constructor() {

    ...

    this.config = {
      hasAllCheckBox: true,
      hasFilter: false,
      hasCollapseExpand: true,
      decoupleChildFromParent: false,
      maxHeight: 500,
      hasDivider: true,
    };
  }
}
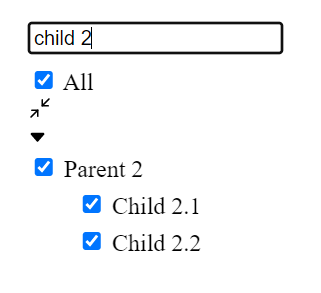
5. Implementing Filtering
To add filtering functionality, set the hasFilter property to true in the config attribute:
this.config = {
  hasAllCheckBox: true,
  hasFilter: true,
  hasCollapseExpand: true,
  decoupleChildFromParent: false,
  maxHeight: 500,
  hasDivider: true
};
6. Event Handling
To handle events like node selection changes, add the (selectedChange) event to the ngx-treeview element in the app.component.html file:
<ngx-treeview [items]="treeItems" [config]="config" (selectedChange)="onSelectedChange($event)"></ngx-treeview>
Then, define the onSelectedChange method in the app.component.ts file:
public onSelectedChange(selected: number[]): void {
  console.log('Selected values:', selected);
}
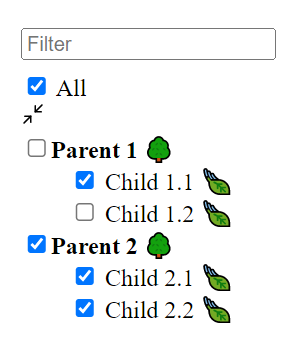
7. Using Templates
To customize the appearance of treeview nodes using Angular templates, add the following code to your app.component.html file:
<ngx-treeview [items]="treeItems" [config]="config" [itemTemplate]="itemTemplate">
  <ng-template #itemTemplate let-item="item">
    <input type="checkbox" [checked]="item.checked" (change)="onCheckboxChange(item)" />
    <ng-container *ngIf="item.children && item.children.length > 0">
      <strong>{{ item.text }}</strong> 🌳
    </ng-container>
    <ng-container *ngIf="!item.children || item.children.length === 0">
      {{ item.text }} 🍃
    </ng-container>
  </ng-template>
</ngx-treeview>
Also, update the component class to add the onCheckboxChange and treeItems as shown below:
import { Component } from '@angular/core';
import { TreeviewConfig, TreeviewItem } from 'ngx-treeview';

@Component({
  selector: 'app-root',
  templateUrl: './app.component.html',
  styleUrls: ['./app.component.scss'],
})
export class AppComponent {
  public treeItems: TreeviewItem[];
  public config: TreeviewConfig;

  constructor() {
    this.treeItems = [
      new TreeviewItem({
        text: 'Parent 1',
        value: 1,
        children: [
          new TreeviewItem({ text: 'Child 1.1', value: 11 }),
          new TreeviewItem({ text: 'Child 1.2', value: 12 }),
        ],
      }),
      new TreeviewItem({
        text: 'Parent 2',
        value: 2,
        children: [
          new TreeviewItem({ text: 'Child 2.1', value: 21 }),
          new TreeviewItem({ text: 'Child 2.2', value: 22 }),
        ],
      }),
    ];

    this.config = {
      hasAllCheckBox: true,
      hasFilter: true,
      hasCollapseExpand: true,
      decoupleChildFromParent: false,
      maxHeight: 500,
      hasDivider: true,
    };
  }

  onCheckboxChange(item: TreeviewItem) {
    item.checked = !item.checked;

    if (item.children) {
      item.children.forEach((child) => (child.checked = item.checked));
    } else {
      const parent = this.treeItems.find((parent) =>
        parent.children.includes(item)
      );
      if (parent) {
        parent.checked = parent.children.every((child) => child.checked);
      }
    }
  }
}
8. Lazy Loading
To implement lazy loading, first, modify the app.component.ts file:
public onSelectedChange(selected: number[]): void {
  console.log('Selected values:', selected);
}

public loadChildren = (item: TreeviewItem): Promise<TreeviewItem[]> => {
  // Replace with your data loading logic.
  return new Promise((resolve) => {
    setTimeout(() => {
      resolve([
        new TreeviewItem({ text: 'Lazy Child 1', value: 100 }),
        new TreeviewItem({ text: 'Lazy Child 2', value: 101 })
      ]);
    }, 1000);
  });
};
Then, add the [loadChildren] attribute to the ngx-treeview element in the app.component.html file:
<ngx-treeview [items]="treeItems" [config]="config" [loadChildren]="loadChildren"></ngx-treeview>
Conclusion
In this article, we explored how to create an ngx treeview in an Angular app with various features such as hierarchical tree structure, checkboxes, collapsible nodes, filtering, and more. By following these steps, you can implement a fully functional treeview component to display and navigate complex data sets in your Angular applications.