In this Angular Material tutorial, we’re going to discuss how to create a Material Autocomplete showing suggestion results from a remote server by using the mat-autocomplete component of the Material library.
The MatAutocomplete component can be used by a user to search from a set of items locally or fetched from a remote server via APIs.
Here we’ll create a new Angular project and install the Material UI package to use its APIs. The mat-autocomplete component is provided by the MatAutocompleteModule API.
The matAutocomple can also display remote results and show a loader meanwhile the API call is in progress. Dynamic responses are integrated when there is a huge database from which a user is going to search for items. This needs a well-optimized approach like limiting minimum character only after which the server API call will hit and also add debounce to check the API is not triggered on every key event.
Let’s start with the implementation…
How to Add Server HTTP Response on Material Autocomplete?
You can follow these steps to populate remote responses in Material autocomplete suggestions using HTTP get calls.
Step 1 – Create Angular Application
Step 2 – Install Material Library
Step 3 – Update HTML Template
Step 4 – Add Debounce in Component Class
Step 5 – See In Action
Step 1 – Create Angular Application
To enable the ng command in the terminal window, make sure to instal the angular cli tool. If you already have, you can update it as well.
# Install NG CLI
npm install -g @angular/cli

#Update NG CLI
ng update
Afterwards, you can hit the following command to create a new angular project with the name provided:
ng new angular-material-appMove inside the application folder
cd angular-material-appStep 2 – Install Material Library
Thereafter creating and moving the terminal to the application folder, we will install the Material library by executing the ng add command. This makes the installation of the material library very easy, you can choose options while installation as shown below:
ng add @angular/material

# ? Choose a prebuilt theme name, or "custom" for a custom theme: Indigo/Pink
# ? Set up global Angular Material typography styles? No
# ? Set up browser animations for Angular Material? Yes
This will update the "styles" property array inside the angular.json file, which you can change anytime.
Step 3 – Import Material Module
The Material Library provides a huge set of usable API’s for its various modules and components. So we need to import only those modules, that we’re going to use in our application. This keeps our app more optimized and size-efficient.
For creating the Material Autocomplete, we will import the MatInputModule and MatAutocompleteModule in AppModule. In addition to these, we will import the HttpClientModule to make remote HTTP get calls to fetch the dynamic responses.
Open the app.module.ts file and update the imports array:
import { NgModule } from '@angular/core';
import { BrowserModule } from '@angular/platform-browser';

import { AppComponent } from './app.component';
import { BrowserAnimationsModule } from '@angular/platform-browser/animations';

// Material Modules

import { MatAutocompleteModule } from '@angular/material/autocomplete';
import { MatInputModule } from '@angular/material/input';
import { HttpClientModule } from '@angular/common/http';

@NgModule({
  declarations: [AppComponent],
  imports: [
    BrowserModule,
    BrowserAnimationsModule,
    HttpClientModule,

    MatInputModule,
    MatAutocompleteModule,
  ],
  providers: [],
  bootstrap: [AppComponent],
})
export class AppModule {}
Step 3 – Update HTML Template
To create the Material Autocomplete we will add the following HTML template in the app.component.html file:
<h4>Remote AutoComplete <span *ngIf="inProgress">| Searching...</span></h4>
    <mat-form-field class="search-min-width">
      <input type="text" placeholder="Select Movie" matInput [matAutocomplete]="car" #movieSearchInput>

      <mat-autocomplete #car="matAutocomplete" (optionSelected)="onSelection($event)">
        <mat-option *ngFor="let option of apiResponse" [value]="option">
          {{option}}
        </mat-option>
      </mat-autocomplete>
    </mat-form-field>
On the Input control, we have [matAutocomplete] property to bind with <mat-autocomplete> component. The template variable #movieSearchInput we will use to get the search term and hit the HTTP call using the RxJS Debounce function.
Step 4 – Add Debounce in Component Class
Next, we will update the component class file to control the 'keyup' event on the Input form field using the ElementRef then make HTTP calls.
Open the app.component.ts file and update it with the following code:
import { Component, ElementRef, ViewChild } from '@angular/core';
import {
  debounceTime,
  distinctUntilChanged,
  filter,
  fromEvent,
  map,
  of,
} from 'rxjs';
import { HttpClient, HttpParams } from '@angular/common/http';

const APIKEY = 'e8067b53';

const PARAMS = new HttpParams({
  fromObject: {
    action: 'opensearch',
    format: 'json',
    origin: '*',
  },
});

@Component({
  selector: 'app-root',
  templateUrl: './app.component.html',
  styleUrls: ['./app.component.css'],
})
export class AppComponent {
  @ViewChild('movieSearchInput', { static: true })
  movieSearchInput!: ElementRef;
  apiResponse: any;
  inProgress = false;

  constructor(private httpClient: HttpClient) {}

  ngOnInit() {
    fromEvent(this.movieSearchInput.nativeElement, 'keyup')
      .pipe(
        map((event: any) => {
          return event.target.value;
        }),
        filter((res) => res.length > 2), // Trigger call if search term character length more than 2
        debounceTime(1000), // Trigger call if last key hit older than 1000 ms
        distinctUntilChanged() // Trigger call if search term different from last
      )
      .subscribe((text: string) => {
        this.inProgress = true;
        this.searchGetCall(text).subscribe(
          (res: any) => {
            console.log(res);
            if (res.Search) {
              this.apiResponse = res.Search.map((val) => val.Title);
              console.log(this.apiResponse);
            }
            this.inProgress = false;
          },
          (err) => {
            console.log('error', err);
            this.inProgress = false;
          }
        );
      });
  }

  onSelection(event) {
    console.log(event.option.value, event.option.id);
  }

  searchGetCall(term: string) {
    if (term === '') {
      return of([]);
    }
    return this.httpClient.get(
      'http://www.omdbapi.com/?s=' + term + '&apikey=' + APIKEY,
      { params: PARAMS.set('search', term) }
    );
  }
}
Inside the ngOnInit hook, we are tracking the ‘keyup’ event to make HTTP calls by controlling the flow using RxJS functions inside the pipe chain.
map(): Fetch required term valuefilter(): Trigger call if search term character length more than 2debounceTime(): Trigger call if last key hit older than 1000 msdistinctUntilChanged(): Trigger call if search term different from last
By Adding the RXJS functions, we can optimize the number of calls we make for server response.
Step 5 – See In Action
That’s it, now you can run your application with all the above changes to see the implementation in action. Execute the following command to run the project on localhost:4200 in your default browser
npm start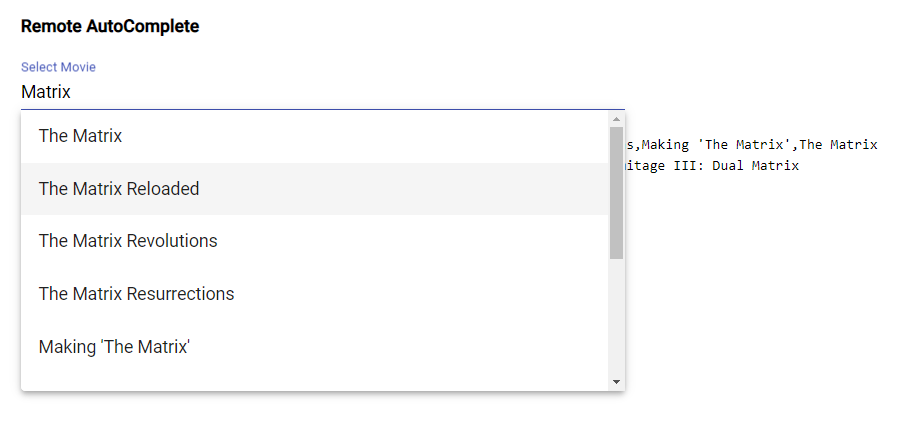
Conclusion
We have implemented the server-side HTTP responses into the material Autocomplete component. Using the RxJS functions we can optimise the way how client-application interact with server APIs and help in reducing resource utilization. This also helps in keeping client-side UI more efficient for longer use.