In this Angular material tutorial, you will learn how to set a default value in the Mat Select component of the Material library. How we can display text other than the value selected.
A Mat Select Material component allows selecting a single value from a list of options available. In our demo app, we will populate a list of items from a JSON object having three keys ID, NAME and DESCRIPTION.
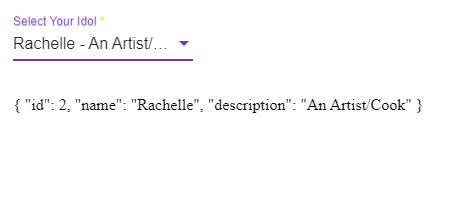
The mat select component will have Reactive form binding with the required validation setup. We will also display the selected value as JSON under beneath.
Let’s discuss the implementation
How to set a default value in the Material Select box?
Follow these steps to populate Mat Select and set the default value:
Step 1 – Create an Angular App
Step 2 – Install Material Library
Step 3 – Add Required Material Modules
Step 4 – Implement Mat Select Component
Step 5 – See In Action
Step 1 – Create an Angular App
To enable the ng command in the terminal window, make sure to instal the angular CLI tool. If you already have, you can update it as well.
# Install NG CLI
npm install -g @angular/cli

#Update NG CLI
ng update
Afterwards, you can hit the following command to create a new angular project with the name provided:
ng new angular-material-table-appMove inside the application folder
cd angular-material-table-appStep 2 – Install Material Library
Thereafter creating and moving the terminal to the application folder, we will install the Material library by executing the ng add command. This makes the installation of the material library very easy, you can choose options while installation as shown below:
ng add @angular/material

# ? Choose a prebuilt theme name, or "custom" for a custom theme: Indigo/Pink
# ? Set up global Angular Material typography styles? No
# ? Set up browser animations for Angular Material? Yes
This will update the "styles" property array inside the angular.json file, which you can change anytime.
Step 3 – Import Material Module
The Material Library provides a huge set of usable APIs for its various modules and components. So we need to import only those modules, that we’re going to use in our application. This keeps our app more optimized and size-efficient.
Let’s import the MatFormFieldModule and MatSelectModule from the Material library. We also need FormsModule and ReactiveFormsModule to use the Reactive forms approach for validation.
Open the app.module.ts file and update the imports array:
import { NgModule } from '@angular/core';
import { BrowserModule } from '@angular/platform-browser';
import { FormsModule, ReactiveFormsModule } from '@angular/forms';

import { AppComponent } from './app.component';
import { BrowserAnimationsModule } from '@angular/platform-browser/animations';

// Material Modules
import { MatFormFieldModule } from '@angular/material/form-field';
import { MatSelectModule } from '@angular/material/select';

@NgModule({
  imports: [
    BrowserModule,
    BrowserAnimationsModule,
    FormsModule,
    ReactiveFormsModule,
    MatFormFieldModule,
    MatSelectModule,
  ],
  declarations: [AppComponent],
  bootstrap: [AppComponent],
})
export class AppModule {}
Step 4 – Implement Mat Select Component
Next, we will add the Mat Select component to the HTML template. Open the app.component.html file and update it with the following:
<div class="wrapper">
  <form [formGroup]="mySelectForm">
    <mat-form-field class="full-width">
      <mat-select placeholder="Select Your Idol" formControlName="yourIdol">
        <mat-option>--</mat-option>
        <mat-option *ngFor="let yi of idolList" [value]="yi">
          {{ yi.name }} - {{ yi.description }}
        </mat-option>
      </mat-select>
    </mat-form-field>

    <p>{{ mySelectForm.get('yourIdol').value | json }}</p>
  </form>
</div>
Afterwards, update the component class. Open the app.component.ts file and update with following code:
import { Component, VERSION } from '@angular/core';
import { FormBuilder, FormGroup, Validators } from '@angular/forms';

@Component({
  selector: 'my-app',
  templateUrl: './app.component.html',
  styleUrls: ['./app.component.css'],
})
export class AppComponent {
  name = 'Angular ' + VERSION.major;

  mySelectForm: FormGroup;

  idolList = [
    {
      id: 1,
      name: 'Lillian',
      description: 'A Break Dancer',
    },
    {
      id: 2,
      name: 'Rachelle',
      description: 'An Artist/Cook',
    },
    {
      id: 3,
      name: 'Maya',
      description: 'A Pop Singer',
    },
  ];

  constructor(private fb: FormBuilder) {}

  ngOnInit() {
    this.mySelectForm = this.fb.group({
      yourIdol: [null, Validators.required],
    });

    // Select default on load
    const toSelect = this.idolList.find((c) => c.id == 3);
    this.mySelectForm.get('yourIdol').setValue(toSelect);
  }
}
We have the idolList JSON object to iterate the item in Mat Select using ngFor directive. Inside the NgOnInit hook, we are fetching the third item from JSON and setting the default value of the Mat Select box.
Step 5 – See In Action
Now you can see the application by running the npm start command in the terminal window. It will open the app in the default 4200 port at the following URL
Find a working app on StackBlitz