In this tutorial, we will discuss creating sortable lists with drag and drop feature using which items can be dragged from one list to drop in another. This feature will be provided by a popular library named Dragula.
Sortable lists are used to enable users to arrange items according to their priority or this item can also be moved or removed across lists. Such behaviour can be used in many places in applications like Task, Music, ToDo lists etc.
We will be using the ng2-dragula npm package, which is exclusively adapted for Angular applications. The services and even handling provide a stable and flexible implementation of Dragular-based sortable lists in Angular apps.
This guide will lead you to implement draggable and sortable lists using the ng2-dragula plugin by proceeding with a step-by-step tutorial.
How to create a Sortable and Drag-Drop Based List in Angular?
Step 1 – Create an Angular App
Step 2 – Install NG2 Dragula Library
Step 3 – Add Polifills for Drag Support
Step 4 – Create Sortable Lists
Step 5 – See In Action
Step 1 – Create an Angular App
Before we start creating Angular app, make sure you have installed the latest version of Angular CLI tool:
npm install -g @angular/cli
Now create a new Angular application by executing below ng command with the name provided:
ng new my-angular-app
Move inside the application directory:
cd my-angular-app
Step 2 – Install NG2 Dragula Library
Head towards the terminal and install the NG2 Dragula library by executing the below command at the root path:
npm install ng2-dragulaAfter installing the package library, we need to import the required module to use its components inside our Angular application. Open the app.module.ts file and update the imports array with DragulaModule
import { NgModule } from '@angular/core';
import { BrowserModule } from '@angular/platform-browser';
import { AppComponent } from './app.component';
import { DragulaModule } from 'ng2-dragula';

@NgModule({
  declarations: [AppComponent],
  imports: [BrowserModule, DragulaModule.forRoot()],
  providers: [],
  bootstrap: [AppComponent],
})
export class AppModule {}
Step 4 – Add Polifills for Drag Support
Next, we need to add the global object on windows for Dragula to work as expected.
Open the polifills.ts file at your project root folder and add the following like at the end of the file:
(window as any).global = window;
Also, add the dragula.css file in the angular.json file’s styles array:
"styles": [
       "src/styles.css",
         "node_modules/dragula/dist/dragula.css"
],
With the above, you can add a custom set of CSS to the app.component.css or styles.css file:
.wrap {
  margin: 20px;
}

.wrapper {
  margin: 20px;
  padding: 20px;
  display: flex;
}

.container {
  min-width: 10px;
  background-color: beige;
}
.container div {
  margin: 5px;
  padding: 10px;
}
.vamp_item {
  background-color: rgb(6, 255, 172);
}
.drak_item {
  background-color: rgb(255, 166, 0);
}
Step 5 Create Sortable Lists
Let’s create the sortable draggable lists of items. Open the app.component.html file then add following template to it:
<div class="wrap">
<h1>Drag Drop using Dragula in Angular</h1>
<div>
<div class="wrapper">
<div
class="container"
dragula="VAMPIRES_LIST"
[(dragulaModel)]="vampires"
>
<div class="{{ vamp.type }}_item" *ngFor="let vamp of vampires">
{{ vamp.name }}
</div>
</div>
<div
class="container"
dragula="VAMPIRES_LIST"
[(dragulaModel)]="drakulas"
>
<div class="{{ drak.type }}_item" *ngFor="let drak of drakulas">
{{ drak.name }}
</div>
</div>
</div>
</div>
<div class="wrapper">
<div class="container">
<pre>{{ vampires | json }}</pre>
</div>
<div class="container">
<pre>{{ drakulas | json }}</pre>
</div>
</div>
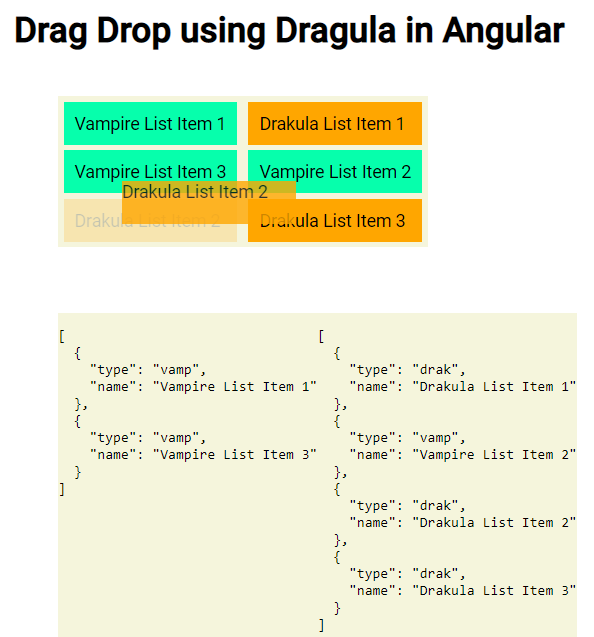
</div>You will notice, we have two lists with dragula property which takes the group name of list, and [(dragulaModel)] model to reflect the updated value.
The list items are getting populated using the ngFor directive with dynamic items. At the bottom, we have also printed the model responses as we sort or drag item inter lists to check updated data.
Similarly, update the component class file to set up the callback function from the service that can be used for any custom handing of list items. Open the app.component.ts file and update it with the following code:
import { Component } from '@angular/core';
import { DragulaService } from 'ng2-dragula';
import { Subscription } from 'rxjs';

@Component({
  selector: 'app-root',
  templateUrl: './app.component.html',
  styleUrls: ['./app.component.css'],
})
export class AppComponent {
  subs = new Subscription();
  vampires = [
    {
      type: 'vamp',
      name: 'Vampire List Item 1',
    },
    {
      type: 'vamp',
      name: 'Vampire List Item 2',
    },
    {
      type: 'vamp',
      name: 'Vampire List Item 3',
    },
  ];
  drakulas = [
    {
      type: 'drak',
      name: 'Drakula List Item 1',
    },
    {
      type: 'drak',
      name: 'Drakula List Item 2',
    },
    {
      type: 'drak',
      name: 'Drakula List Item 3',
    },
  ];

  constructor(private dragulaService: DragulaService) {
    // Callback events
    this.subs.add(
      this.dragulaService.drag().subscribe(({ name, el, source }) => {
        console.log('DRAG', name, el, source);
      })
    );
    this.subs.add(
      this.dragulaService
        .drop()
        .subscribe(({ name, el, target, source, sibling }) => {
          console.log('DROP', name, el, target, source, sibling);
        })
    );
    this.subs.add(
      this.dragulaService
        .dropModel()
        .subscribe(
          ({
            name,
            el,
            target,
            source,
            sibling,
            sourceModel,
            targetModel,
            item,
          }) => {
            console.log(
              'dropModel',
              name,
              el,
              target,
              source,
              sibling,
              sourceModel,
              targetModel,
              item
            );
          }
        )
    );
  }

  ngOnDestroy() {
    // destroy all the subscriptions at once
    this.subs.unsubscribe();
  }
}
Step 6 – See In Action
After adding the required changes, run your Angular application by hitting the following command:
npm startThis will start the development web server at local at the following URL:
Conclusion
Using the NG2 Dragula we created dynamic lists items, in which items can drag or sorted by the users. We can easily handle the drag and sort event and limit if an item can go in another list or not by defining its group name in dragula property.