In this tutorial, we will discuss how to add a form using Angular Material Form controls with validation. The form will have a text field, select dropdown and radio control to select an option from.
In Angular we have two types of Forms available:
Template Driven Form
Reactive Forms
Here we will focus on creating Angular Template Driven Form with required controls and Validation behavior. Let’s implementation from start by creating a new Angular 8 project than adding Angular Material to it.
Create an Angular Project
Make sure you have the latest version of Angular CLI installed.
$ npm install -g @angular/cliCreate a new project using Angular CLI tool by running following command
$ ng new angular-form-validation
? Would you like to add Angular routing? = Yes
? Which stylesheet format would you like to use? = CSS

$ cd angular-form-validation
Install Angular Material
As we are creating a v8 Angular project, so we need the same version for Angular Material. Run following NPM command to install Angular Material and it's dependencies
# Install material, CDK and animations
$ npm install --save @angular/material @angular/cdk @angular/animations
Configure Material Animations
Next, open app.module.ts file to import BrowserAnimationsModule then add it in imports array to enable animation for Material components.
//app.module.ts
import { BrowserModule } from '@angular/platform-browser';
import { NgModule } from '@angular/core';

import { AppRoutingModule } from './app-routing.module';
import { AppComponent } from './app.component';

import { BrowserAnimationsModule } from '@angular/platform-browser/animations';

@NgModule({
  declarations: [
    AppComponent
  ],
  imports: [
    BrowserModule,
    AppRoutingModule,
    BrowserAnimationsModule
  ],
  providers: [],
  bootstrap: [AppComponent]
})
export class AppModule { }
Add Material Theme
To add a theme of Material in the project, open styles.css file then import one of the theme file used to style Material components.
/* styles.css */
/* You can add global styles to this file, and also import other style files */
@import "~@angular/material/prebuilt-themes/indigo-pink.css";
We are done with Angular material installation and configurations.
Import Material Modules
To use Angular Material form controls, we need to import them in the app's module file so that they are available anywhere in our application.
In our Form, we will be having Input, Select Dropdown, Radio buttons and also Form field module used to wrap textarea, input, select, etc.
Also, we have used SnackBar, it is like a toast message which shows information message to the user on a floating container on view.
So after making the required imports, our app.module.ts file will look like this:
//app.module.ts
import { BrowserModule } from '@angular/platform-browser';
import { NgModule } from '@angular/core';

import { AppRoutingModule } from './app-routing.module';
import { AppComponent } from './app.component';

import { BrowserAnimationsModule } from '@angular/platform-browser/animations';

import {
  MatFormFieldModule,
  MatInputModule,
  MatSelectModule,
  MatRadioModule,
  MatButtonModule,
  MatSnackBarModule
 } from '@angular/material';

import { FormsModule } from '@angular/forms';

@NgModule({
  declarations: [
    AppComponent
  ],
  imports: [
    BrowserModule,
    AppRoutingModule,
    BrowserAnimationsModule,

    FormsModule,
    MatFormFieldModule,
    MatInputModule,
    MatSelectModule,
    MatRadioModule,
    MatButtonModule,
    MatSnackBarModule
  ],
  providers: [],
  bootstrap: [AppComponent]
})
export class AppModule { }
If you notice above, we also having FormsModule, as we will use the ngForm directive to control form validation.
Add Form and Form Controls
Finally, we are ready to add a form in App component template app.component.html file
In form tag (ngSubmit) event handler is calling the submitForm method to handle form data.
<mat-form-field> is used to wrap some of the controls like here we wrapped Input and Select. But we can't use it to wrap Radio controls.
That's why we added a custom validation handler login on <mat-radio-group> by wrapping it in a custom div with ngClass.
<form #myForm="ngForm" (ngSubmit)="submitForm($event)">

  <mat-form-field>
    <input matInput placeholder="Input" [(ngModel)]="formData.name" name="name" required>
  </mat-form-field>

  <mat-form-field>
    <mat-label>Select Designation</mat-label>
    <mat-select [(ngModel)]="formData.designation" name="designation" required>
      <mat-option [value]="">Select Designation</mat-option>
      <mat-option *ngFor="let des of designations" [value]="des.value">
        {{des.value}}
      </mat-option>
    </mat-select>
  </mat-form-field>

  <div [ngClass]="{'mat-form-field-invalid':myForm.submitted && !formData.gender}">
    <mat-radio-group [(ngModel)]="formData.gender" name="gender" required>
      <mat-radio-button value="male">Male</mat-radio-button>
      <mat-radio-button value="femal">Female</mat-radio-button>
    </mat-radio-group>
  </div>

  <div class="submit-button">
    <button mat-flat-button color="primary" type="submit">Submit</button>
  </div>
</form>
For Radio Group validation to show red color text we need to add some CSS in styles.css making it highlight if the value is not selected.
.mat-form-field-invalid .mat-radio-label-content{
    color:#f44336;
}
.mat-form-field-invalid .mat-radio-outer-circle{
    border-color:#f44336!important;
}
In the app.component.ts file, we have a list of designation options and submitFrom method which will check if the form is valid using template variable reference we got using @ViewChild
//app.component.ts
import { Component, OnInit, ViewChild } from '@angular/core';
import { NgForm } from '@angular/forms';
import { MatSnackBar } from '@angular/material/snack-bar';

export interface Designation {
  id: string;
  value: string;
}

@Component({
  selector: 'app-formvalidation',
  templateUrl: './formvalidation.component.html',
  styleUrls: ['./formvalidation.component.css']
})
export class FormvalidationComponent implements OnInit {

  @ViewChild('myForm',{static:false}) public MyForm: NgForm;

  fname:string;

  formData = {
    name:"",
    designation:"",
    gender:"",
  }

  constructor(private _snackBar: MatSnackBar) { }

  ngOnInit() {
  }

  designations: Designation[] = [
    {id: '1', value: 'Developer'},
    {id: '2', value: 'Senior Programmer'},
    {id: '3', value: 'Software Architect'}
  ];

  submitForm(e){
    console.log(this.MyForm);
    if(this.MyForm.valid){
        //Submit form logic here!
    }else{
      this._snackBar.open("Please fill all fields","",{duration:1000});
    }
  }

}
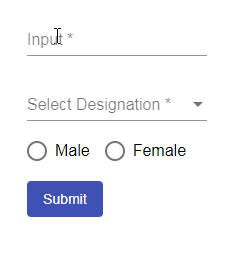
The form will look like this:
Conclusion: We discussed how to implement a simple template-driven form using Angular Material controls with validation. Here we also added Radio group with validation using custom class.