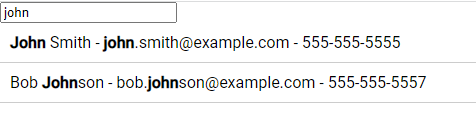
In this tutorial, we will learn how to create an Angular filter list component with matching text highlighting. This is a useful feature to have in any app that displays a large amount of data, as it allows users to quickly find and identify the information they are looking for.
We will be using a sample JSON object as the data source for our filter list, and we will walk through each step of the process, including how to set up the component, create the filter function, and implement the highlighting feature.
Step 1: Implement the highlighting feature
To highlight the matching text, we can use a pipe to modify the data before it is displayed in the list. Create a new pipe called highlight and add it to the name, email, and phone properties in the template.
To create a new pipe in Angular, you can use the ng generate pipe command in the terminal, followed by the name of your pipe. For example, to create a pipe called highlight, you would run the following command:
ng generate pipe highlightThis will create a new file called highlight.pipe.ts in the src/app folder, which will contain the basic structure of a pipe.
Here is an example of the highlight.pipe.ts file:
import { Pipe, PipeTransform } from '@angular/core';

@Pipe({
  name: 'highlight'
})
export class HighlightPipe implements PipeTransform {
  transform(value: string, search: string): string {
    if (!search) {
      return value;
    }
    const regex = new RegExp(search, 'gi');
    return value.replace(regex, match => `<mark>${match}</mark>`);
  }
}
Step 2: Update the App component class
Next, update the AppComponent class to have the filterData function as shown below:
import { Component, OnInit } from '@angular/core';
import { HttpClient } from '@angular/common/http';

@Component({
  selector: 'app-root',
  templateUrl: './app.component.html',
  styleUrls: ['./app.component.css'],
})
export class AppComponent implements OnInit {
  filterText!: string;
  filteredData!: any[];
  data: any;
  constructor(private http: HttpClient) {}
  ngOnInit() {
    this.http.get('assets/data.json').subscribe((res: any) => {
      this.data = res.data;
      this.filteredData = this.data;
    });
  }
  filterData() {
    this.filteredData = this.data.filter(
      (item: { name: string; email: string; phone: string | string[] }) => {
        return (
          item.name.toLowerCase().includes(this.filterText.toLowerCase()) ||
          item.email.toLowerCase().includes(this.filterText.toLowerCase()) ||
          item.phone.includes(this.filterText)
        );
      }
    );
  }
}
Step 3: Update Template HTML
Here is the Template html to show a filter with input. We also used the highlight pipe to highlight the searched term in results:
<input [(ngModel)]="filterText" (keyup)="filterData()" placeholder="Search...">
<ul>
    <li *ngFor="let item of filteredData">
        <span [innerHTML]="item.name | highlight: filterText"></span> - <span
            [innerHTML]="item.email | highlight: filterText"></span> - <span
            [innerHTML]="item.phone | highlight: filterText"></span>
    </li>
</ul>
Step 4: Sample Data
Create a file data.json inside the assets folder, that will have the following content in it:
{
  "data": [
    {
      "id": 1,
      "name": "John Smith",
      "email": "john.smith@example.com",
      "phone": "555-555-5555"
    },
    {
      "id": 2,
      "name": "Jane Doe",
      "email": "jane.doe@example.com",
      "phone": "555-555-5556"
    },
    {
      "id": 3,
      "name": "Bob Johnson",
      "email": "bob.johnson@example.com",
      "phone": "555-555-5557"
    }
  ]
}
Step 5: Update App Module
In the app.module.ts file, we will add the highlight pipe and HttpClientModule as shown below:
import { NgModule } from '@angular/core';
import { BrowserModule } from '@angular/platform-browser';
import { AppComponent } from './app.component';
import { FormsModule } from '@angular/forms';
import { HighlightPipe } from 'src/highlight.pipe';
import { HttpClientModule } from '@angular/common/http';

@NgModule({
  declarations: [HighlightPipe, AppComponent],
  imports: [FormsModule, BrowserModule, HttpClientModule],
  providers: [],
  bootstrap: [AppComponent],
})
export class AppModule {}
The filter pipe can be used in various other places in your application where you need to filter and display data to the user. Some examples include:
- A search feature for a product catalog, where users can search for specific products by name or category.
- A table or list of data, where users can filter the data by specific columns or fields.
- A messaging or chat application, where users can filter through their past conversations or messages by keyword or sender.
- A file manager, where users can search for specific files by name or type.
- A scheduling or calendar app, where users can filter events by date, location, or category.
In each of these examples, the filter pipe can be used to filter the data based on user input, and the highlighting feature can be used to make it easier for users to identify the data they are looking for.
It’s also worth noting that this filter pipe could be easily reusable across multiple components, this way you can centralize your logic and make it easier to maintain.
Additionally, keep in mind that this is just one example of how to filter and highlight data in Angular, and there are many other ways to achieve the same results.
Conclusion
In this tutorial, we learned how to create an Angular filter list component with matching text highlighting. We started by setting up the component and creating a sample JSON object as the data source.
We then created a filter function to filter the data based on the filter text input, and implemented a highlighting feature using a custom pipe. We also provided an example of how to style the filter results as a floating container using CSS.
With this feature in place, users will be able to quickly find and identify the information they are looking for, making your app more user-friendly and efficient. Keep in mind that this is just one example of how to implement a filter list component, and you can further customize it to suit your specific needs.