How to load JSON files placed locally in the application’s assets folder; In this tutorial, we will focus on how to fetch JSON data from a local folder instead of loading them from a remote server, afterwords use the JSON data to create a Bootstrap table.
Ideally, the data is fetched from a remote server using HTTP protocols in the form of a JSON object which is the short name of Javascript Object Notation. This is the most common way, how a client application communicates with a server to send/ receive data.
But in some cases, we may need to load the JSON data which is placed locally in the application’s own assets or another folder. These locally placed JSON files may consist of configuration files, data to be shown when an app is offline etc.
In this guide, you will learn how to efficiently and easily load JSON data from a local JSON file and populate that data into a Bootstrap styles datatable.
How to Display JSON data in Table in Angular App?
- Step 1 – Create and Setup Angular Project
- Step 2 – Create JSON File in Assets Folder
- Step 3 – Install & Config Bootstrap
- Step 4 – Import Employees JSON & Create Interface
- Step 5 – Create Table with Bootstrap Style
- Step 6 – Update Compiler Options in TS Config
- Step 7 – Run Angular App
Step 1 – Create and Setup Angular Project
To create an Angular project, make sure you have the Angular CLI tool installed on your system.
npm install -g @angular/cliAfterwards, you can execute the below command to create a new Angular app with the name provided of your choice:
ng new angular-json-appNext, move inside the application directory by hitting the change directory command:
cd angular-json-appStep 2 – Create JSON File in Assets Folder
Now, create a new JSON file under the assets folder, that will have Employees data in the JSON format. Create a new file at this location ~src\assets\employees.json and update it with the following JSON content:
[
  {
    "id": 1,
    "name": "Leanne Graham",
    "username": "Bret",
    "email": "Sincere@april.biz",
    "phone": "1-770-736-8031 x56442",
    "website": "hildegard.org"
  },
  {
    "id": 2,
    "name": "Ervin Howell",
    "username": "Antonette",
    "email": "Shanna@melissa.tv",
    "phone": "010-692-6593 x09125",
    "website": "anastasia.net"
  },
  {
    "id": 3,
    "name": "Clementine Bauch",
    "username": "Samantha",
    "email": "Nathan@yesenia.net",
    "phone": "1-463-123-4447",
    "website": "ramiro.info"
  },
  {
    "id": 4,
    "name": "Patricia Lebsack",
    "username": "Karianne",
    "email": "Julianne.OConner@kory.org",
    "phone": "493-170-9623 x156",
    "website": "kale.biz"
  },
  {
    "id": 5,
    "name": "Chelsey Dietrich",
    "username": "Kamren",
    "email": "Lucio_Hettinger@annie.ca",
    "phone": "(254)954-1289",
    "website": "demarco.info"
  },
  {
    "id": 6,
    "name": "Mrs. Dennis Schulist",
    "username": "Leopoldo_Corkery",
    "email": "Karley_Dach@jasper.info",
    "phone": "1-477-935-8478 x6430",
    "website": "ola.org"
  },
  {
    "id": 7,
    "name": "Kurtis Weissnat",
    "username": "Elwyn.Skiles",
    "email": "Telly.Hoeger@billy.biz",
    "phone": "210.067.6132",
    "website": "elvis.io"
  },
  {
    "id": 8,
    "name": "Nicholas Runolfsdottir V",
    "username": "Maxime_Nienow",
    "email": "Sherwood@rosamond.me",
    "phone": "586.493.6943 x140",
    "website": "jacynthe.com"
  },
  {
    "id": 9,
    "name": "Glenna Reichert",
    "username": "Delphine",
    "email": "Chaim_McDermott@dana.io",
    "phone": "(775)976-6794 x41206",
    "website": "conrad.com"
  },
  {
    "id": 10,
    "name": "Clementina DuBuque",
    "username": "Moriah.Stanton",
    "email": "Rey.Padberg@karina.biz",
    "phone": "024-648-3804",
    "website": "ambrose.net"
  }
]
Step 3 – Install & Config Bootstrap
To create a table with Bootstrap style, you need to install the bootstrap package:
npm install bootstrap --saveThereafter, update the "styles" property array inside the angular.json file at project root:
"styles": [
  "src/styles.css",
  "node_modules/bootstrap/dist/css/bootstrap.min.css"
],
Step 4 – Import Employees JSON & Create Interface
Now, you need to import the employees.json file into the AppComponent. Also, we will create an interface to define the type of Employee properties. You can use this tool to create an Interface for you with one click.
Open the app.component.ts file and update it as shown below:
import { Component } from '@angular/core';
import EmployeesJson from '../assets/employees.json';

interface EMPLOYEE {
  id: number;
  name: string;
  username: string;
  email: string;
  phone: string;
  website: string;
}

@Component({
  selector: 'app-root',
  templateUrl: './app.component.html',
  styleUrls: ['./app.component.css']
})
export class AppComponent {
  title = 'Import JSON Data from Assets Folder';

  Employees: EMPLOYEE[] = EmployeesJson;

  constructor(){
    console.log(this.Employees);
  }
}
Step 5 – Create Table with Bootstrap Style
In this step, we will update the HTML template to add a table and having angular *ngFor directive to iterate JSON array items.
Open the app.component.html file and update it as shown below:
<div class="container mt-5">

  <h1>{{title}}</h1>

  <table class="table">
    <thead>
        <tr>
          <th>Id</th>
          <th>Name</th>
          <th>Username</th>
          <th>Email</th>
          <th>Phone</th>
          <th>Website</th>
        </tr>
    </thead>
    <tbody>
      <tr *ngFor="let employee of Employees">
        <th scope="row">{{ employee.id }}</th>
        <td>{{ employee.name }}</td>
        <td>{{ employee.username }}</td>
        <td>{{ employee.email }}</td>
        <td>{{ employee.phone }}</td>
        <td>{{ employee.website }}</td>
      </tr>
    </tbody>
  </table>
</div>
Step 6 – Update Compiler Options in TS Config
You will notice an error in the app.component.ts file while importing the JSON file directly, which says “Cannot find module ‘../assets/employees.json’. Consider using ‘–resolveJsonModule’ to import module with ‘.json’ extension.ts(2732)”
To work it properly we need to update the tsconfig.json file. Add the "resolveJsonModule" and "esModuleInterop" properties under "compilerOptions" as shown below:
{
  "compileOnSave": false,
  "compilerOptions": {
    "resolveJsonModule": true,
    "esModuleInterop": true,
    ...
    ...
Step 7 – Run Angular App
Now, execute the below command in the terminal window to start the web server and run the application:
ng serve --openit will open the application at the following URL:
http://localhost:4200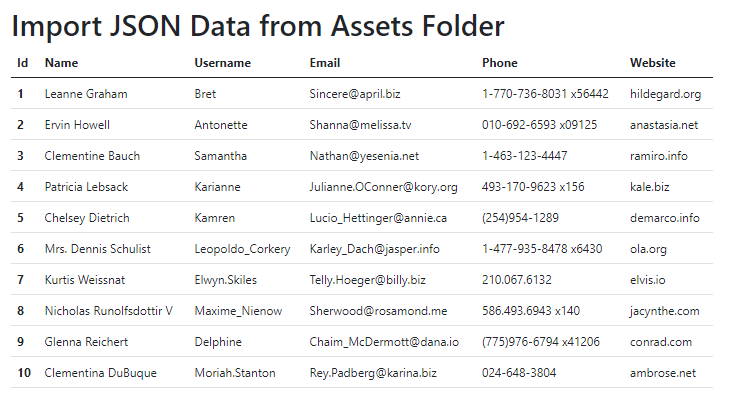
Conclusion
We discussed placing JSON files locally into the application’s assets folder and import them inside the AppComponent. The JSON data can be directly loaded into the component class by updating the tsconfig.json file. Using this method you can easily load JSON data and use it in your application.