Angular applications are data-centric, which needs to connect with a server to store and fetch data. In Angular, we achieve the server communication channel through the HttpClientModule API service.
In this Angular tutorial, We’ll be discussing how to develop an Angular 12 application performing CRUD operations having Bootstrap 4 styles. CRUD is a combination of Create, Read, Update and Delete operations. These are the most common types of REST APIs or Webservice verbs we use.
Introduction of our Angular application
We are going to build an Angular application, that will store and fetch Books details using RESTfull API web services. Besides this, our application will have the following features:
- Users will be able to Create new book records, Edit/ Update any existing item.
- Any item can be deleted by providing the ID of the mapped book.
- The search filter will show the list of matching book titles.
Let’s start with building our app.
Structure of Application
In our Angular application, we’ll create new Components including ListComponent, DetailsComponent and CreateComponent. Moreover to handle the HTTP Services and connect with Web services, we’ll create a service named BooksService.
These components will be shown on specific routes, for that we’ll also configure the App Routing Module.
For adding the style to our application, we’ll be using the Bootstrap 4 style component.
Adding Mock Server for our Application
We can easily set up a local mock server by installing the json-server package. This will help up to quickly test our application performing CRUD operations by using a JSON file.
Install json-server
Run the npm command to install the json-server package globally.
$ <span class="token function">npm</span> <span class="token function">install</span> -g json-serverCreate a JSON file
Next, create a data.json file inside the app/data.json this file will keep the data that will be used for CRUD operations.
Add the following property in data.json file
<span class="token punctuation">{</span>
    <span class="token property">"books"</span><span class="token operator">:</span><span class="token punctuation">[</span><span class="token punctuation">]</span>
<span class="token punctuation">}</span>Start mock server
Finally, run the mock server in new CLI instance with json file specified using below command
$ json-server --watch ./src/app/data.json

  \<span class="token punctuation">{</span>^_^<span class="token punctuation">}</span>/ hi<span class="token operator">!</span>

  Loading ./src/app/data.json
  Done

  Resources
  http://localhost:3000/books

  Home
  http://localhost:3000

  Type s + enter at any <span class="token function">time</span> to create a snapshot of the database
Watching<span class="token punctuation">..</span>.Following are the API URLs that will be available on our server:
- GET /books– fetch all books
- GET /books/: id – fetch a single book detail by id
- POST /books – create a new book
- PUT /books/: id – update a book by id
- PATCH /books/: id – partially update a book by id
- DELETE /books/:id – delete a book by id
- GET /books?title_like=text – filter the list of books with title name provided.
Step 1: Create a new Angular application
Moving to create an application, make sure you have the latest version of Angular CLI installed
npm install -g @angular/cliAfter that, create a new angular project by executing ng command
ng new angular-crud-appIt will ask a few questions:
- Would you like to add Angular routing? – Select Yes as we need Routing for our application.
- Which stylesheet format would you like to use? – We will go for SCSS, but you can choose any.
Get inside the project directory
cd angular-crud-app
Step 2: Generate the required Components and Service
To better showcase the application features, we’ll show CRUD operation in separate views. Also, we’ll have a books service to manage the HTTP Web services.
Execute the following generate commands to create components and service using the Angular CLI tool.
ng generate service services/books
ng generate component components/create
ng generate component components/details
ng generate component components/list
The above commands will create the following components in the app/components folder. Angular CLI will auto-register these components in AppModule of the application.
CreateComponent– Will have a form to create new Books.DetailsComponent– Show details of each selected Book.ListComponent– This will show a list of all or searched Books.
A service named BooksService is also created in the services folder. This service will manage the CRUD operations and error handling of API calls.
Step 3: Refactor the AppModule
Our Angular application will be having Forms to perform CRUD operations, so we need to import the FormsModule.
Also to communicate with Web services and make HTTP calls, we’ll import HttpClientModule.
Open the app.module.ts file and update as shown below:
import { NgModule } from '@angular/core';
import { BrowserModule } from '@angular/platform-browser';

import { AppRoutingModule } from './app-routing.module';
import { AppComponent } from './app.component';
import { CreateComponent } from './components/create/create.component';
import { DetailsComponent } from './components/details/details.component';
import { ListComponent } from './components/list/list.component';

import { FormsModule } from '@angular/forms';
import { HttpClientModule } from '@angular/common/http';

@NgModule({
  declarations: [
    AppComponent,
    CreateComponent,
    DetailsComponent,
    ListComponent
  ],
  imports: [
    BrowserModule,
    AppRoutingModule,
    FormsModule,
    HttpClientModule
  ],
  providers: [],
  bootstrap: [AppComponent]
})
export class AppModule { }
Step 4: Update Angular Application Routes.
While creating the Angular application, we selected Yes to create Routing. Due to that we already have the app-routing.module.ts file in the app folder.
Next, we need to update this file to add more routes to show our newly created components as shown below:
import { NgModule } from '@angular/core';
import { RouterModule, Routes } from '@angular/router';
import { CreateComponent } from './components/create/create.component';
import { DetailsComponent } from './components/details/details.component';
import { ListComponent } from './components/list/list.component';

const routes: Routes = [
  { path: '', redirectTo: 'books', pathMatch: 'full' },
  { path: 'books', component: ListComponent },
  { path: 'book/:id', component: DetailsComponent },
  { path: 'add', component: CreateComponent }
];

@NgModule({
  imports: [RouterModule.forRoot(routes)],
  exports: [RouterModule]
})
export class AppRoutingModule { }
Step 5: Adding Bootstrap in Angular application
To quickly style our application, we can include the bootstrap.min.css file in the <head> section of index.html as shown below.
<!doctype html>
<html lang="en">
<head>
  <meta charset="utf-8">
  <title>AngularCrudApp</title>
  <base href="/">
  <meta name="viewport" content="width=device-width, initial-scale=1">
  <link rel="icon" type="image/x-icon" href="favicon.ico">
  <link rel="stylesheet" href="https://maxcdn.bootstrapcdn.com/bootstrap/4.0.0/css/bootstrap.min.css">

</head>
<body>
  <app-root></app-root>
</body>
</html>
Next, we’ll update the App Component to create Navigation links on top using Bootstrap stylings.
Open the app.component.html file and update it with this code:
<div>
  <nav class="navbar navbar-expand navbar-dark bg-primary">
    <a href="#" class="navbar-brand">Freaky Jolly</a>
    <div class="navbar-nav mr-auto">
      <li class="nav-item" routerLink="books" routerLinkActive="active">
        <a href="javascript:void(0)" class="nav-link">List of Books</a>
      </li>
      <li class="nav-item" routerLink="add" routerLinkActive="active">
        <a href="javascript:void(0)" class="nav-link">Add a Book</a>
      </li>
    </div>
  </nav>

  <div class="container mt-5">
    <router-outlet></router-outlet>
  </div>
</div>
Above, you will notice routerLink directives, which are used to link between views and helps in routing the pages. The router-outlet will be the container of our view or components.
Step 7: Refactor the Books Service to Handle HTTP Calls
Now, we’ll focus on the main component of our application, the BooksService. Our service will use the HttpClient class to expose various HTTP methods to make REST API calls.
Open the services/books.service.ts file and update it
import { HttpClient, HttpErrorResponse, HttpHeaders } from '@angular/common/http';
import { Injectable } from '@angular/core';
import { catchError } from 'rxjs/operators';
import { Observable, throwError } from 'rxjs';

@Injectable({
  providedIn: 'root'
})
export class BooksService {


  apiUrl: string = 'http://localhost:3000/books';
  headers = new HttpHeaders().set('Content-Type', 'application/json');


  constructor(private httpClient: HttpClient) { }

  // Show lists of item
  list(): Observable<any> {
    return this.httpClient.get(this.apiUrl).pipe(
      catchError(this.handleError)
    );
  }

  // Create new item
  getItem(id: any): Observable<any> {
    return this.httpClient.get(`${this.apiUrl}/${id}`).pipe(
      catchError(this.handleError)
    );
  }

  create(data: any): Observable<any> {
    return this.httpClient.post(this.apiUrl, data).pipe(
      catchError(this.handleError)
    );
  }

  // Edit/ Update
  update(id: any, data: any): Observable<any> {
    return this.httpClient.put(`${this.apiUrl}/${id}`, data).pipe(
      catchError(this.handleError)
    );
  }

  // Delete
  delete(id: any): Observable<any> {
    return this.httpClient.delete(`${this.apiUrl}/${id}`).pipe(
      catchError(this.handleError)
    );
  }

  // Search By Name
  filterByTitle(title: any): Observable<any> {
    return this.httpClient.get(`${this.apiUrl}?title_like=${title}`).pipe(
      catchError(this.handleError)
    );
  }

  // Handle API errors
  handleError(error: HttpErrorResponse) {
    if (error.error instanceof ErrorEvent) {
      console.error('An error occurred:', error.error.message);
    } else {
      console.error(
        `Backend returned code ${error.status}, ` +
        `body was: ${error.error}`);
    }
    return throwError(
      'Something bad happened; please try again later.');
  };

}
Step 8: Refactor the Angular Components
Next, we’ll update the components which we create on starting of our tutorial.
Creating or Adding New Book
The CreateComponent will have a form to create a new Book with details including Title and Description.
Update the components\create\create.component.html file with the following code having Bootstrap styles.
<div style="width: 500px; margin: auto;">
  <div class="submit-form">
    <div *ngIf="!isBookAdded">
      <div class="form-group">
        <label for="title">Title</label>
        <input type="text" class="form-control" id="title" required [(ngModel)]="book.title" name="name" />
      </div>

      <div class="form-group">
        <label for="description">Description</label>
        <input class="form-control" id="description" required [(ngModel)]="book.description" name="description" />
      </div>

      <button (click)="addBook()" class="btn btn-success">Create</button>
    </div>

    <div *ngIf="isBookAdded">
      <h3>New book added!</h3>
      <button class="btn btn-success" (click)="newBook()"> + Add More</button>
    </div>
  </div>
</div>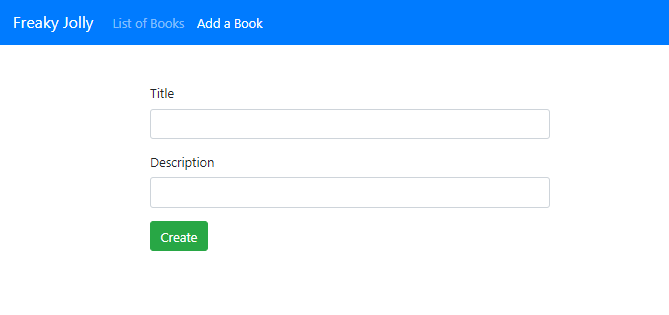
In the Component class, we’ll inject our BooksService to use its create() method.
Open the components\create\create.component.ts and update with the following code.
import { Component, OnInit } from '@angular/core';
import { BooksService } from 'src/app/services/books.service';

@Component({
  selector: 'app-create',
  templateUrl: './create.component.html',
  styleUrls: ['./create.component.scss']
})
export class CreateComponent implements OnInit {

  book = {
    title: '',
    description: ''
  };
  isBookAdded = false;

  constructor(private booksService: BooksService) { }

  ngOnInit(): void { }

  // Add New
  addBook(): void {
    const data = {
      title: this.book.title,
      description: this.book.description
    };
    if (!data.title) {
      alert('Please add title!');
      return;
    }

    this.booksService.create(data)
      .subscribe(
        response => {
          console.log(response);
          this.isBookAdded = true;
        },
        error => {
          console.log(error);
        });
  }

  // Reset on adding new
  newBook(): void {
    this.isBookAdded = false;
    this.book = {
      title: '',
      description: ''
    };
  }

}
Show List of All Books
On the List Component page a user can perform the following operations:
- Deletes single book
- Delete all books at once
- Search for titles of books
We’ll inject the BooksService and call its methods from template HTML. The list of all books will be fetched to show-up details in the table format. In that table, each row will also have Edit and Delete user actions. On clicking the Edit button user will simply redirect to the details route link i.e /book/:id.
The search bar can be used to fetch a filtered list of records. Open the list.component.html file and update with the following code.
<div class="list row">
  <div class="col-md-8">
    <div class="input-group mb-4">
      <input type="text" class="form-control" placeholder="Search by title" [(ngModel)]="searchTitle" />
      <div class="input-group-append">
        <button class="btn btn-outline-secondary" type="button" (click)="searchByTitle()">
          Search
        </button>
      </div>
    </div>
  </div>
  <div class="col-md-12">
    <h4>Book List</h4>

    <table class="table">
      <thead>
        <tr>
          <th scope="col">#</th>
          <th scope="col">Title</th>
          <th scope="col">Description</th>
          <th scope="col" style="min-width: 150px;">Action</th>
        </tr>
      </thead>
      <tbody>
        <tr *ngFor="let book of books;">
          <th scope="row">{{book.id}}</th>
          <td><b>{{book.title}}</b></td>
          <td>{{book.description}}</td>
          <td>
            <button type="button" class="btn btn-danger" routerLink="/book/{{book.id}}">Edit</button>
            <button type="button" class="btn btn-warning" (click)="deleteBook(book.id)">Delete</button>
          </td>
        </tr>
      </tbody>
    </table>

  </div>
</div>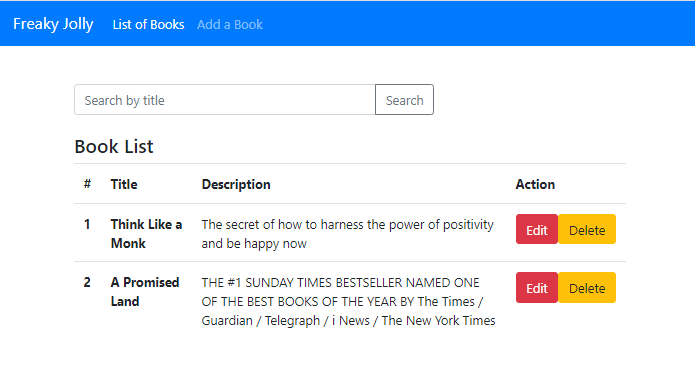
After adding the template HTML, update the component class with methods defined. Open the list.component.ts file and update
import { Component, OnInit } from '@angular/core';
import { BooksService } from 'src/app/services/books.service';

@Component({
  selector: 'app-list',
  templateUrl: './list.component.html',
  styleUrls: ['./list.component.scss']
})
export class ListComponent implements OnInit {

  books: any;
  currentBook:any;
  currentIndex = -1;
  searchTitle = '';

  constructor(private booksService: BooksService) { }

  ngOnInit(): void {
    this.getAllBooks();
  }

  // Get list
  getAllBooks(): void {
    this.booksService.list()
      .subscribe(
        (books: any) => {
          this.books = books;
        },
        (error: any) => {
          console.log(error);
        });
  }

  // Delete action
  deleteBook(id:number){
    this.booksService.delete(id)
    .subscribe(
      response => {
        this.getAllBooks();
      },
      error => {
        console.log(error);
      });
  }

  // Search items
  searchByTitle(): void {
    this.booksService.filterByTitle(this.searchTitle)
      .subscribe(
        books => {
          this.books = books;
        },
        error => {
          console.log(error);
        });
  }

}
Book Details Component
Finally, we have the Details component, which will display the details of the selected book from the list page. The Details component will show bu on /book/:id route URL from where the id will be used to fetch its details.
The details will be shown in a prepopulated form, having button to Update or Delete the book.
Open the details.component.html file and update it with the following code.
<div style="width: 500px; margin: auto;">
    <div *ngIf="currentBook" class="edit-form">
      <h4>Book</h4>
      <form>
        <div class="form-group">
          <label for="title">Title</label>
          <input
            type="text"
            class="form-control"
            id="name"
            [(ngModel)]="currentBook.title"
            name="name"
          />
        </div>
        <div class="form-group">
          <label for="description">Description</label>
          <input
            type="text"
            class="form-control"
            id="description"
            [(ngModel)]="currentBook.description"
            name="description"
          />
        </div>

      </form>

      <button type="button" class="btn btn-danger" (click)="updateBook()" >Update</button>
      <button type="button" class="btn btn-warning" (click)="deleteBook()">Delete</button>

    </div>

  </div>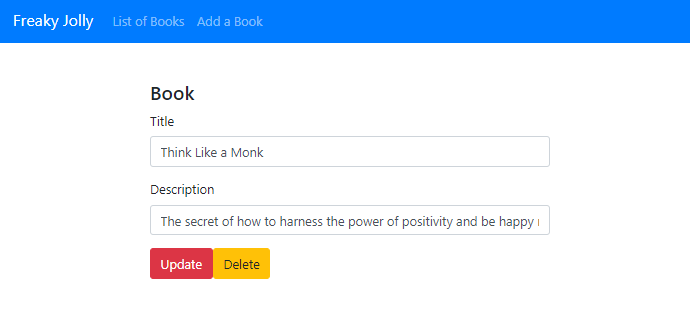
After that update the component class to fetch book details by getting the id from the route URL by using the ActivatedRoute and Route class.
Open the details.component.ts file and update it with the following code.
import { Component, OnInit } from '@angular/core';
import { ActivatedRoute, Router } from '@angular/router';
import { BooksService } from 'src/app/services/books.service';

@Component({
  selector: 'app-details',
  templateUrl: './details.component.html',
  styleUrls: ['./details.component.scss']
})
export class DetailsComponent implements OnInit {

  currentBook: any;
  message = '';

  constructor(
    private booksService: BooksService,
    private route: ActivatedRoute,
    private router: Router) { }

  ngOnInit(): void {
    this.message = '';
    this.getBook(this.route.snapshot.paramMap.get('id'));
  }

  getBook(id: string | null): void {
    this.booksService.getItem(id)
      .subscribe(
        (book: null) => {
          this.currentBook = book;
          console.log(book);
        },
        (error: any) => {
          console.log(error);
        });
  }

  setAvailableStatus(status: any): void {
    const data = {
      name: this.currentBook.name,
      description: this.currentBook.description,
      available: status
    };

    this.booksService.update(this.currentBook.id, data)
      .subscribe(
        response => {
          this.currentBook.available = status;
          console.log(response);
        },
        error => {
          console.log(error);
        });
  }

  updateBook(): void {
    this.booksService.update(this.currentBook.id, this.currentBook)
      .subscribe(
        response => {
          console.log(response);
          this.message = 'The product was updated!';
        },
        error => {
          console.log(error);
        });
  }

  deleteBook(): void {
    this.booksService.delete(this.currentBook.id)
      .subscribe(
        response => {
          console.log(response);
          this.router.navigate(['/books']);
        },
        error => {
          console.log(error);
        });
  }

}
Step 9: Serve or Run Application in the Browser
We are done with coding stuff, so move to the terminal and execute the following command to serve the application in the browser window.
ng serve –open
This opens the application on the default localhost:4200 port.
Conclusion
To summarize, we discussed how to perform CRUD operations in an Angular application like Create, Edit, List and Delete. Moreover, we also added the search feature to filter out list responses.
Moving from mock services to real is very easy, you need to set your server and the client application will start behaving in a similar manner.
Hope you enjoyed this tutorial.. Thanks…