In this tutorial, we will discuss how to create a stepper-based form in React application using the react-stepzilla library and implement validation and manual step change method by using its jumpToStep functoin.
React-Stepzilla is a library that enables you to create multi-step forms easily in React. It simplifies building complex forms by providing an intuitive way to break the layout into several smaller steps. In this tutorial, we will be exploring how to use React-Stepzilla to buid a multi-step form.
In this project, we will create a sample form using React Stepzilla library to break down the form into three different steps. The first step will have fields for the user’s first name and last name, the second step will have a mandatory field for the user’s email address and age, and the third step will have fields for the user’s current company name and experience.
We will also demonstrate the use of the jumpToStep function provided by the React Stepzilla library to allow the user to switch between multiple or any step during the form filling process. Additionally, we will show how to validate the email address and display an error message to the user if the email address is not valid.
How to Create Stepper Form using StepZilla in React?
Follow these step to create a step based form in react app:
Step 1 – Create React App
Step 2 – Install Required Liberaries
Step 3 – Importing the Required Libraries
Step 4 – Creating a React Component and Initializing the State
Step 5 – Creating the jumpToStep and handleInputChange Methods
Step 6 – Creating an Array of Steps
Step 7 – Setting App Component’s Render Method
Step 8 – Add Step Classes
Step 9 – Run the Application
Step 1 – Create React App
First, make sure you have installed the create react app in your system:
npm install create-react-app --globalNext, you can create a new React js application by executing the below npx command:
npx create-react-app react-appThereafter move into the app directory and open in your favourite IDE like VS Code:
cd react-app

code .
Step 2 – Install Required Libraries
We will now install the react-stepzilla to create the step based forms and bootstrap to add requires CSS styles to our form.
Run the following npm command at you application root to install these libraries:
npm install react-stepzilla bootstrap
Step 3 – Importing the Required Libraries
Now, will import the required liberties and CSS files into out App or any other component you wish to be used to create the step forms.
import React from "react";
import StepZilla from "react-stepzilla";
import "bootstrap/dist/css/bootstrap.css";
import "react-stepzilla/src/css/main.css";
Step 4 – Setup App Component Initializing the State
We have a class-based App component. Wherein initialize the state with three properties: firstName, email, and companyName then bind the jumpToStep and handleInputChange methods with the class.
class App extends React.Component {
  constructor(props) {
    super(props);
    this.state = {
      firstName: "",
      email: "",
      companyName: "",
    };
    this.jumpToStep = this.jumpToStep.bind(this);
    this.handleInputChange = this.handleInputChange.bind(this);
  }
  // ...
}
Step 5 – Creating the jumpToStep and handleInputChange Methods
jumpToStep Method
Create a method called jumpToStep that accepts a step number as an argument. We can call the jumpToStep method of the StepZilla instance to jump to the specified step.
handleInputChange Method
To facilitate the input handling functionality of the React app component, a method named handleInputChange should be created, which will receive an event object as its input. The target, value, and name properties of the event object must be extracted for this method to work properly. Once these properties have been retrieved, the state object should be updated using the name property as the key and the new value as the value.
handleInputChange(event) {
  const target = event.target;
  const value = target.value;
  const name = target.name;
  this.setState({
    [name]: value,
  });
}
Step 6 – Creating an Array of Steps
Next, we will create an array called steps that contains three objects. Each object represents a step and has two properties: name and component.
The name property represents the name of the step, while the component property represents the React component that renders the step. Then will pass the firstName, email, companyName, jumpToStep, and handleInputChange methods as props to each component.
const steps = [
      {
        name: "Step One",
        component: (
          <StepOne
            jumpToStep={this.jumpToStep}
            firstName={this.state.firstName}
            handleInputChange={this.handleInputChange}
          />
        ),
      },
      {
        name: "Step Two",
        component: (
          <StepTwo
            jumpToStep={this.jumpToStep}
            email={this.state.email}
            handleInputChange={this.handleInputChange}
          />
        ),
      },
      {
        name: "Step Three",
        component: (
          <StepThree
            jumpToStep={this.jumpToStep}
            companyName={this.state.companyName}
            handleInputChange={this.handleInputChange}
            firstName={this.state.firstName}
            email={this.state.email}
          />
        ),
      },
    ];
Step 7 – Setting App Component’s Render Method
In the render method of the App component, return a div element with the class name “container” then add the StepZilla component. Set the preventEnterSubmission prop to true to prevent the form from being submitted when the enter key is pressed. Assign a ref to the StepZilla component by passing a function to the ref
return (
      <div className="container">
        <StepZilla
          steps={steps}
          preventEnterSubmission={true}
          ref={(s) => (this.stepzillaInstance = s)}
        />
        <pre>{JSON.stringify(this.props.data, null, 2)}</pre>
      </div>
    );
Step 8 – Add Step Classes
Let’s have a look at each step component class, each step will have its form template JSX.
class StepOne extends React.Component {
render() {
return (
<div>
<h1>Step One</h1>
<div className="form-group">
<label htmlFor="firstName">First Name:</label>
<input
type="text"
className="form-control"
id="firstName"
name="firstName"
value={this.props.firstName}
onChange={this.props.handleInputChange}
/>
</div>
<hr />
<button
className="btn btn-secondary"
onClick={() => this.props.jumpToStep(1)}
>
Next
</button>
</div>
);
}
}
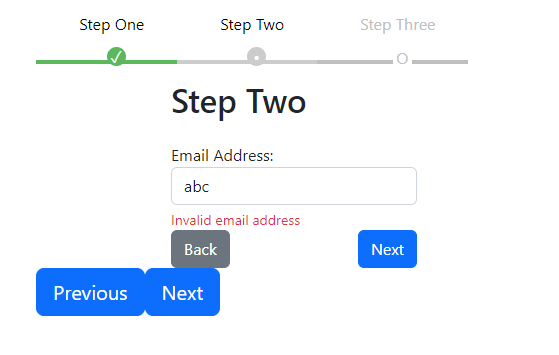
class StepTwo extends React.Component {
constructor(props) {
super(props);
this.state = {
emailError: "",
};
this.handleNext = this.handleNext.bind(this);
}
handleNext() {
if (!this.props.email) {
this.setState({ emailError: "Email is required" });
return;
}
if (!this.validateEmail(this.props.email)) {
this.setState({ emailError: "Invalid email address" });
return;
}
this.props.jumpToStep(2);
}
handleBlur() {
if (this.props.email && !this.validateEmail(this.props.email)) {
this.setState({ emailError: "Invalid email address" });
return;
}
this.setState({ emailError: "" });
}
validateEmail(email) {
const re = /\S+@\S+\.\S+/;
return re.test(email);
}
render() {
const invalidFeedbackStyle = {
display: this.state.emailError !== "" ? "block" : "none",
};
return (
<div className="row justify-content-center">
<div className="col-6">
<h1 className="mb-4">Step Two</h1>
<form>
<div className="form-group">
<label htmlFor="emailInput">Email Address:</label>
<input
type="email"
name="email"
id="emailInput"
className="form-control"
value={this.props.email}
onChange={this.props.handleInputChange}
onBlur={() => this.handleBlur()}
required
/>
{this.state.emailError && (
<div className="invalid-feedback" style={invalidFeedbackStyle}>
{this.state.emailError}
</div>
)}
</div>
</form>
<div className="d-flex justify-content-between">
<button
className="btn btn-secondary"
onClick={() => this.props.jumpToStep(0)}
>
Back
</button>
<button className="btn btn-primary" onClick={this.handleNext}>
Next
</button>
</div>
</div>
</div>
);
}
}
class StepThree extends React.Component {
render() {
return (
<div>
<h1 className="mb-5">Step Three</h1>
<div className="form-group">
<label htmlFor="companyName">Company Name:</label>
<input
type="text"
name="companyName"
id="companyName"
className="form-control"
value={this.props.companyName}
onChange={this.props.handleInputChange}
/>
</div>
<hr className="my-5" />
<button
type="button"
className="btn btn-primary mr-3"
onClick={() => this.props.jumpToStep(1)}
>
Back
</button>
<button
type="button"
className="btn btn-success"
onClick={() =>
alert(
`First Name: ${this.props.firstName}\nEmail Address: ${this.props.email}\nCompany Name: ${this.props.companyName}`
)
}
>
Submit
</button>
</div>
);
}
}The StepTwo is having email validation and StepThree is having an alert to show submitted values. Also added additional jumpToStep functions to provide examples of custom traverse to steps.
Step 9 – Run the Application
The final App component class will look like this:
import React from "react";
import StepZilla from "react-stepzilla";
import "bootstrap/dist/css/bootstrap.css";
import "react-stepzilla/src/css/main.css";

class App extends React.Component {
  constructor(props) {
    super(props);
    this.state = {
      firstName: "",
      email: "",
      companyName: "",
    };
    this.jumpToStep = this.jumpToStep.bind(this);
    this.handleInputChange = this.handleInputChange.bind(this);
  }

  jumpToStep(step) {
    this.stepzillaInstance.jumpToStep(step);
  }

  handleInputChange(event) {
    console.log({ event });
    const target = event.target;
    const value = target.value;
    const name = target.name;
    this.setState({
      [name]: value,
    });
  }

  render() {
    const steps = [
      {
        name: "Step One",
        component: (
          <StepOne
            jumpToStep={this.jumpToStep}
            firstName={this.state.firstName}
            handleInputChange={this.handleInputChange}
          />
        ),
      },
      {
        name: "Step Two",
        component: (
          <StepTwo
            jumpToStep={this.jumpToStep}
            email={this.state.email}
            handleInputChange={this.handleInputChange}
          />
        ),
      },
      {
        name: "Step Three",
        component: (
          <StepThree
            jumpToStep={this.jumpToStep}
            companyName={this.state.companyName}
            handleInputChange={this.handleInputChange}
            firstName={this.state.firstName}
            email={this.state.email}
          />
        ),
      },
    ];

    return (
      <div className="container">
        <StepZilla
          steps={steps}
          // nextTextOnFinalActionStep="Submit"
          preventEnterSubmission={true}
          ref={(s) => (this.stepzillaInstance = s)}
        />
        <pre>{JSON.stringify(this.props.data, null, 2)}</pre>
      </div>
    );
  }
}

class StepOne extends React.Component {
  render() {
    return (
      <div>
        <h1>Step One</h1>
        <div className="form-group">
          <label htmlFor="firstName">First Name:</label>
          <input
            type="text"
            className="form-control"
            id="firstName"
            name="firstName"
            value={this.props.firstName}
            onChange={this.props.handleInputChange}
          />
        </div>
        <hr />
        <button
          className="btn btn-secondary"
          onClick={() => this.props.jumpToStep(1)}
        >
          Next
        </button>
      </div>
    );
  }
}

class StepTwo extends React.Component {
  constructor(props) {
    super(props);
    this.state = {
      emailError: "",
    };
    this.handleNext = this.handleNext.bind(this);
  }

  handleNext() {
    if (!this.props.email) {
      this.setState({ emailError: "Email is required" });
      return;
    }

    if (!this.validateEmail(this.props.email)) {
      this.setState({ emailError: "Invalid email address" });
      return;
    }

    this.props.jumpToStep(2);
  }

  handleBlur() {
    if (this.props.email && !this.validateEmail(this.props.email)) {
      this.setState({ emailError: "Invalid email address" });
      return;
    }
    this.setState({ emailError: "" });
  }

  validateEmail(email) {
    const re = /\S+@\S+\.\S+/;
    return re.test(email);
  }

  render() {
    const invalidFeedbackStyle = {
      display: this.state.emailError !== "" ? "block" : "none",
    };
    return (
      <div className="row justify-content-center">
        <div className="col-6">
          <h1 className="mb-4">Step Two</h1>
          <form>
            <div className="form-group">
              <label htmlFor="emailInput">Email Address:</label>
              <input
                type="email"
                name="email"
                id="emailInput"
                className="form-control"
                value={this.props.email}
                onChange={this.props.handleInputChange}
                onBlur={() => this.handleBlur()}
                required
              />
              {this.state.emailError && (
                <div className="invalid-feedback" style={invalidFeedbackStyle}>
                  {this.state.emailError}
                </div>
              )}
            </div>
          </form>
          <div className="d-flex justify-content-between">
            <button
              className="btn btn-secondary"
              onClick={() => this.props.jumpToStep(0)}
            >
              Back
            </button>
            <button className="btn btn-primary" onClick={this.handleNext}>
              Next
            </button>
          </div>
        </div>
      </div>
    );
  }
}

class StepThree extends React.Component {
  render() {
    return (
      <div>
        <h1 className="mb-5">Step Three</h1>
        <div className="form-group">
          <label htmlFor="companyName">Company Name:</label>
          <input
            type="text"
            name="companyName"
            id="companyName"
            className="form-control"
            value={this.props.companyName}
            onChange={this.props.handleInputChange}
          />
        </div>
        <hr className="my-5" />
        <button
          type="button"
          className="btn btn-primary mr-3"
          onClick={() => this.props.jumpToStep(1)}
        >
          Back
        </button>
        <button
          type="button"
          className="btn btn-success"
          onClick={() =>
            alert(
              `First Name: ${this.props.firstName}\nEmail Address: ${this.props.email}\nCompany Name: ${this.props.companyName}`
            )
          }
        >
          Submit
        </button>
      </div>
    );
  }
}

export default App;
Now run the app by executing npm start.
Conclusion
In conclusion, the development of React components requires careful consideration of the functionality required for the application. Creating a multi-step form using React Stepzilla is an effective way to mange complex forms with multiple steps. Implementing a handleInputChange method is also important to update the state of the component with the new values entered by the user. With these best practices in mind, developers can create robust and efficient React components for their applications.