In this article, you will learn how to implement server-side pagination in Next js with getServerSideProps. We will be using the react-paginate to create a pagination component. By setting up the server using ExpressJS API and the database using PHPMyAdmin we will create a full workflow and working example.
Moreover, you will also learn how to create a dynamic page to handle server-side pagination and use getServerSideProps to handle current page data. To style our application, we will use Bootstrap styles and also customize the pagination CSS to have a better-looking pagination demo.
What is getServerSideProps in Next JS?
The getServerSideProps is used to fetch data in Next js which runs on the server side every time we make a request to the page. It means whenever we make a request to the page, the getServerSideProps is executed to fetch data and use that data to render the page.
Some reasons why and in which use-case we use getServerSideProps:
- Need to fetch data which keeps on changing.
- The data on the page that can’t be cached
- When you need to access the request params or its headers.
How to Add Pagination using getServerSideProps in Next JS?
Follow these step-by-step guides to implement the server-side pagination with the backend having API built on ExpressJS and database on PHPMyAdmin
Step 1 – Create the Next JS Application
Step 2 – Install Required Libraries
Step 3 – Setup Express Server
Step 4 – Create Pagination Component
Step 5 – Update Index Page
Step 6 – Customize CSS Style
Step 7 – Create a Dynamic Page
Step 8 – Run App and Server for Testing
Step 1 – Create the Next JS Application
So let’s begin by creating a new next JS application by executing the below command:
npx create-next-app@11 pagination-nextjs-appThis will create a new application named pagination-nextjs-app. Next you can enter the application directory by hitting the cd command:
cd pagination-nextjs-app
Step 2 – Install Required Libraries
After we have created the Next JS application, we will install some of the required libraries for our Next JS app.
react-paginate: The react-paginate plugin provides easy to use pagination component with a number of useful features and customizations.
NProgress: The NProgress provides a linear loader indicator component. This helps to indicate users about the ongoing process as we see on YouTube. The Progress bar is showing on page top horizontally which can be easily customized via CSS styles
express mysql cors: The express, MySQL and cors will help users to create node-based APIs and other packages will provide seamless connectivity with the PHPMyAdmin database.
bootstrap: To make the application look nice, we will use ready-to-use CSS styling classes from Bootstrap.
Let’s execute the following command in the terminal at your application root folder and install all the libraries at once:
npm install react-paginate nprogress express mysql cors bootstrapAhem! That was quick 🙂
Step 3 – Setup Express JS Server
Now we will set up our Express-based server and also create the required API paths. Create a new directory server at your project root, then create a file Server.js in it. So that the path will look like this ~pagination-nextjs-app\server\server.js
Now update the Server.js file with the following:
const express = require("express");
const mysql = require("mysql");
const cors = require("cors");

const app = express();
app.use(cors());

// Create connection
const db = mysql.createConnection({
  host: "localhost",
  user: "root",
  password: "",
  database: "freakyjolly_demo",
});

// Connect
db.connect((err) => {
  if (err) {
    throw err;
  }
  console.log("MySql Connected...");
});

// Get paginated items
app.get("/items", (req, res) => {
  let page = req.query.page || 1;
  let limit = parseInt(req.query.limit) || 10; // number of records per page
  let offset = (page - 1) * limit;
  let sql = `SELECT COUNT(*) AS total FROM items`;
  db.query(sql, (err, result) => {
    if (err) throw err;
    let total = result[0].total;
    sql = `SELECT * FROM items LIMIT ${limit} OFFSET ${offset}`;
    db.query(sql, (err, results) => {
      if (err) throw err;
      res.send({ total, results });
    });
  });
});

// Create table
app.get('/createitemstable', (req, res) => {
    let sql = 'CREATE TABLE items(id int AUTO_INCREMENT, name VARCHAR(255), description VARCHAR(255), PRIMARY KEY(id))';
    db.query(sql, (err, result) => {
        if(err) throw err;
        console.log(result);
        res.send('Items table created...');
    });
});

// Insert items
app.get('/additems', (req, res) => {
    for(let i = 1; i <= 150; i++) {
        let item = {name: `Student Name ${i}`, description: `Student Description ${i}`};
        let sql = 'INSERT INTO items SET ?';
        let query = db.query(sql, item, (err, result) => {
            if(err) throw err;
            console.log(result);
        });
    }
    res.send('150 items added...');
});

app.listen("3005", () => {
  console.log("Server started on port 3005");
});
In our case, we have a Database name freakyjolly_demo. We have added the /createitemstable and /additems APIs to quickly create a table and inset 150 dummy items in it related to Students.
You can try running the server by hitting the following command:
node server/server.jsYou can visit http://localhost:3005/createitemstable to create a new table in the database.
After that visit http://localhost:3005/additems to create dummy items into the table we create above.
Step 4 – Create Pagination Component
Thereafter we will create the Pagination component which in turn will use the react-paginator to use the ReactPaginate component.
Create a new file at this location ~pagination-nextjs-app\components\Pagination.js and update it with the following code:
import React from "react";
import ReactPaginate from "react-paginate";

export default function Pagination({
  pageCount,
  handlePageClick,
  currentPage,
}) {
  return (
    <div>
      <button
        onClick={() => handlePageClick({ selected: 0 })}
        disabled={currentPage === 1}
      >
        first
      </button>
      <ReactPaginate
        previousLabel={"previous"}
        nextLabel={"next"}
        breakLabel={"..."}
        breakClassName={"break-me"}
        pageCount={pageCount}
        marginPagesDisplayed={2}
        pageRangeDisplayed={5}
        onPageChange={handlePageClick}
        containerClassName={"pagination"}
        activeClassName={"active"}
        pageClassName={"page-item"}
        pageLinkClassName={"page-link"}
        previousClassName={"page-item"}
        nextClassName={"page-item"}
        previousLinkClassName={"page-link"}
        nextLinkClassName={"page-link"}
        breakLinkClassName={"page-link"}
        disabledClassName={"disabled"}
        forcePage={currentPage - 1}
      />
      <button
        onClick={() => handlePageClick({ selected: pageCount - 1 })}
        disabled={currentPage === pageCount}
      >
        last
      </button>
    </div>
  );
}
Step 5 – Update Index Page
Now we will update the index.js page which acts as a landing page for Next JS applications. We will create a table to list table rows and import our Pagination component in it.
Open the ~pagination-nextjs-app\pages\index.js file and update with the following:
import { useRouter } from "next/router";
import Pagination from "../components/Pagination";
import { useEffect, useState } from "react";

export default function Home({ data, total, page }) {
  const router = useRouter();
  const [currentPage, setCurrentPage] = useState(1);
  const [pageSize, setPageSize] = useState(5); // Add this line

  const handlePageClick = (data) => {
    let selected = data.selected + 1;
    setCurrentPage(selected);

    router.push(`/page/${selected}`);
    document.getElementById("top").scrollIntoView({ behavior: "smooth" });
  };

    useEffect(() => {
      if (page) {
        setCurrentPage(page);
      }
    }, [page]);

  const pageCount = Math.ceil(total / pageSize); // Update this line

  return (
    <div id="top" className="container">
      <h1>Next JS Pagination using getServerSideProps with React Paginator - Freaky Jolly</h1>
      <table className="table">
        <thead>
          <tr>
            <th>ID</th>
            <th>Name</th>
            <th>Description</th>
          </tr>
        </thead>
        <tbody>
          {data.map((item) => (
            <tr key={item.id}>
              <td>{item.id}</td>
              <td>{item.name}</td>
              <td>{item.description}</td>
            </tr>
          ))}
        </tbody>
      </table>
      <Pagination
        pageCount={pageCount}
        handlePageClick={handlePageClick}
        currentPage={currentPage}
      />
    </div>
  );
}

export async function getServerSideProps(context) {
  try {
    const { query } = context;
    const page = query.page || 1;
    const limit = query.limit || 5;

    const res = await fetch(
      `http://localhost:3005/items?page=${page}&limit=${limit}`
    );

    if (!res.ok) {
      throw new Error("Server error");
    }

    const response = await res.json();
    console.log(response); // Log the server response to the console

    const { total, results } = response;

    return {
      props: {
        data: results,
        total,
      },
    };
  } catch (error) {
    console.error(error);
    return {
      props: {
        data: [], // Return empty array if server request fails
        total: 0, // Return 0 if server request fails
      },
    };
  }
}
The important thing to notice above is we used the getServerSideProps function to fetch the data server-side before the page is rendered. We are using the fetch method to get API response and wait till data is received.
After getting the data we pass it to the Home component with the required props. Which in turn renders the page and displays it to the user on the front end.
We will also deploy the NProgree loading bas that will show up until this server-side data fetch till the page render is completed. For that, we will do changes in the _app.js file.
Use NProgress while Page Transitions
In the _app.js file, we will use Router events to call NProgress start() and done() methods to show/ hide the progress bar.
Open the file ~pagination-nextjs-app\pages\_app.js and update with the following:
import Router from "next/router";
import NProgress from "nprogress";
import "bootstrap/dist/css/bootstrap.min.css";
import "../styles/pagination.css";
import "../styles/nprogress.css"; // assuming you have nprogress.css file in styles directory

Router.events.on("routeChangeStart", () => NProgress.start());
Router.events.on("routeChangeComplete", () => NProgress.done());
Router.events.on("routeChangeError", () => NProgress.done());

function MyApp({ Component, pageProps }) {
  return <Component {...pageProps} />;
}

export default MyApp;
Step 6 – Customize CSS Style
Now we will create the CSS files to style out Pagination and NProgress loading bar.
Create ~pagination-nextjs-app\styles\nprogress.css file and update with the following:
#nprogress {
  pointer-events: none;
}

#nprogress .bar {
  background: #29d;
  position: fixed;
  z-index: 1031;
  top: 0;
  left: 0;
  width: 100%;
  height: 2px;
}

#nprogress .peg {
  display: block;
  position: absolute;
  right: 0px;
  width: 100px;
  height: 100%;
  box-shadow: 0 0 10px #29d, 0 0 5px #29d;
  opacity: 1;
  transform: rotate(3deg) translate(0px, -4px);
}

#nprogress .spinner {
  display: 'block';
  position: fixed;
  z-index: 1031;
  top: 15px;
  right: 15px;
}

#nprogress .spinner-icon {
  width: 18px;
  height: 18px;
  box-sizing: border-box;
  border: solid 2px transparent;
  border-top-color: #29d;
  border-left-color: #29d;
  border-radius: 50%;
  animation: nprogress-spinner 400ms linear infinite;
}

.nprogress-custom-parent {
  overflow: hidden;
  position: relative;
}

.nprogress-custom-parent #nprogress .spinner,
.nprogress-custom-parent #nprogress .bar {
  position: absolute;
}

@keyframes nprogress-spinner {
  0%   { transform: rotate(0deg); }
  100% { transform: rotate(360deg); }
}
Create ~pagination-nextjs-app\styles\pagination.css file and update with the following:
.pagination {
  display: flex;
  justify-content: center;
  list-style: none;
  padding: 20px 0;
}

.page-item {
  margin: 0 5px;
}

.page-link {
  padding: 5px 10px;
  border: 1px solid #ddd;
  color: #000;
  text-decoration: none;
}

.page-link:hover {
  background-color: #ddd;
}

.active .page-link {
  background-color: #007bff;
  color: #fff;
}

.disabled .page-link {
  color: #ddd;
  cursor: not-allowed;
}
Step 7 – Create a Dynamic Page
To handle the server-side pagination when we click the page number we need to create dynamic routes. For example the page URLs like http://localhost:3000/page/11
For this we will create dynamic pages, so create one at this location and file name: ~pagination-nextjs-app\pages\page\[page].js
Thereafter update the [page].js file with the following content:
import { useRouter } from "next/router";
import Home from "../index";

export default function Page({ data, total }) {
  const router = useRouter();
  const { page } = router.query;

  return <Home data={data} total={total} page={page} />;
}

export async function getServerSideProps(context) {
  try {
    const { params, query } = context;
    const page = params.page || 1;
    const limit = query.limit || 5;

    const res = await fetch(
      `http://localhost:3005/items?page=${page}&limit=${limit}`
    );

    if (!res.ok) {
      throw new Error("Server error");
    }

    const { total, results } = await res.json();

    return {
      props: {
        data: results,
        total,
        page,
      },
    };
  } catch (error) {
    console.error(error);
    return {
      props: {
        data: [], // Return empty array if server request fails
        total: 0, // Return 0 if server request fails
        page: 1,
      },
    };
  }
}
In this dynamic page as well we used getServerSideProps to update the page data and render by passing the props. We implemented the getServerSideProps based pagination.
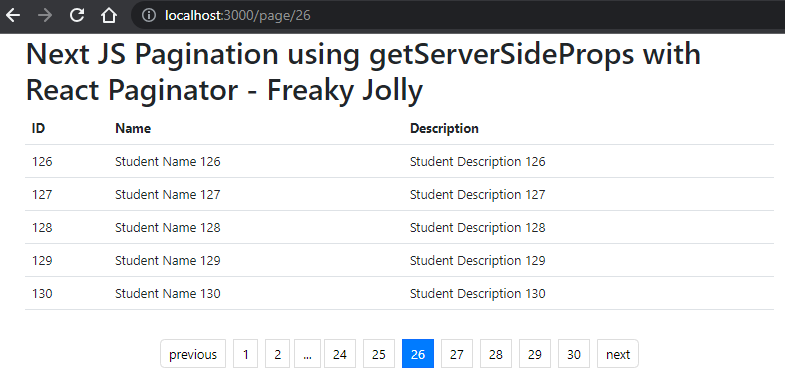
Step 8 – Run App and Server for Testing
We are done we all the implementation and are now ready to test our app. You can open two different terminals at the application root to execute the following commands for the Server and Application
npm run dev for running the application
node server/server.js to run the API server.
Conclusion
We have implemented Pagination in the Next JS application using getServerSideProps by using the Express API server. We discussed how to create a new PHPMyAdmin BD and connect NODE APIs with it to fetch real data for server-side pagination.
We create a Pagination component using the react-paginator plugin and Bootstrap CSS styles. hope this will be helpful.