In this Nextjs tutorial, you will learn how to connect Firebase authentication in the Next js application to log in or register the users with email and password.
We will get into details including how to create a new Firebase app, enable authentication and get the configuration file. After that, we will create a new Nextjs app and install the required library to seamlessly integrate Firebase authentication.
Our application will have Login and Registration components and a user profile page. The login and Registration component will display server responses in the form of an alert box to intimate users about success or errors.
To design our Nextjs app, we will use Bootstrap style and React Bootstrap components to easily create good-looking pages. We will use the Bootstrap Alert component to show messages on Login/ Register forms. The Form will have an on-change event to hide the Alert boxes if a user changes the values.
Serverless Architecture using Firebase in Nextjs
Here we will implement the serverless architecture where the server-side logic is hosted on cloud-based computing services, like Firebase. This architecture allows developers to develop an application without knowing the underline information which are kept abstract.
By using Firebase and Next.js, we can create serverless applications where Firebase handles the backend services like user authentication, database management, and cloud storage, whereas Next.js handles the frontend UI application.
Let’s dive in and create an awesome app using Next.js and Firebase:
How to Add Firebase Auth in Nex js Application?
Follow these step-by-step processes to integrate Firebase Authentication in the Next.js app and create Login/ Register screen:
Step 1 – Setup Firebase Application
Step 2 – Create Next js Application
Step 3 – Add Bootstrap Styles
Step 4 – Install Firebase JS SDK
Step 5 – Configure Firebase in App
Step 6 – Create Login/ Register Components
Step 7 – Create a User Profile page
Step 8 – Setup Firebase Auth Observable
Step 1 – Setup Firebase Application
Before creating the Nextjs application, let’s head towards the Firebase and create a new project and web application in it. If you already have one, just skip this step and jump to the next.
Create a Firebase project
Go to the Firebase console, then click on “Add project“, and follow the screen to fill in details about your project.

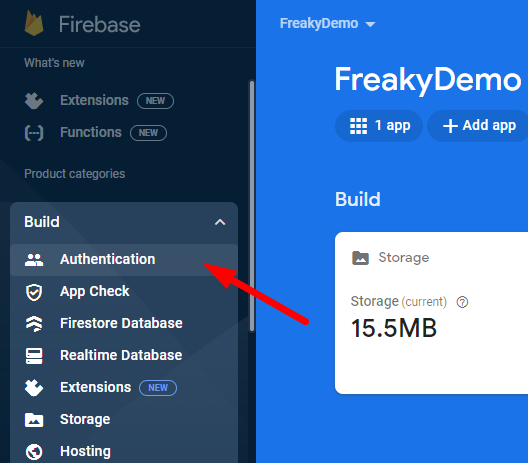
Enable the Authentication service
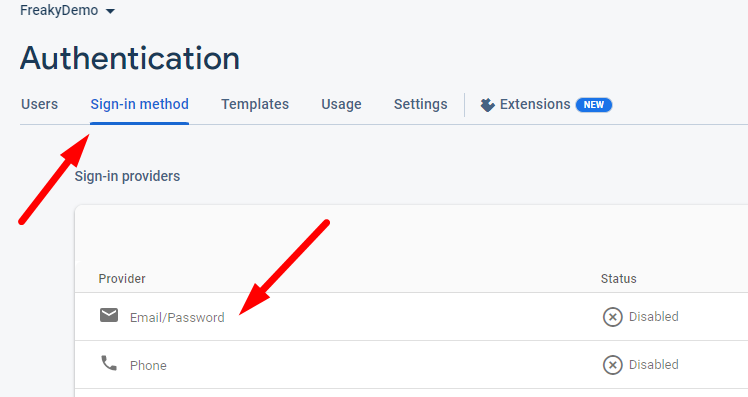
Next, click on your Firebase project, click on the “Authentication” tab in the left side nav and click on “Get Started”.
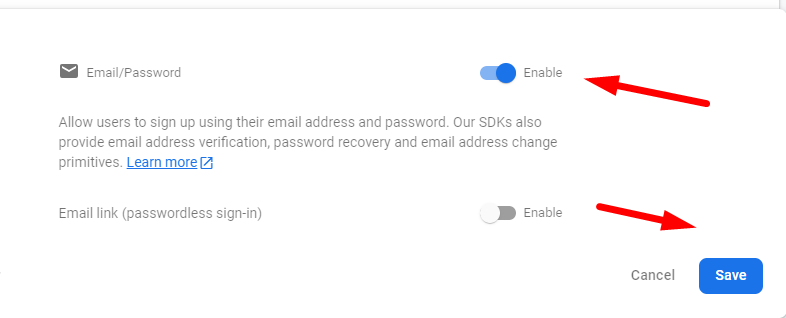
Here, you can enable the sign-in methods you want to use e.g., Email/Password that we will use in our app.
Get your Firebase project’s configuration details
In your project’s dashboard, click on the gear icon on the left side menu to open the “Project settings“.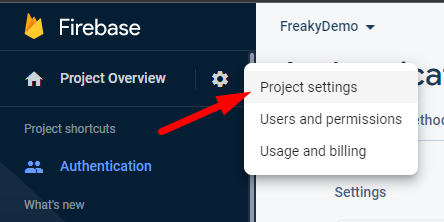
In the “Project settings” page, you’ll see a section called “Your apps“. If you haven’t added an app to your project yet, click on the “</>” button to add a web app.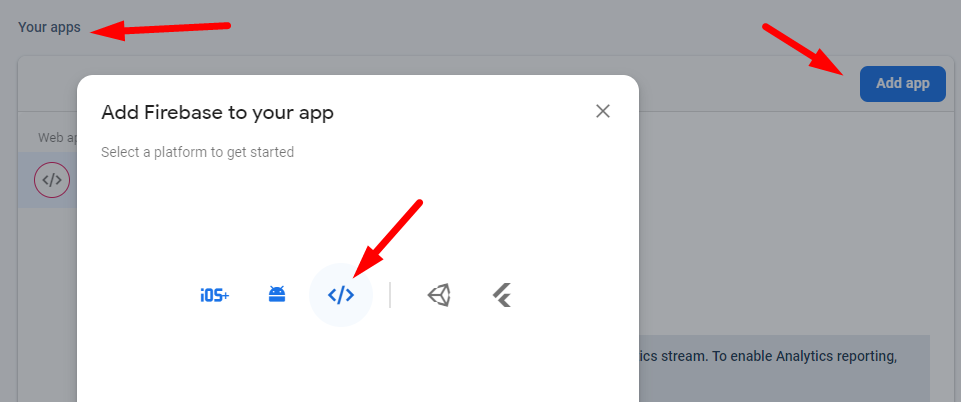
After adding a web app, you’ll see a code snippet that looks like this:
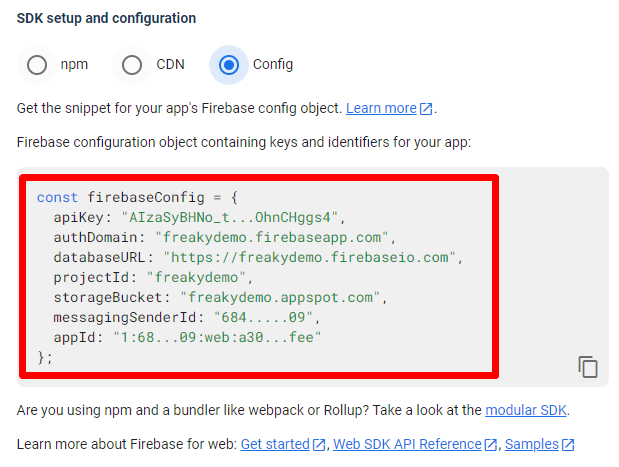
Keep these configuration values handy, which we will use in our Next js app’s auth configuration.
Step 2 – Create Next js Application
First, make sure you have Node.js and npm installed on your machine. Now can create a new Next.js application by hitting the create-next-app command. This command will set up a new Next.js application:
npx create-next-app@11 my-next-app
Navigate into your new project’s directory:
cd my-next-app
Then, start the Next.js development server:
npm run dev
It will start the local dev server, open your browser and go to http://localhost:3000. You should be able to see your new Next.js application up and running.
Step 3 – Add Bootstrap Styles
Now we will add Bootstrap styles to your Next.js application. We will install Bootstrap and React Bootstrap packages in Next.js project by running:
npm install bootstrap react-bootstrap
Then, we need to import Bootstrap’s CSS in the _app.js file:
import 'bootstrap/dist/css/bootstrap.css';
Step 4 – Install and Setup Firebase JS SDK
Thereafter, we will install the Firebase JS SDK in the Nextjs app, which will help use to connect with Firebase services like authentication. let’s follow a few of the substeps install and configure the Firebase JS SDK:
Installing the Firebase JS SDK
We need to install the Firebase JavaScript SDK, for that run the following command in your project directory:
npm install firebase
Initializing Firebase
After installing the SDK, we need to initialize Firebase. To do this, we need to create a new Firebase auth file names firebase.js in the lib folder. So the file path will be ~lib\firebase.js:
import { initializeApp } from "firebase/app";
import { getAuth } from "firebase/auth";

const firebaseConfig = {
  apiKey: "AIzaSy...CHggs4",
  authDomain: "freakydemo.firebaseapp.com",
  databaseURL: "https://freakydemo.firebaseio.com",
  projectId: "freakydemo",
  storageBucket: "freakydemo.appspot.com",
  messagingSenderId: "6842...09",
  appId: "1:684....b7afee",
};

const app = initializeApp(firebaseConfig);
const auth = getAuth(app);

export { app, auth };
Now, Firebase Authentication is ready to be used in our Next.js project. Let’s start creating authentication features such as user Login, Register etc in further steps.
Step 6 – Create Login/ Register Components
Now we will create the Login and Registration component which will use the Firebase methods for respective operations. We will use Bootstrap components to create form fields and Alerts messages.
Creating a Form for User Registration
Create a simple registration form using React in the components folder so that the file path will look like this ~components\Register.js.
Update the Register.js file content with the following:
import React, { useState } from "react";
import { createUserWithEmailAndPassword } from "firebase/auth";
import { auth } from "../lib/firebase";
import { Button, Form, Alert } from "react-bootstrap";
const Register = () => {
const [email, setEmail] = useState("");
const [password, setPassword] = useState("");
const [message, setMessage] = useState("");
const [messageType, setMessageType] = useState("danger");
const handleSubmit = (e) => {
e.preventDefault();
createUserWithEmailAndPassword(auth, email, password)
.then((userCredential) => {
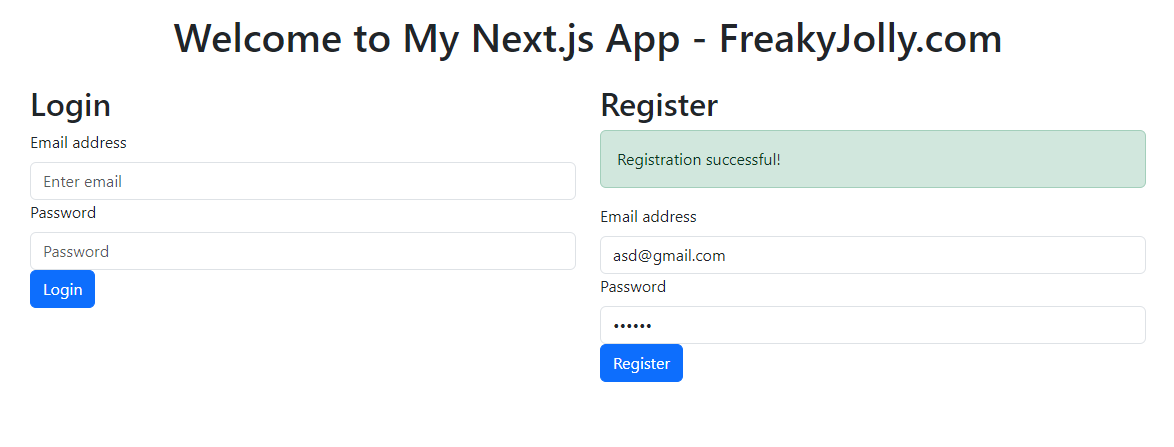
setMessage("Registration successful!");
setMessageType("success");
})
.catch((error) => {
setMessage(error.message);
setMessageType("danger");
});
};
const handleInputChange = () => {
setMessage("");
};
return (
<Form onSubmit={handleSubmit}>
{message && <Alert variant={messageType}>{message}</Alert>}
<Form.Group controlId="formBasicEmail">
<Form.Label>Email address</Form.Label>
<Form.Control
type="email"
placeholder="Enter email"
value={email}
onChange={(e) => {
setEmail(e.target.value);
handleInputChange();
}}
required
/>
</Form.Group>
<Form.Group controlId="formBasicPassword">
<Form.Label>Password</Form.Label>
<Form.Control
type="password"
placeholder="Password"
value={password}
onChange={(e) => {
setPassword(e.target.value);
handleInputChange();
}}
required
/>
</Form.Group>
<Button variant="primary" type="submit">
Register
</Button>
</Form>
);
};
export default Register;
Firebase provides a simple and secure way to register users with the createUserWithEmailAndPassword method which we have used in the above component.
We are fetching the Firebase responses and showing them in the Alert message above Form if there is any error or if registration is successful.
On each form field, we also have handleInputChange an event to hide the previously shown message to improve user experience.
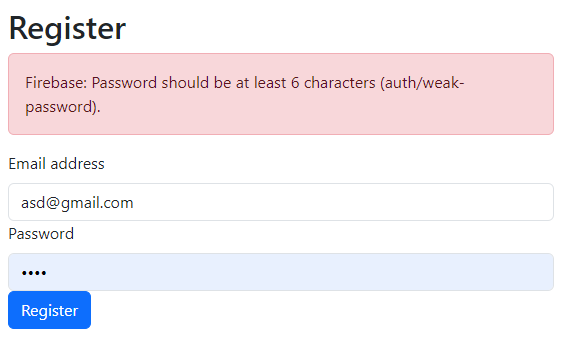
We are also performing the form validation to check email validation and password length.
Creating a Form for User Login
Just like the registration form, we can create a login form in our Next.js application. Create a new component file at this path ~components\Login.js and update it with the following:
import React, { useState } from 'react';
import { signInWithEmailAndPassword } from "firebase/auth";
import { auth } from '../lib/firebase';
import { Button, Form, Alert } from 'react-bootstrap';
import { useRouter } from 'next/router';

const Login = () => {
  const [email, setEmail] = useState('');
  const [password, setPassword] = useState('');
  const [message, setMessage] = useState('');
  const [messageType, setMessageType] = useState('danger');

  const router = useRouter();

  const handleSubmit = (e) => {
    e.preventDefault();

    signInWithEmailAndPassword(auth, email, password)
      .then((userCredential) => {
        setMessage('Login successful!');
        setMessageType('success');
        router.push('/userprofile');
      })
      .catch((error) => {
        setMessage(error.message);
        setMessageType('danger');
      });
  }

  const handleInputChange = () => {
    setMessage('');
  }

  return (
    <Form onSubmit={handleSubmit}>
      {message && <Alert variant={messageType}>{message}</Alert>}
      <Form.Group controlId="formBasicEmail">
        <Form.Label>Email address</Form.Label>
        <Form.Control
          type="email"
          placeholder="Enter email"
          value={email}
          onChange={(e) => {
            setEmail(e.target.value);
            handleInputChange();
          }}
          required
        />
      </Form.Group>

      <Form.Group controlId="formBasicPassword">
        <Form.Label>Password</Form.Label>
        <Form.Control
          type="password"
          placeholder="Password"
          value={password}
          onChange={(e) => {
            setPassword(e.target.value);
            handleInputChange();
          }}
          required
        />
      </Form.Group>

      <Button variant="primary" type="submit">
        Login
      </Button>
    </Form>
  );
}

export default Login;
Once users have registered, they need to be able to log in to their accounts. Firebase provides an easy way to authenticate users with the signInWithEmailAndPassword method.
Step 7 – Create a User Profile page
After the user Registers or log in the application using the Firebase authentication, we will redirect to the User Profile page. This page will display the user details like an Email Address and a Logout button.
We will also check if a user is still logged in or not. if a user is not logged in, it will be redirected to the Login/ Register screen.
Create a Router page in the pages folder named userprofile.js so the path will be ~pages\userprofile.js
import React, { useEffect } from "react";
import { auth } from "../lib/firebase";
import { Button } from "react-bootstrap";
import { signOut } from "firebase/auth";
import { useRouter } from "next/router";

const UserProfile = () => {
  const user = auth.currentUser;
  const router = useRouter();

  useEffect(() => {
    if (!user) {
      router.push("/");
    }
  }, [user, router]);

  const handleLogout = () => {
    signOut(auth)
      .then(() => {
        router.push("/");
      })
      .catch((error) => {
        // An error happened.
      });
  };

  return (
    <div>
      <h1>User Profile</h1>
      {user && <p>Email: {user.email}</p>}
      <Button onClick={handleLogout}>Logout</Button>
    </div>
  );
};

export default UserProfile;
Step 8 – Update Index Page
Now, we will update the default Index.js page in the Next app to show out Login and Register forms. Open the file ~pages\index.js and update it as below:
import React from "react";
import Login from "../components/Login";
import Register from "../components/Register";
import { Container, Row, Col } from "react-bootstrap";

const Home = () => (
  <Container>
    <h1 className="text-center my-4">Welcome to My Next.js App - FreakyJolly.com</h1>
    <Row>
      <Col md={6}>
        <h2>Login</h2>
        <Login />
      </Col>
      <Col md={6}>
        <h2>Register</h2>
        <Register />
      </Col>
    </Row>
  </Container>
);

export default Home;
Step 9 – Setup Firebase Auth Observable
Firebase also allows setting an observer on the authentication state so that whenever there is a change in user authentication there will be a state change. This observer is a function that gets called whenever the user’s sign-in state changes.
To set an authentication state observer, you can use the onAuthStateChanged method from Firebase’s auth module. Create a new file at this path ~components\AuthObserver.js and update it:
import { useEffect } from "react";
import { onAuthStateChanged } from "firebase/auth";
import { auth } from "../lib/firebase";

const AuthObserver = () => {
  useEffect(() => {
    const unsubscribe = onAuthStateChanged(auth, (user) => {
      if (user) {
        // User is signed in...
        console.log("User is signed in...");
        const uid = user.uid;
      } else {
        // User is signed out...
        console.log("User is signed out...");
      }
    });

    // Cleanup subscription on unmount
    return () => unsubscribe();
  }, []);

  return null;
};

export default AuthObserver;
You can call this observable in the _app.js file as shown below:
import React from 'react';
import AuthObserver from '../components/AuthObserver';
import "../styles/globals.css";
import "bootstrap/dist/css/bootstrap.css";

function MyApp({ Component, pageProps }) {
  return (
    <>
      <AuthObserver />
      <Component {...pageProps} />
    </>
  );
}

export default MyApp;
That’s it we have implemented the changes, now you can run the application to see it working:
Conclusion
We have implemented the Firebase Authentication using Email Address and Password in Next js application by using the Firebase methods. We also covered how to handle user messages and redirection based on authentication state. Hope this will be helpfull.